
This article will be a step-by-step tutorial of how to install WordPress on DigitalOcean by creating your own Virtual Private Server (VPS) and how to add a Domain name with enabled SSL.
After we finish the only thing left for you will be to start creating content for your own personal website. And don’t tell me that you don’t need a site. In a times like these almost everybody needs one.
Table of Contents
What will you learn?
Don’t worry if you don’t know what is VPS, DigitalOcean, WordPress or Domain. You came to the right place. I will try to explain and show these things as best as I can.
The end goal of this article is to learn how to create your own personal site on you own private server in the cloud using one of the best technologies available.
Now I will smash the subscribe button for my own Newsletter hoping that you will do the same and I will start this.
What is WordPress?
WordPress is an extremely popular open-source content management system (CMS). Or in other words WordPress is what your site visitors will see and interact with in their browsers. And will allow you to create posts and pages very easily.
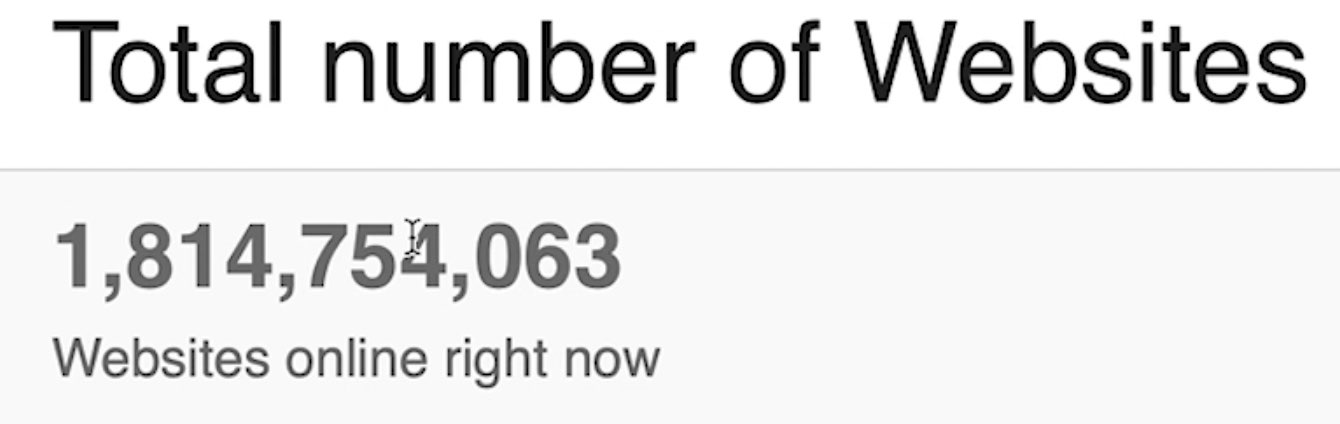
WordPress is used in above 39% of all websites that are currently online. That number is huge having in mind that there are about 2 billion websites at the moment.
WordPress have an embedded store where you can choose between vast variety of free and paid themes and plug-ins that can change the look, feel and purpose of your site in a matter of minutes.
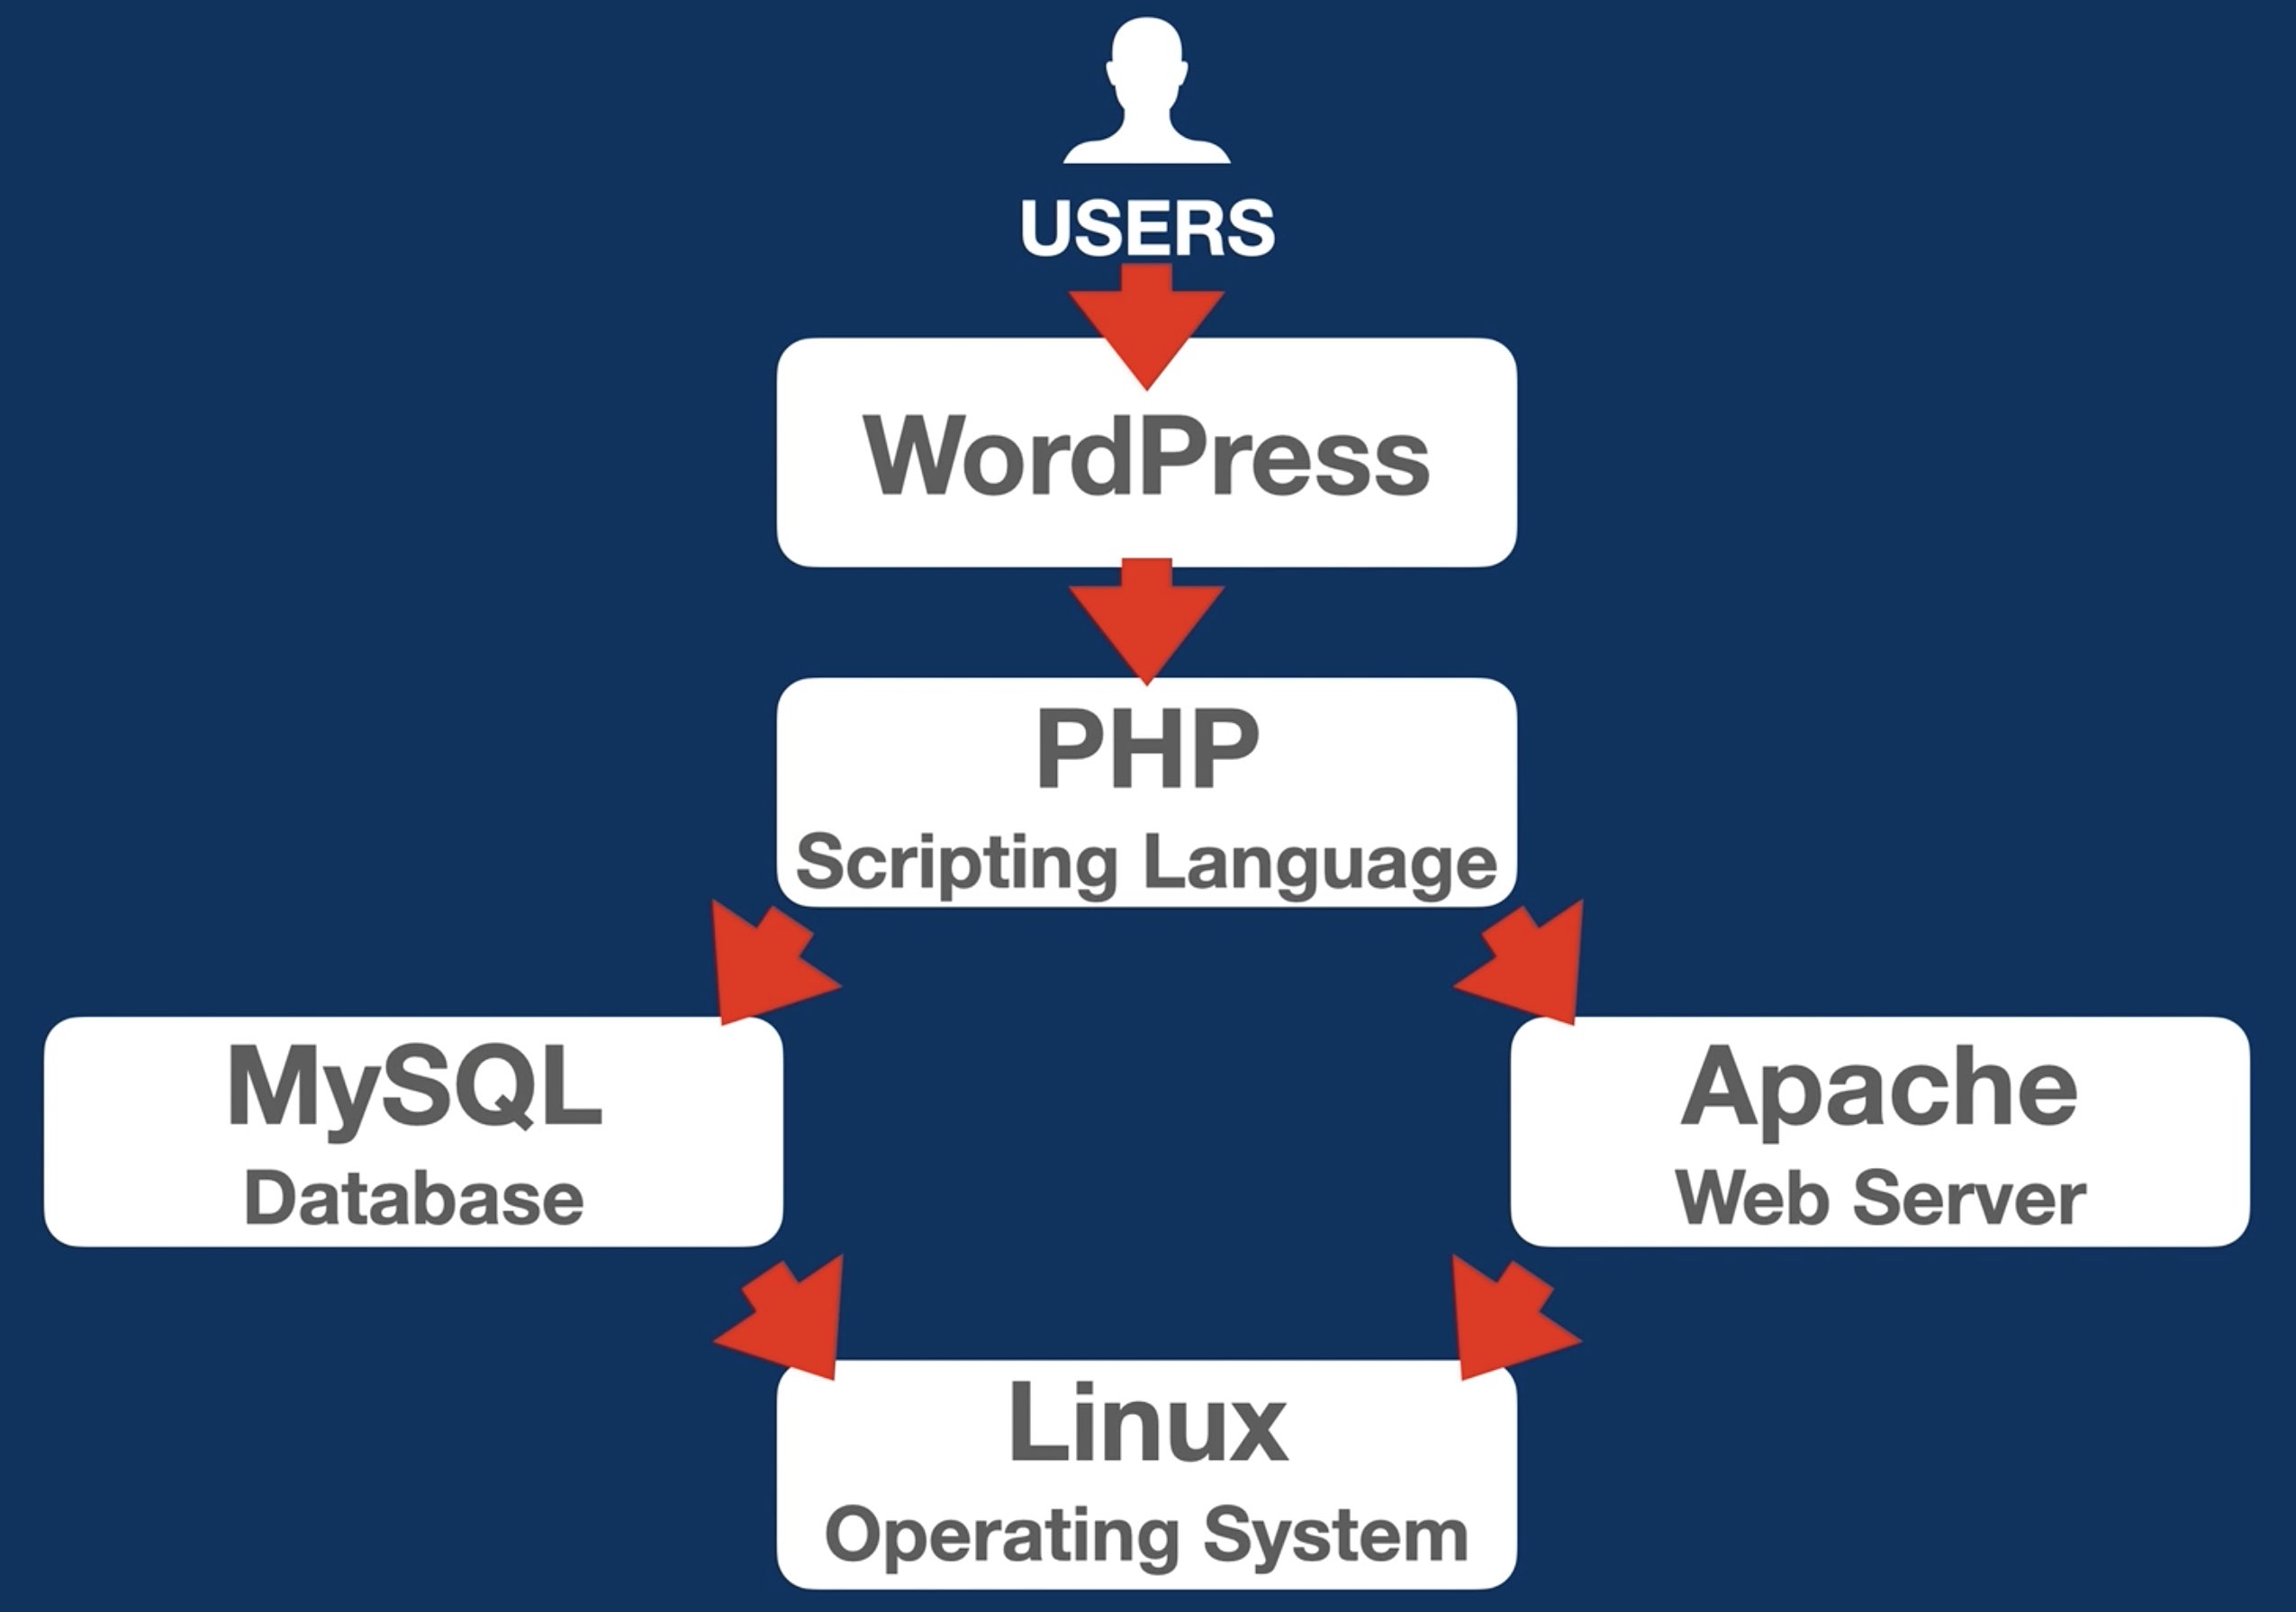
To allow all of these things, WordPress rely on a scripting language called PHP, a database where all of the configuration and content is stored that is usually MySQL DB server, and a web server that serve the site visitors requests and that is usually Apache Web Server.
These components needs to be installed on an always on, no matter what server usually with Linux OS.
WordPress on DigitalOcean
And this is exactly the place where a virtual private server provider like DigitalOcean steps in to help us with all of these things in one very elegant, fast and secure way.
The hosting provider doesn’t have to be DigitalOcean, there are thousand alternatives out there, but I did my research and I choose DigitalOcean for my own website that you are currently reading.
I used these guys, as well as several others hosting testers and almost everywhere DigtialOcean was in the top 3 providers for multiple years in a row. Of course, there are faster and cheaper alternatives at the moment, but either they are featured. That means the hosting provider pay for the review and the results may be a little beautified. Or I never heard about them before, or they are just faster for some random period, but not before or after that, so finally I omit the all others and stayed with DO (DigitalOcean).
Sign up for DigitalOcean
If you want to try DigitalOcean as well absolutely free of charge you can use my affiliate sign-up link to get $100 dollars that you can spend on DigitalOcean services for two months.
Then you can decide whether to continue using their services or you can say goodbye to DigitalOcean.
Just to mention that I also used such affiliate link from a digital friend when I started with DigitalOcean, but of course you can skip all of these affiliate things and go directly to DigitalOcean website.
Either way let’s finally install that WordPress on DigitalOcean.
WordPress 1-Click droplet on DigitalOcean
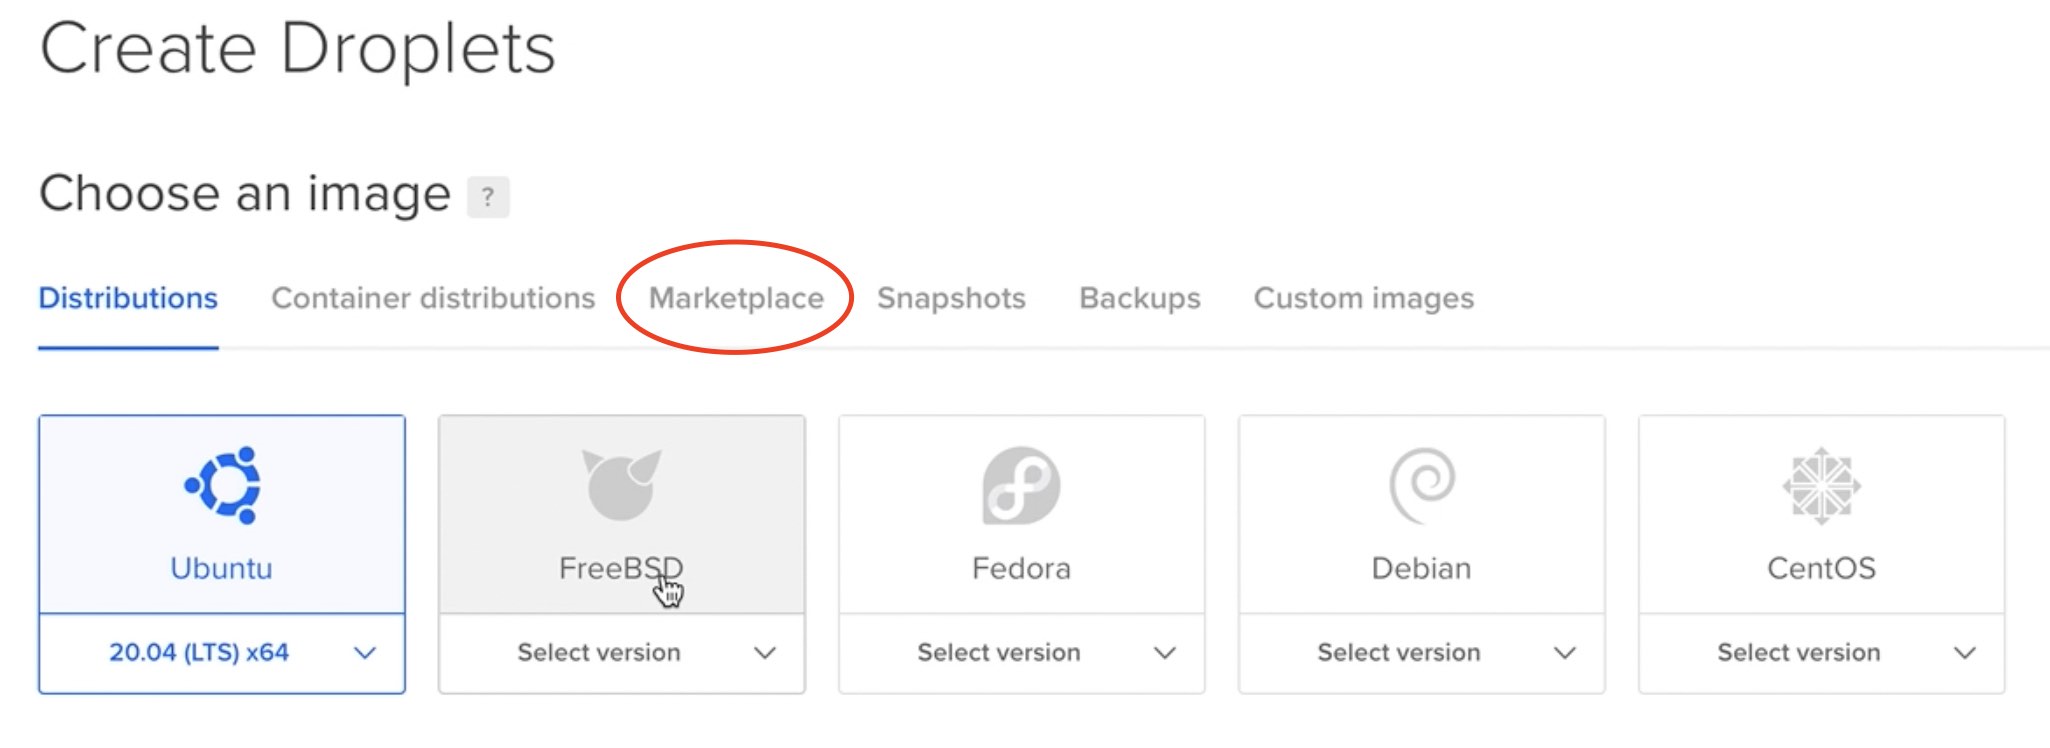
After you sign up in DigitalOcean click on the Create > Droplets buttons.
Droplet is the DigitalOcean term of Virtual Server.
You will then see a screen where you can choose different Linux distributions, but you don’t want that. Unless you want to install everything manually as these are images with nothing more than a Linux OS installed.
Instead click on Marketplace:
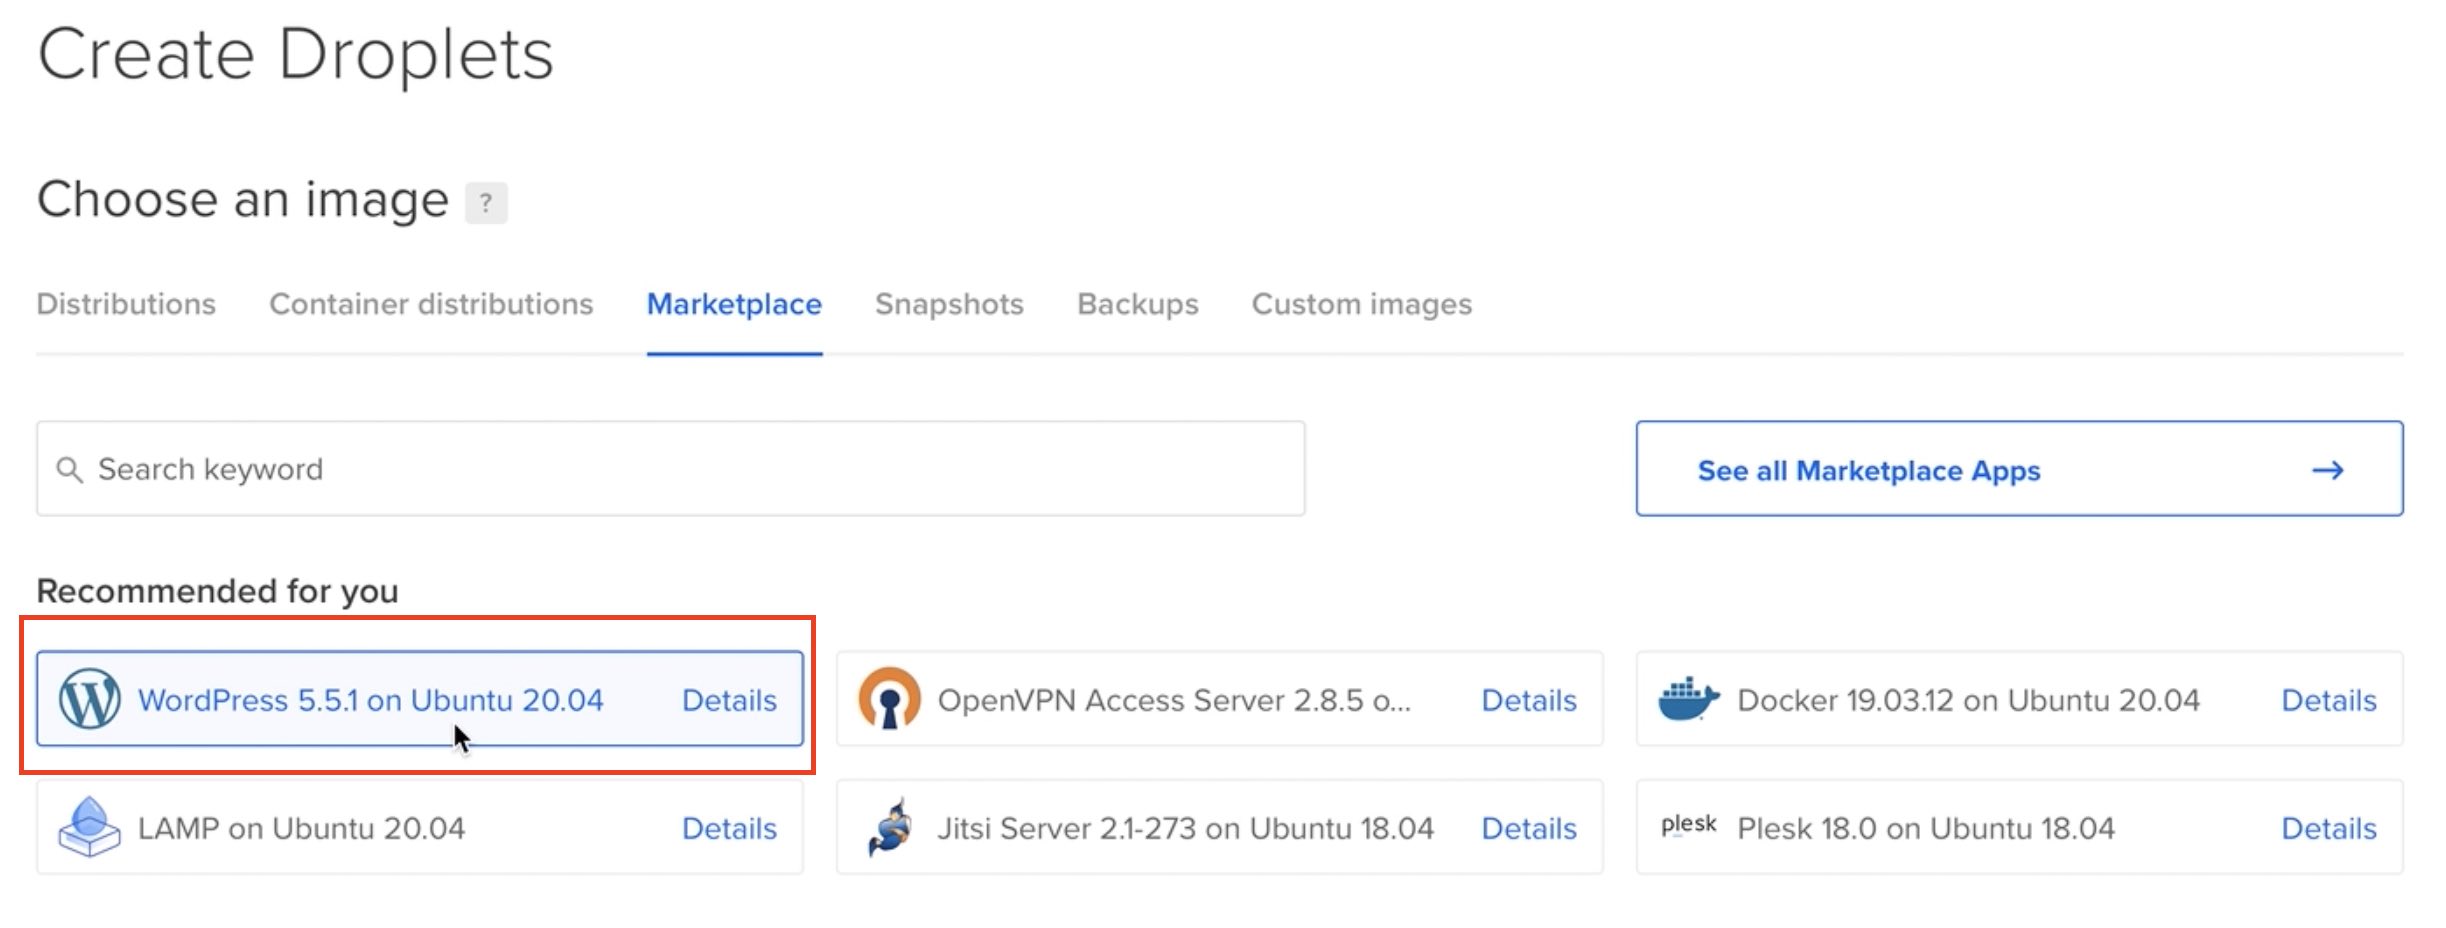
Then find the WordPress X.XX on Ubuntu XX.XX and select it (where X represent the versions and they may differ at the time when you are doing it).
After you choose that, you can customize your Droplet, but I suggest to start with the following settings, as you can always change later them if there is such need.
- Under Choose a Plan:
- Select – Shared CPU: Basic
- For memory and CPU select – $5/mo option that includes 1 GB Memory and 1 CPU as well as 25 GB SSD Disk
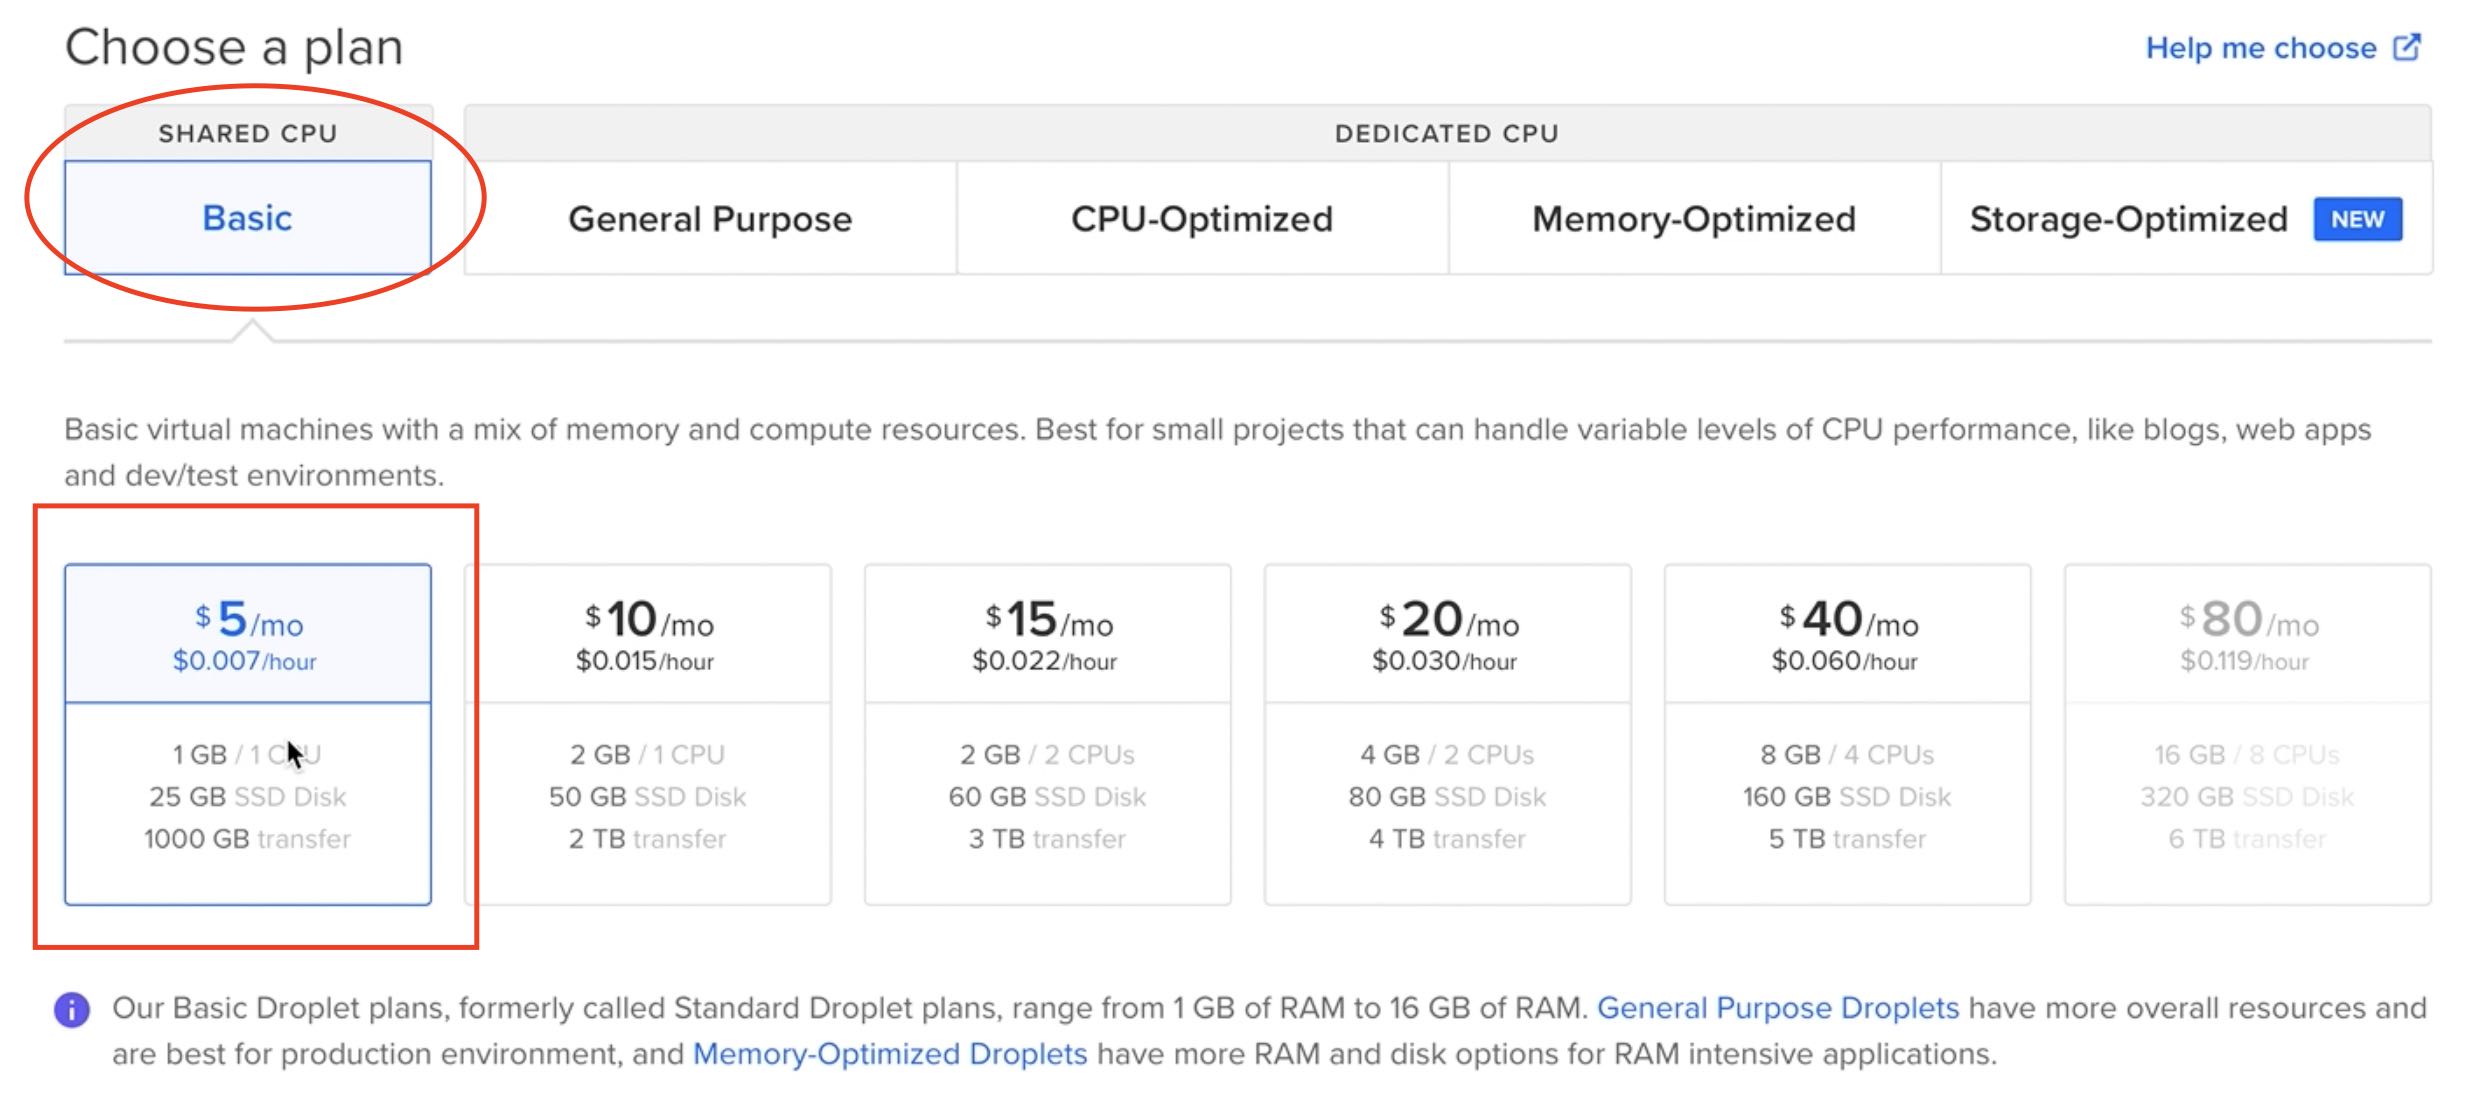
- Skip the Add Block Storage option.
- Then, under Choose a datacenter region – select the closest location to your place or the closest location to where your site visitors will come from. Whatever you choose it’s not a big deal most of the times.
- Leave VPC Network on default as it is.
- Under Select additional options you can select only Monitoring. It’s free and it gives you more details about your Droplet usage right on the DO dashboard.
- As Authentication select Password and choose strong password for the root user. Later it is highly recommended to change that to SSH keys.
- When you scroll a bit you can change the name of your Droplet, but you can freely leave it as it is.
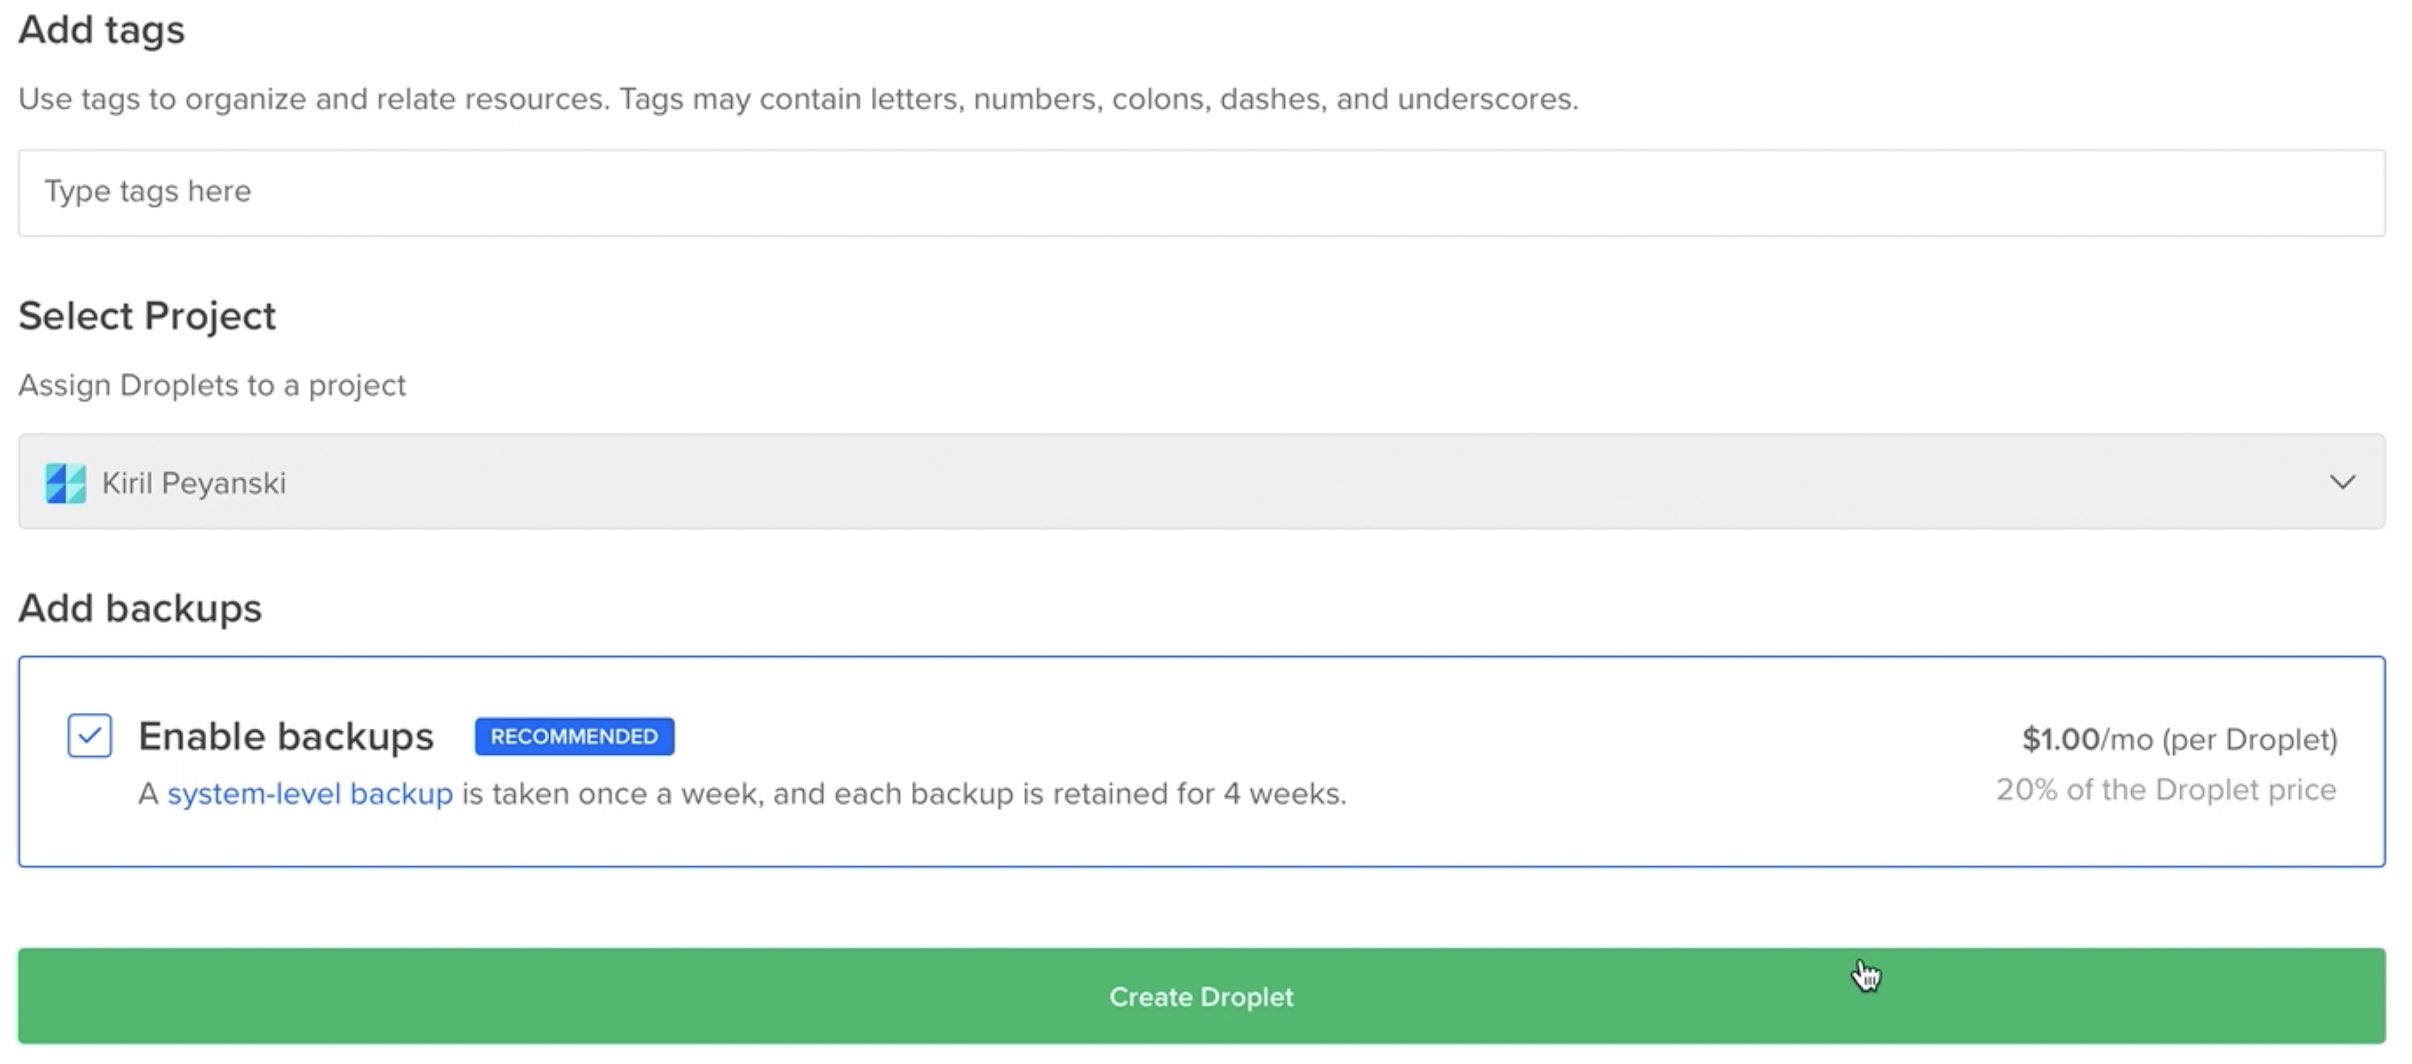
- Tags are optional, they can be put in a good use if you have multiple servers/droplets under one account. So leave them empty.
- You can Enable backups, which is highly recommended unfortunately it is not free, but at least it is cheap – $1/mo.
- Finally click on Create Droplet.
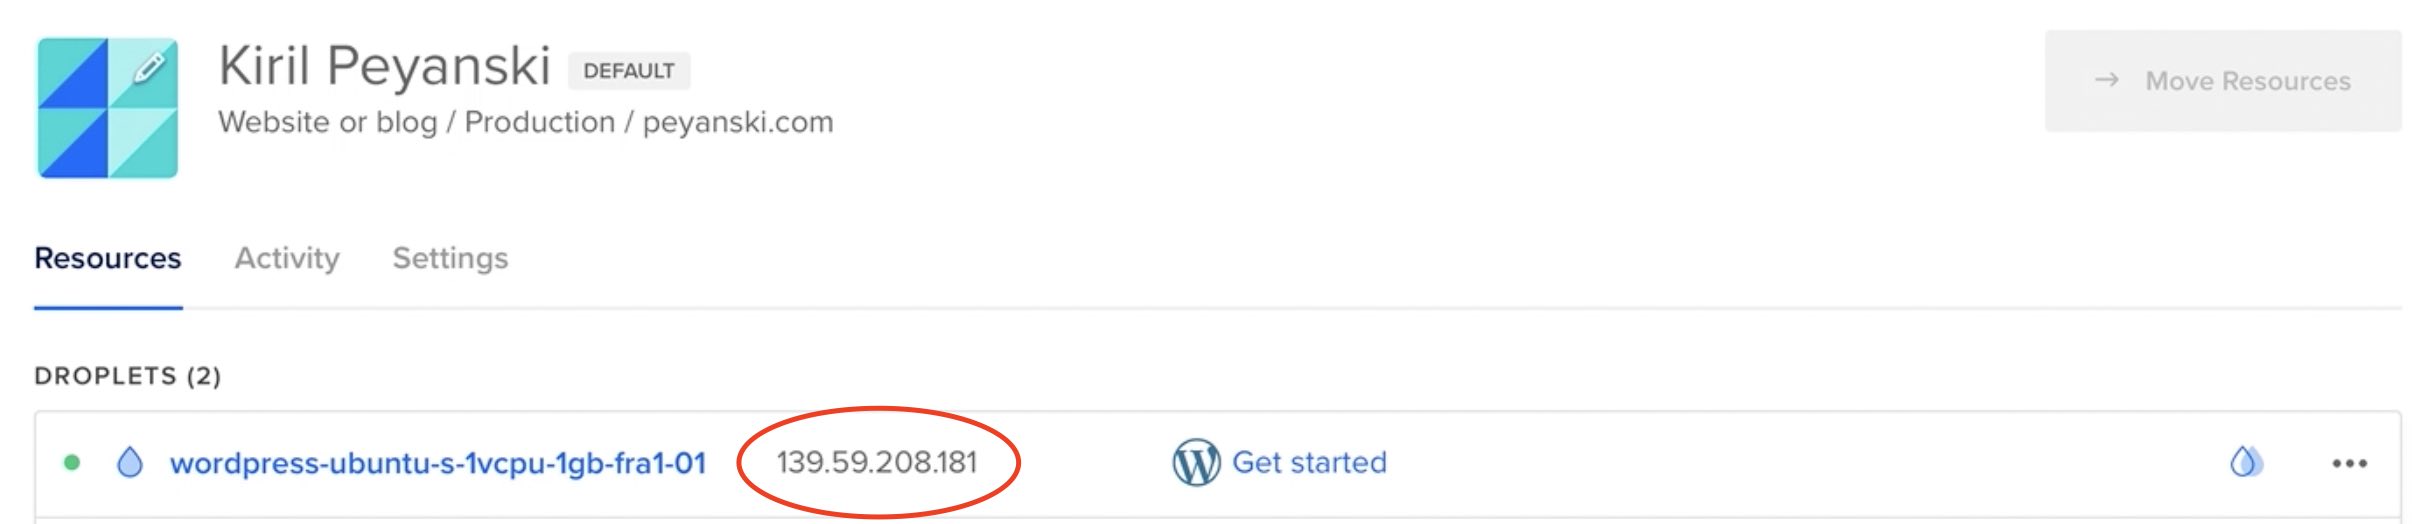
After literally half a minute or less you will have up and running Droplet with WordPress on DigitalOcean 💨
We have left only few steps before we open our new website for the first time. The important thing for now is to know from where to get your Droplet real static IP.
That was easy right?
Let’s talk about Domains
We are almost ready with WordPress on DigitalOcean and now is the best time to talk about domains.
If you want to have your-name.com or your-business.com website you have to buy that domain.
The alternative is to enter the IP of your Virtual Private Server in the browser or to use free, but very long subdomains. And that is not very user friendly if you want to attract real visitors and if you want them to take you seriously.
Just like with the hosting providers there are thousands of registrars out there from where you can buy all sort of domains. I will point you to just two of them:
- The first one is called porkbun.com that I’m currently using for my site.
- And the second one is (affiliate link) GoDaddy.com that seems to have very good marketing and a lot of people are using it.
But It doesn’t really matter which domain registrar you will choose. The service is exactly the same just double check the renewal price of your future domain.
For the sake of this demo I will use DuckDNS sub-domain which comes for free, but first I will quickly show you what you need to do if you buy your own domain.
Buying a Domain
I will show you how you can buy domain from Porkbun.com, because I can show you the control panel where you can edit the DNS settings. The procedure is similar in all domain registrars.
- You have to search for free domain of your choice.
- Several domain extensions will be offered for you (e.g. .com, .org, . net)
- Double check the renewal price. Usually the renewal price after the first year is much higher than your initial payment.
- Select the one that you want and checkout.

Editing DNS records
When you finally have your very own Domain you have to point that domain to your server IP. In our case that is the DigitalOcean droplet. After you do that and if someone type your domain name in a browser it will be redirected to the DigitalOcean server where the WordPress is installed and waiting to serve visitors.
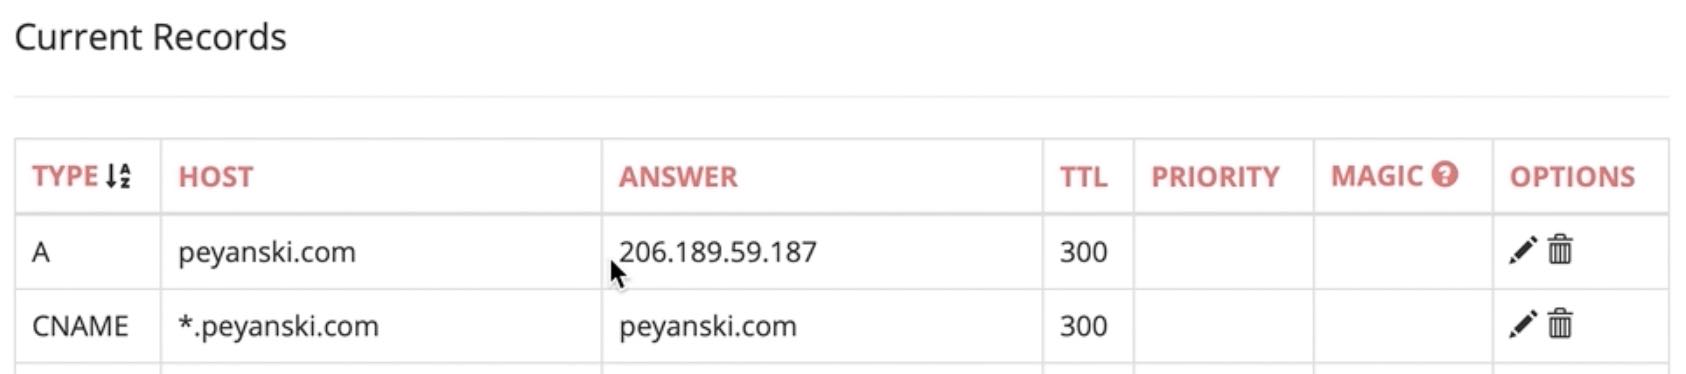
To accomplish all of that you have to edit your DNS settings. Again this is almost almost identical in all domain registrars out there. You want to have two records in your DNS settings:
- Record of type A with “YOUR_DOMAIN” as HOST and your “DROPLET_IP” as ANSWER.
- Record of type CNAME with “*.YOUR_DOMAIN” as HOST and “YOUR_DOMAIN” as ANSWER. This is needed to catch all of your domain prefixes (e.g. www.your-domain) and to route them to your domain.
The same procedure described above is valid for the (affiliate link) GoDaddy.com or any other domain registrars.
What If you don’t want to pay for domain?
If you don’t want to pay for domain – DuckDNS (and similar services) are your best friend. This is how you can use a domain name free of charge using DuckDNS.
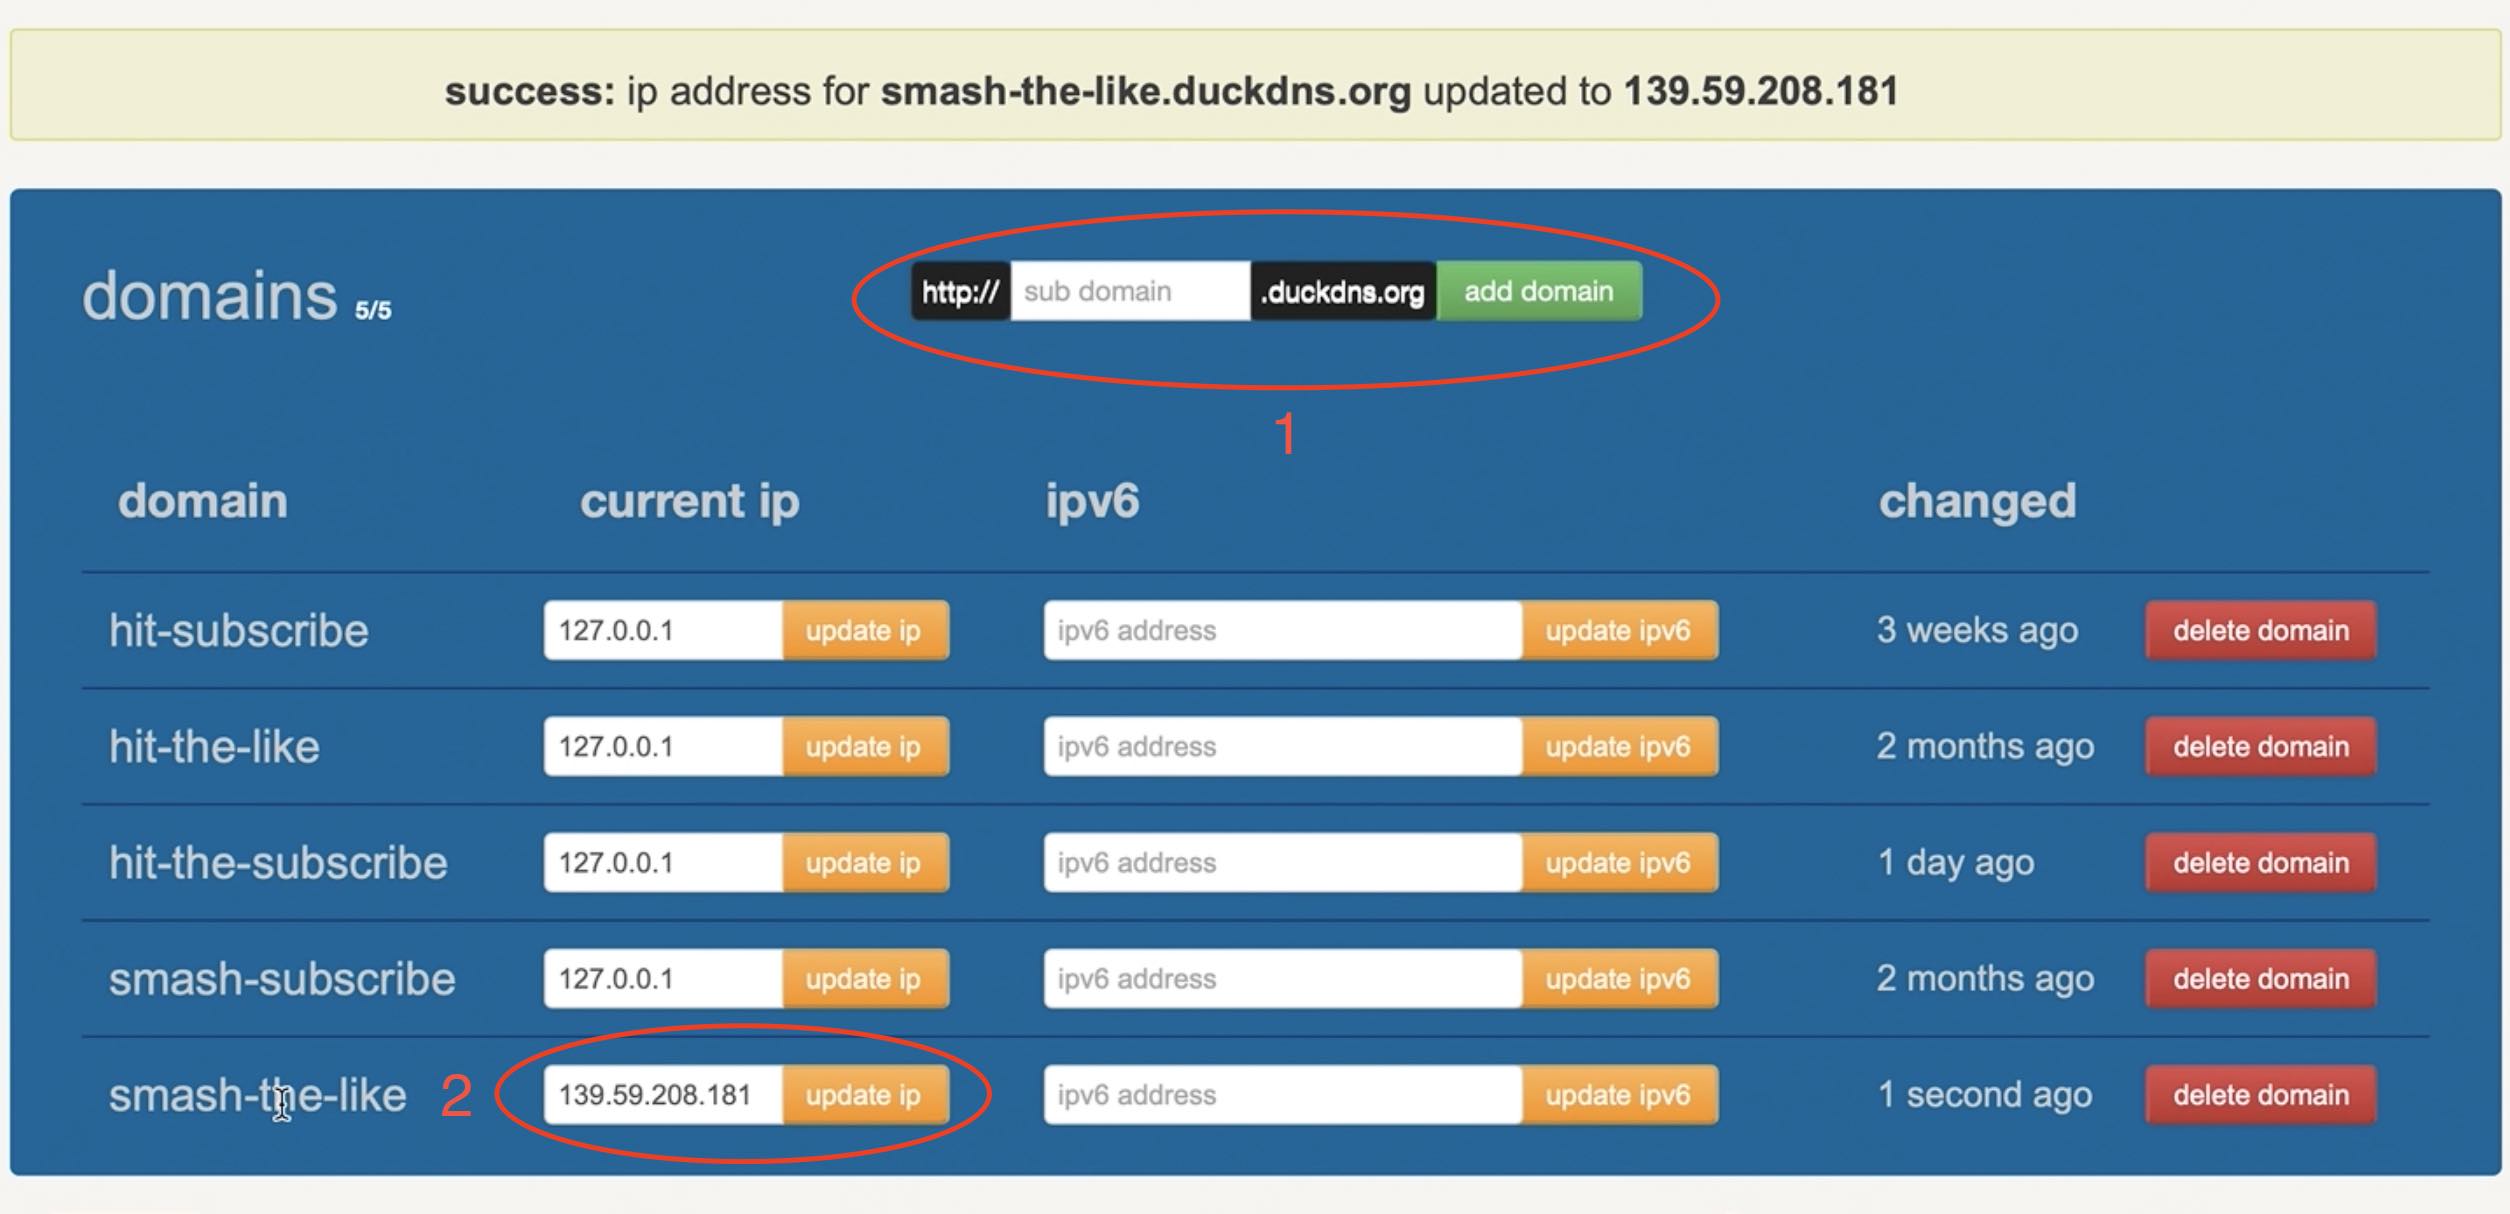
- Go to https://duckdns.org and log in with either of the available options.
- Add new domain of your choice. In my example below and in video I used the domain: smash-the-like.duckdns.org
- Update the current ip with the IP from the DigitalOcean droplet. That means go back to your DigitalOcean dashboard find the IP of the Droplet copy it and paste it next to your domain in duckdns. Finally click on update ip.
Finish the WordPress on DigitalOcean setup
Now we either have a domain name from DuckDNS or real paid domain. It doesn’t matter the procedure that follows Is all the same.
After the creation of the One-Click Droplet with WordPress on DigitalOcean, we need to log into the Droplet via SSH to finish the WordPress setup.
If you are using Linux or Mac you can open a Terminal and type:
ssh root@YOUR_DROPLET_IPIf you are using Windows you can use any SSH client you wish and I recommend PuTTY.
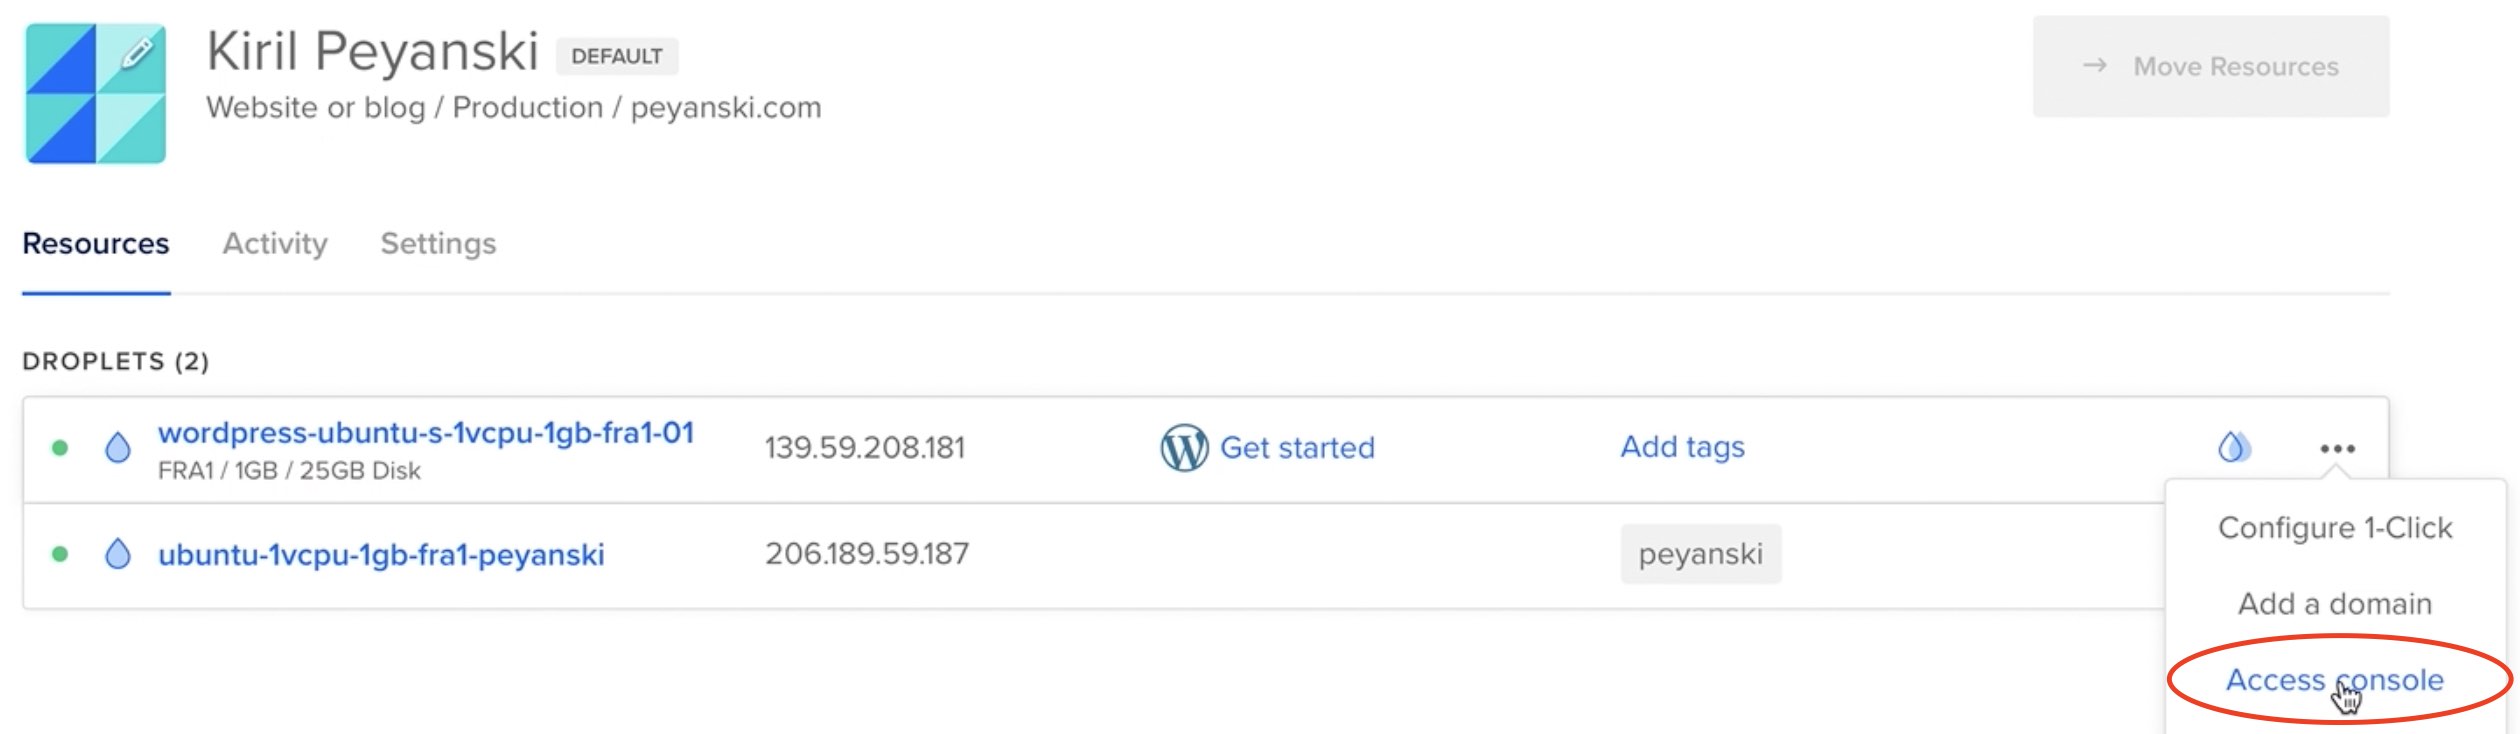
Or if you don’t want to use any SSH clients, you can click on the three dots menu right next to the Droplet in DigitalOcean dashboard and select Access Console.
As user type: root and for the password use the one that you choose during the creation of the One-Click Droplet with WordPress on DigitalOcean,
After you successfully connect to the DO Droplet for the first time. There will be an automatic script waiting for some answers from you.
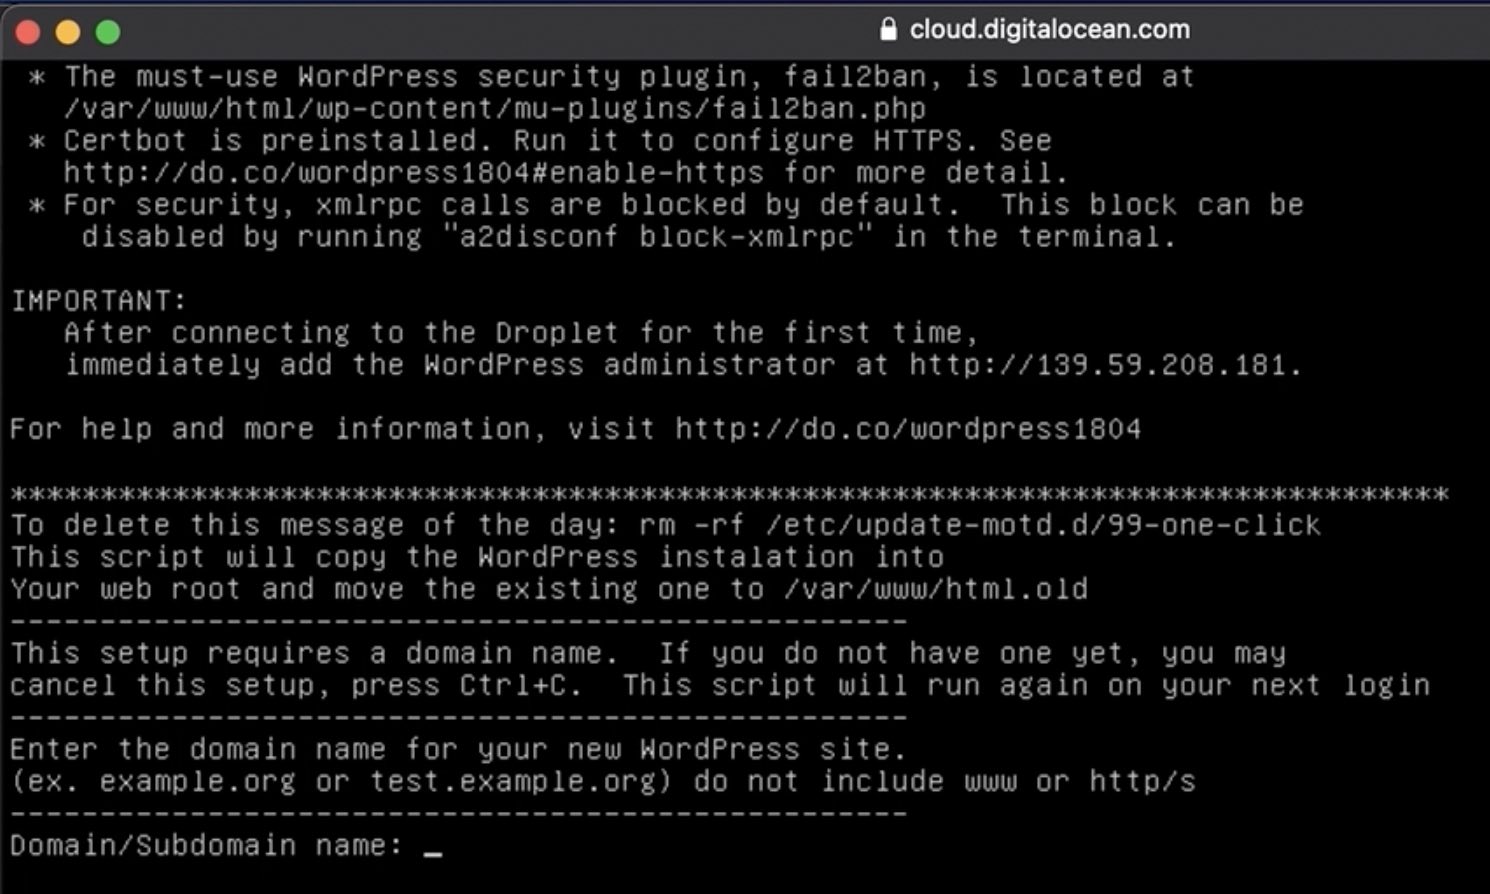
And we will make this script happy by answering all of the questions. In return the script will make us also happy as we will have our website up & running in no time. Let’s begin:
- On Domain/Subdomain name: just enter your domain or subdomain
- On the next question enter your real email (not like me in the video)
- For the username choose a name that you will use to access the WordPress administrator dashboard
- For the password choose very strong password with lower & upper case characters as well as special symbols and make sure that you remember it.
- Enter a Blog Title – it’s all on you here to think of something fancy.
- On the question: Is the information correct – type “y”.
- Would you like to use LetsEncrypt (certbot) … – type again “y”.
- Enter your real email again.
- Agree with the LetsEncrypt Terms by hit the “a”.
- Decide whether you would like to share your email with EFF and hit either “y” or “n”.
- On the question: Which names would you like to activate HTTPS for – hit Enter. That way you will activate HTTPS for all names.
- Type 2 on the final question to redirect all traffic to HTTPS and to remove not encrypted access via HTTP.
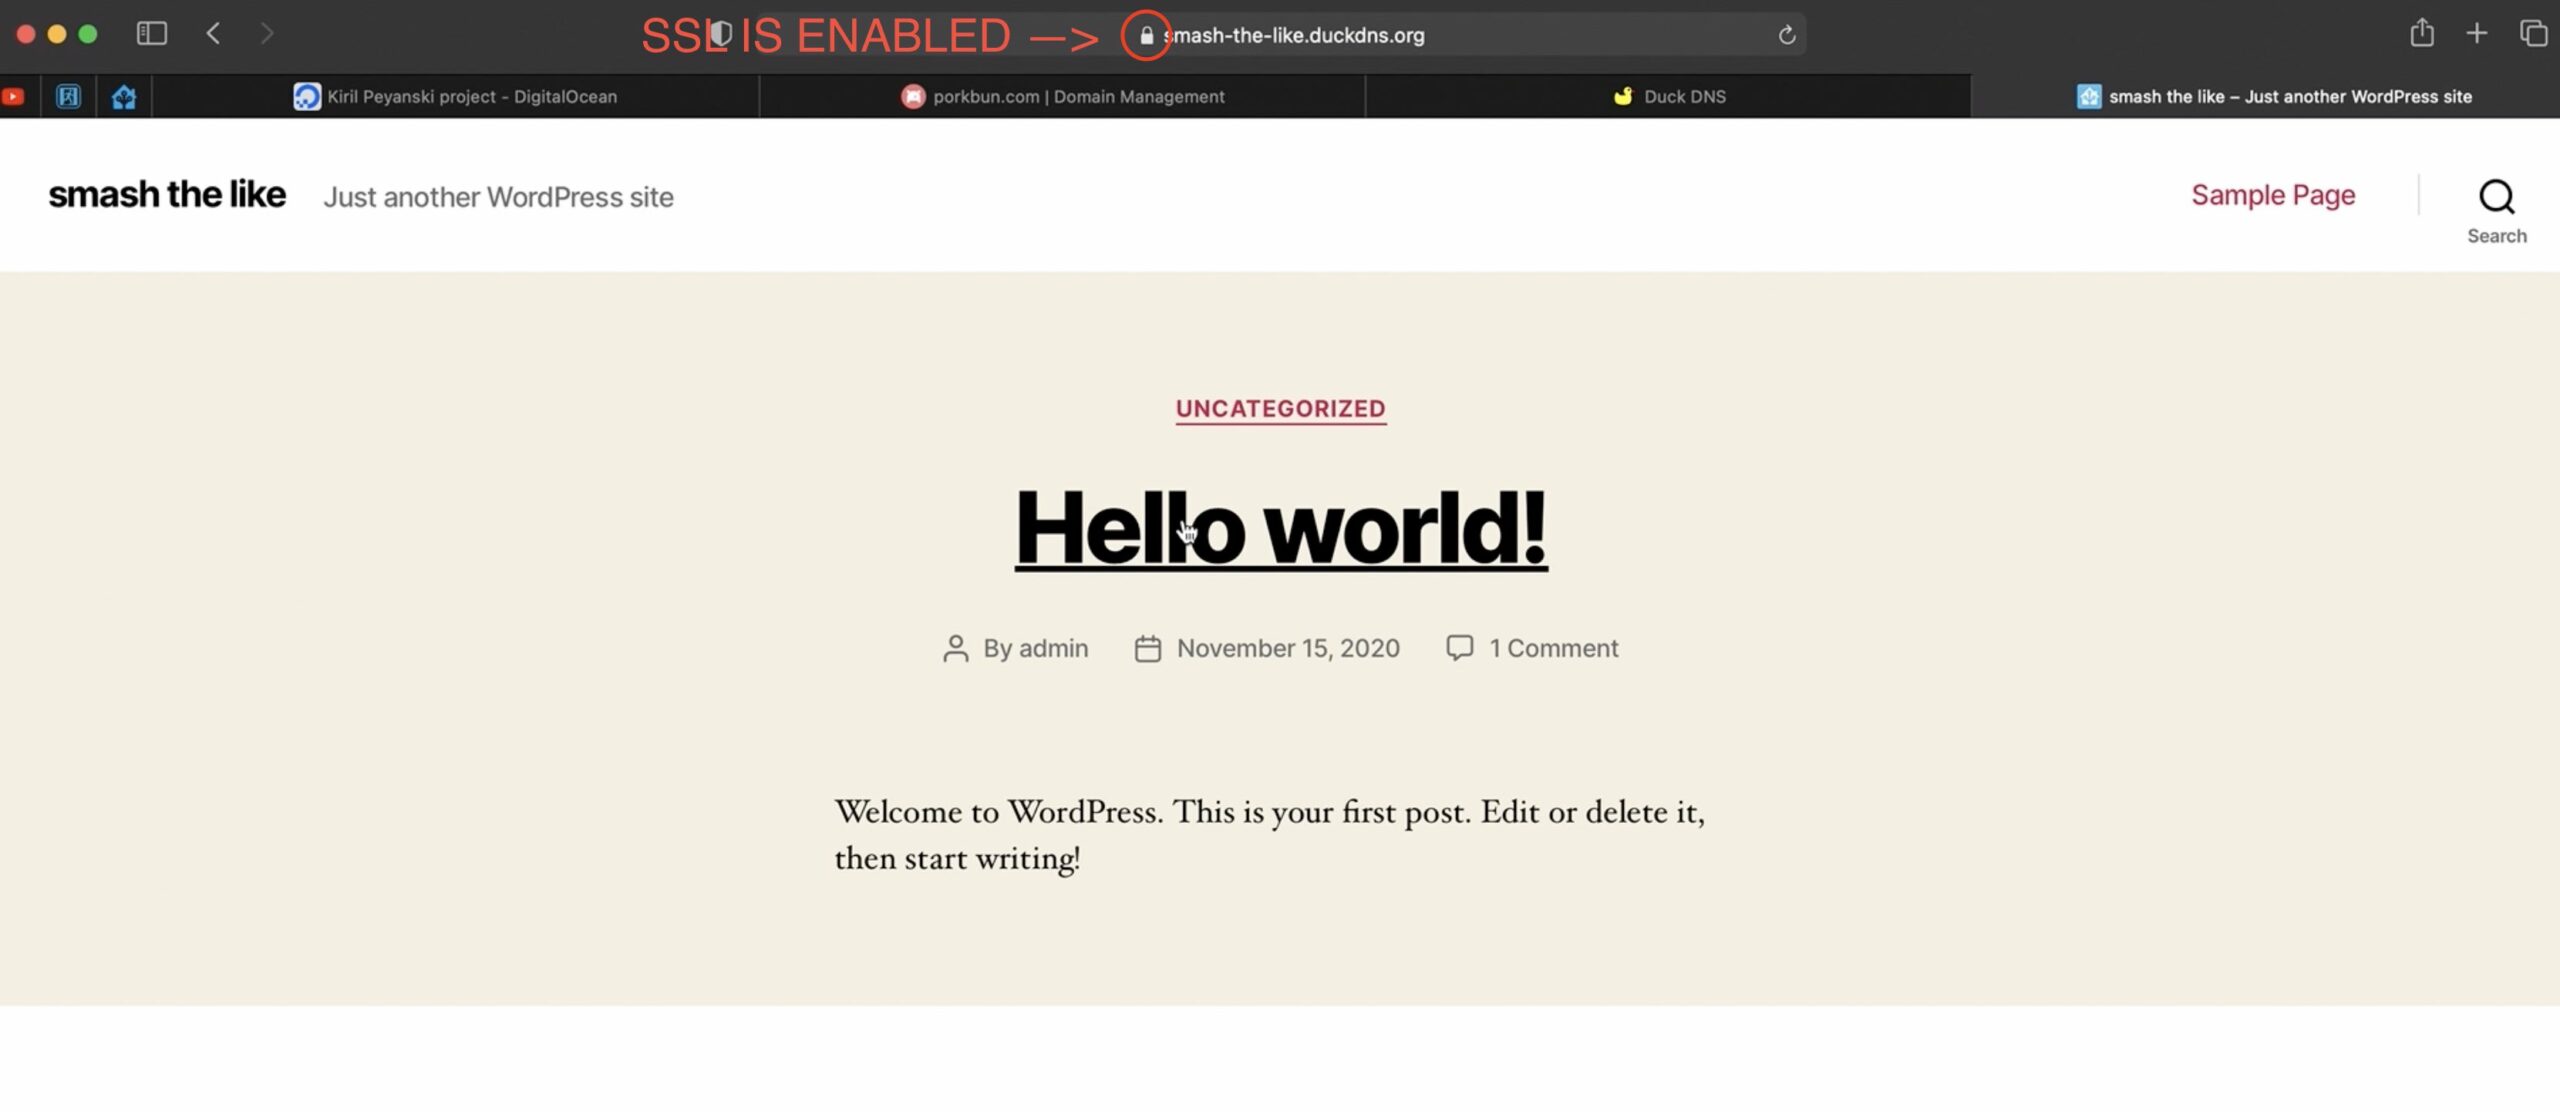
If everything is fine you will see an “Installation complete…” message. That means you can open your own site for the first time.
Just open a new browser/tab and enter your domain name. And you will see the WordPress welcome screen. You will also have valid SSL certificate from LetsEncrypt and secure communication over HTTPS.
To open the admin panel/dashboard of WordPress enter the following address:
https://your-domain/wp-adminFrom the admin panel of WordPress you can add posts & pages. You can change the appearance by changing the theme and you can add all sort of plug-ins.
The customisation and content creation in your new website I will leave to you.
Question for You!
Let me know in the comments do you want to see such tutorials in the future or not?
Also if you followed this guide (either from here or from my YouTube video) and successfully created a website – I would love to see it. But there is a little catch. To understand that you really use this guide and not just spamming around I would require to use #IMadeIt in your comments, otherwise I will not approve it.
Support my Work!
If you want to secure this blog existence you can become one of my supporters. You can see exactly how in this section of my site.
Any other sort of engagement on this site and my YouTube channel does really help out a lot with the Google & YouTube algorithms, so make sure you hit the subscribe, as well as the Like and Bell buttons.
You can also buy my Smart Home Getting Started Actionable Guide right here -> LINK
Also feel free to add me on Twitter by searching for @KPeyanski. You can find me on my Discord server as well.
I really hope that you find this information useful and you now know more about how to setup WordPress on DigitalOcean in a secure, fast and easy way.
Stay safe and don’t forget – Home Smart, But Not Hard!
Thank you for reading, I will see you in the next article.