Is MotionEye the ultimate NVR (Network Video Recorder)?
Maybe you have several cameras from different brands that you want to put in one place and you want to record movies or pictures continuously or when motion is detected.
Well, you came to the right place I will show you how you can do all of that with MotionEye on Raspberry Pi or any other linux device.
Table of Contents
What is MotionEye?
MotionEye is a web-based frontend for motion. And Motion is an open source program that monitors the video signal from one or more cameras. It is able to detect if a significant part of the picture has changed. Or in other words, it can detect motion.
What you will get from this Article?
1. Two ways of installing MotionEye
I will show you not one, but two ways of installing MotionEye that are kind of universal as you can use them for ARM architecture (like Raspberry Pi) or x86 architecture (AMD or Intel processors).
The first method is very easy by using Docker and a menu, the second is even easier, but it requires Home Assistant.
You can choose which one is more suitable for you.
2. Adding cameras and important MotionEye options
Then I will show you how you can add cameras in MotionEye and how to configure and use the most important options.
Finally I will ask you to comment this article and to subscribe for my newsletter – I’m kidding this part will be in the middle of the article.
3. Home Assistant Automation that will send notification when MotionEye says so.
Now seriously the final part will be configuring an automation in Home Assistant so when motion is detected a notification will be sent using web hooks.
So let’s go:
Installing MotionEye
Like I said above I will show you two ways of installing MotionEye. They are all quite easy, but if I have to rank them somehow – the order will the following: the first will be the “hardest” and the second will be the easiest.
1. Install MotionEye with Docker and a menu
I’ll be using Raspberry Pi for this, but you can use whatever you like as long as it have Docker and Git. The Raspberry have Git preinstalled and Docker can be installed from the menu. Just wait an see.
If you don’t have git and you are on Raspberry or any other Debian based Linux distribution you can execute the following to install Git:
sudo apt-get install git -yThen clone the following repo, which will give you the menu that we need:
git clone https://github.com/SensorsIot/IOTstack.git ~/IOTstack
Enter to the newly created folder and execute the menu script:
cd ~/IOTstack && bash ./menu.sh
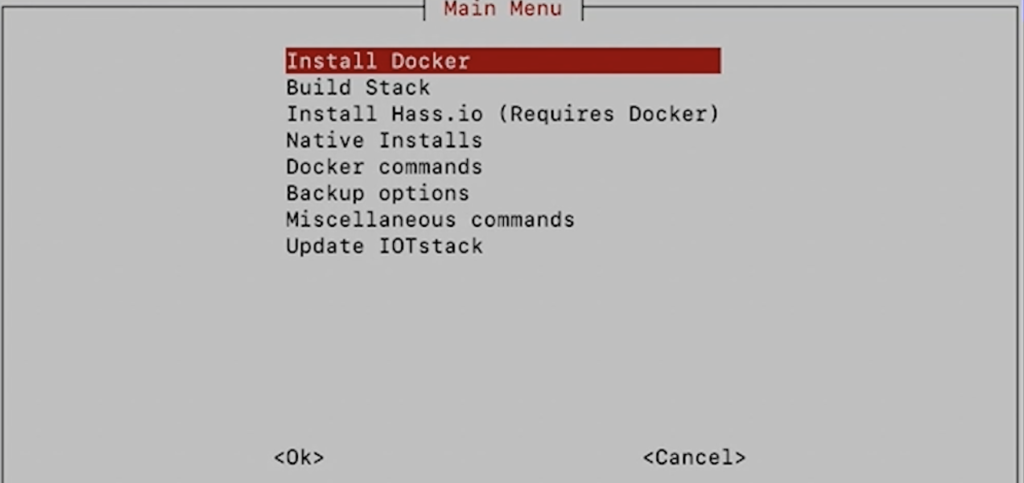
If you don’t have Docker on your system, you can install it from the menu as well. Just press Enter when your marker is on “Install Docker”. Use this method only if you are using Raspberry Pi. Otherwise ask Google how to install it for your OS/Device.

Select MotionEye from the menu.
finally execute this command, which will do the dirty work for you. It will download the latest motionEye image from Docker Hub and it will create a Docker container for you:
docker-compose up -d
To test if everything after docker-compose finish open a browser ant type the following URL:
http://YOUR_IP:8765
You should be greeted by MotionEye welcome screen.
2. Installing MotionEye from Home Assistant
I just showed you how to install MotionEye using Docker. Before we go to the interesting part that is adding and configuring cameras – I will quickly show you the Home Assistant method.
Open your Home Assistant installation and go to Supervisor and then Add-on store.
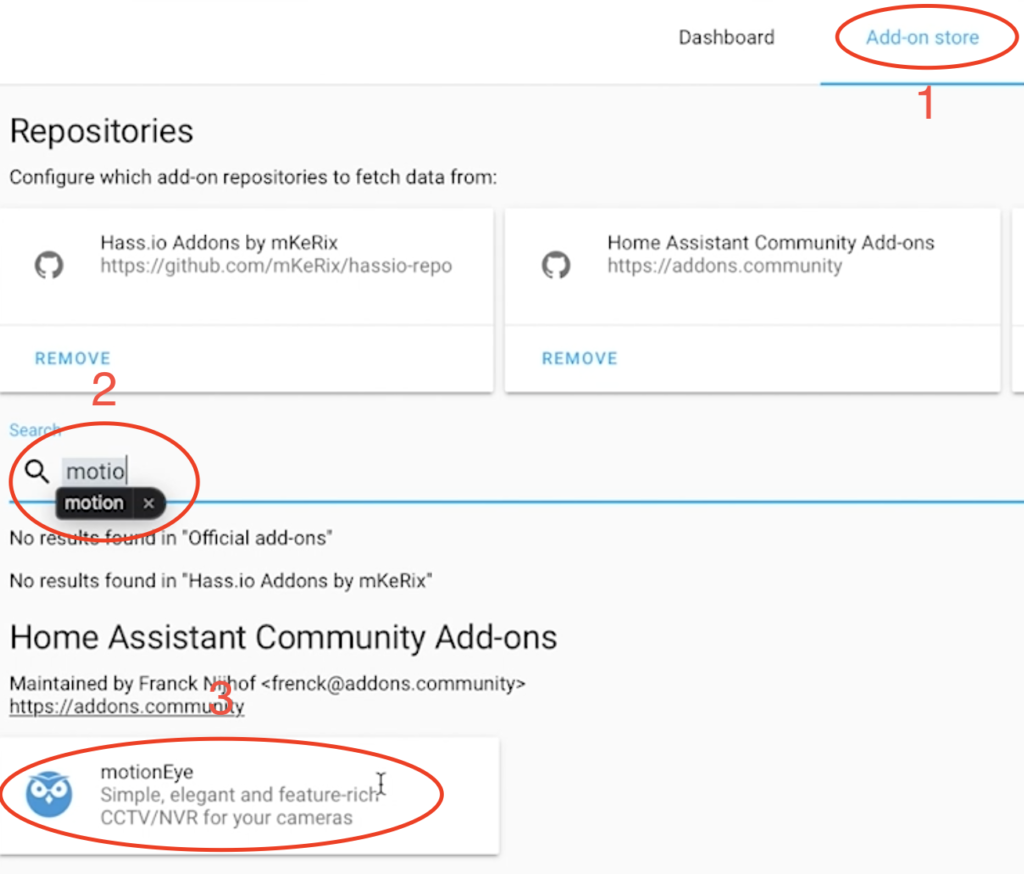
Search for Motion in the search field and click on the result.
Click on the “INSTALL” button and wait a bit the installation to finish. After that you can toggle the “Show in sidebar” button and then you can click “START” button.
When the MotionEye add-on is started you can open the web interface by either click on the “OPEN WEB UI” or if you enabled “Show in sidebar” on the “motionEye” button in the sidebar.
That was piece of cake right ?
Quick note about the performance
OK these were the installation methods that I wanted to show you. Remember MotionEye and Motion engine are not featherlight. They can be hungry for resources and if your Raspberry Pi is struggling you can use the same methods on your always working desktop/server if you happen to have one.
And if you need help for Home Assistant migration process check this article of mine. The details are for Windows there, but you can use it for whatever OS you like as long as it it supports VirtualBox.
Subscribe to get a Bonus
As I promised in the beginning of this article this is the best time where you can subscribe for my newsletter and join my Discord server if you didn’t do that already.
If you prefer to read and you don’t want to miss my next smart home article go to peyanski.com/newsletter that is peyanski.com/newsletter and type your Name and E-mail there.
As a bonus I promise to send you my exclusive post – Getting Started Smart Home Guide absolutely for FREE.
[sibwp_form id=2]
Now let’s finish this …
Let’s add a camera in MotionEye
Let’s add some cameras now and later we will configure what will happen if motion is detected.
When you first open the Web Interface of the MotionEye (http://YOUR_IP:8765) you have to login.
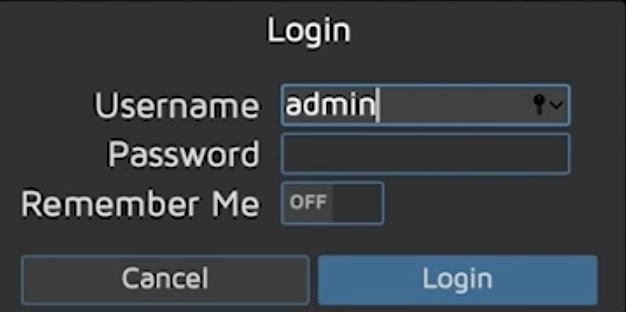
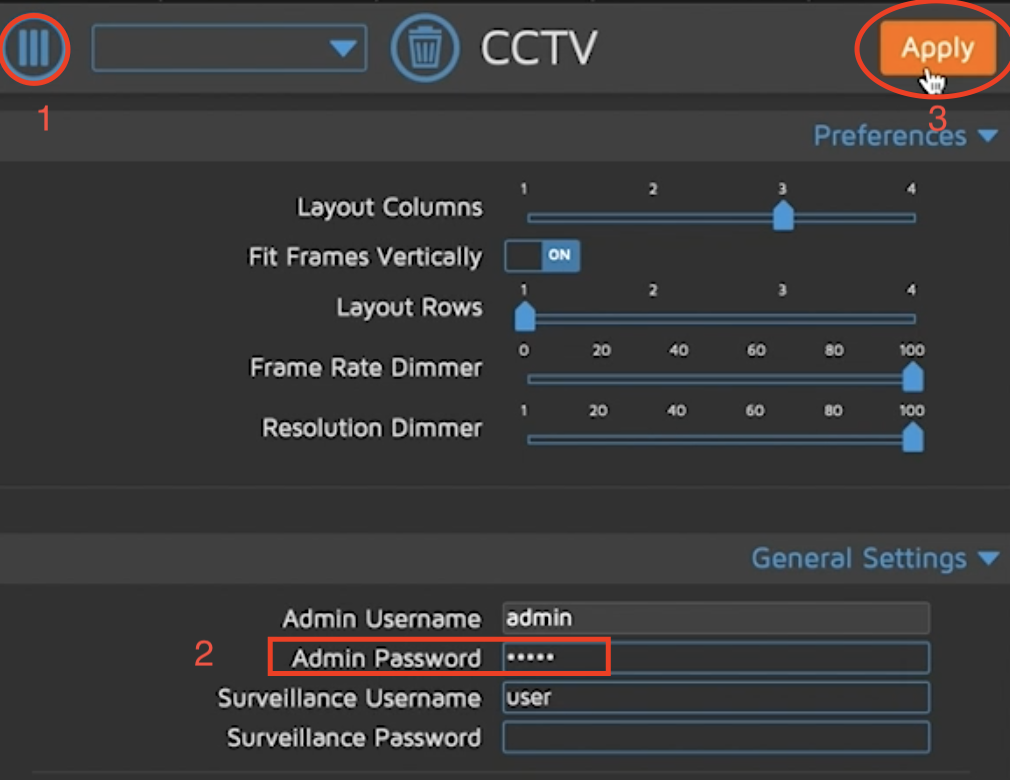
To do that use “Admin” user and no password.
Before adding your first camera take a moment and set a password for this Admin user.
Go to to the settings in the upper left corner and type your password in Admin Password field. When you are done click Apply button. After that you have to re-login with your new password.
Now you can calmly add your first camera by clicking on the big blue text in the centre of your screen saying: “You have not configure any camera yet. Click here to add one…”
When you do that a dialog will appear. You have to add you camera details now to join it in the MotionEye winning team.
I’m using an $30 RTSP enabled camera from Sonoff, so I will choose a Network camera, the URL and credentials I will get from my eWeLink app.

You should find your camera details and add it there. Luckily MotionEye support a lot of cameras, so the chance of successfully adding a camera is pretty big as long as you have all of credentials and addresses required in the dialog above.
Question For You
Quick question: Hardware NVR, Software NVR or No NVR are you currently using? Type your answer in the comments section below. Bonus points for more details like what model/brand your NVR is or you want to be.
Important Camera Settings in MotionEye
In the next several headers I will list the most important MotionEye settings:
HINTS: Next to every settings you will see a question mark in a circle. If you hover your mouse pointer there for a while you will see a hint about the option of you interest.
Configure Video Resolution and Frame rate
From this section you can change the resolution and frame rate of your camera.
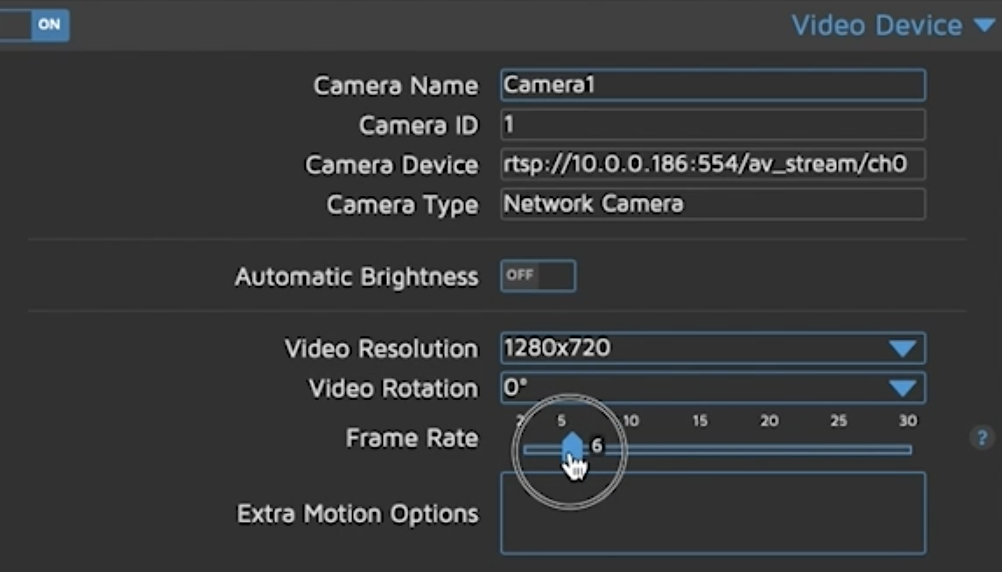
Please check you camera specification for best results.
File Storage settings in MotionEye
You can find here the folder where Movies and Pictures recordings will be stored for your camera.
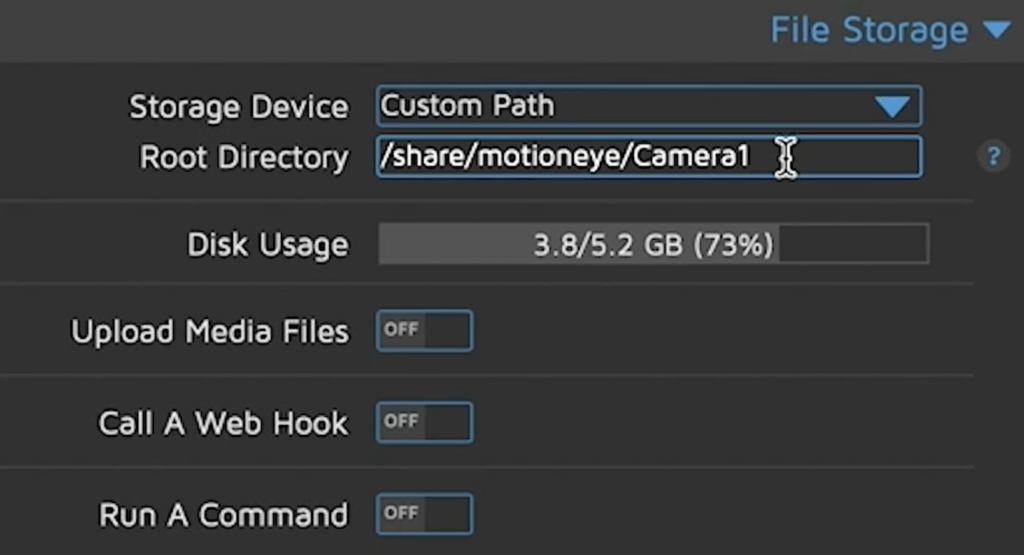
Of course you can change the folder if you wish.
Remember this path we will use it later when testing motion detection.
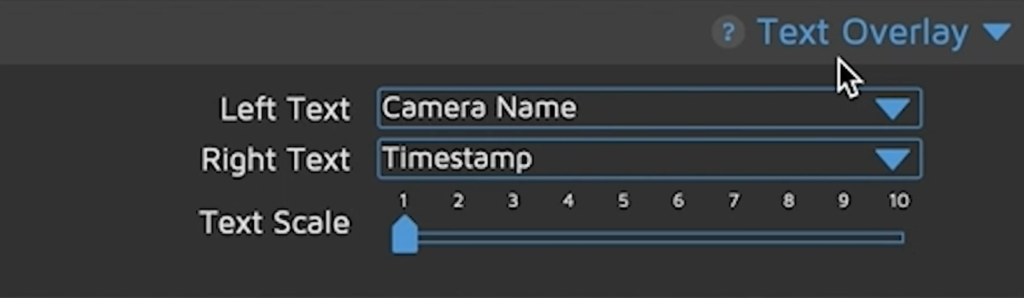
Text Overlay settings in MotionEye
From here you can change the text and scale displayed when you are viewing your camera. By default the camera name and the current time is displayed.
Video Streaming settings in MotionEye
When you add a camera in MotionEye, it automatically creates several URLs that you can use for notification or embedding purposes in you automations for your smart home. For example to send a picture to your Telegram when motion is detected.
The real-life example I can give is with my ESP-32 cameras that I have. When I flash them I enable an HTTP web server on them which due to the device limitation is only possible to open from only one device at a time.
But once I add such a camera in MotionEye I can open the MotionEye Streaming URL in as many devices I wish simultaneously.
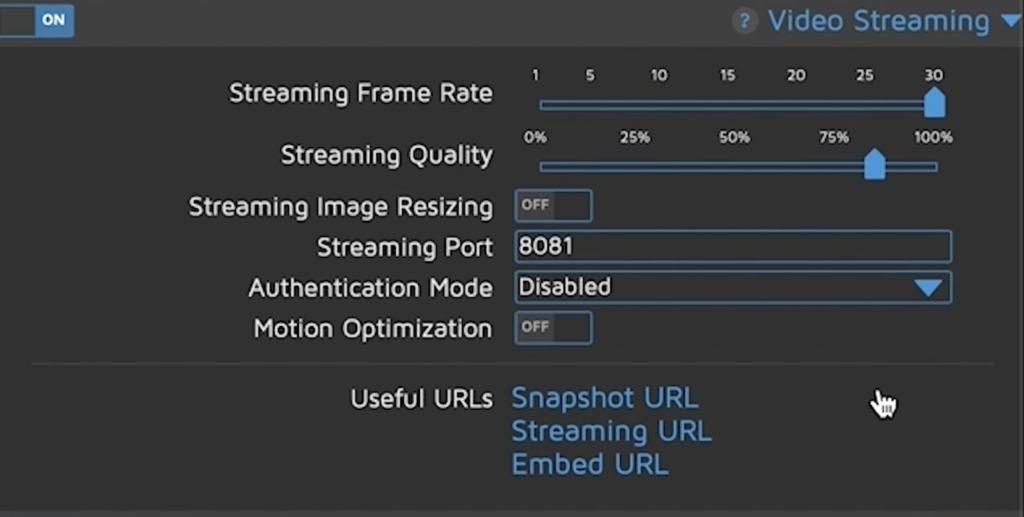
From this section you can set and get very useful settings.
Still Images settings in MotionEye
From this section you can set the retention period for the pictures using the Preserve Pictures option. When set for “One Week” for example the pictures captured from you camera will be stored in your File Storage folder for guess how long? Answer: One week 😂

If you change Capture Mode to Motion Triggered you will have a picture stored every time when motion is detected.
Movies settings in MotionEye
These settings are very similar to the Still Images with some nice additions related to Movies like Movie Format, Maximum Length and Movie Passthrough.
You can again set a Recording Mode to activate only when motion is detected or continuously like a real NVR. Keep watch of your free disk space when playing with these Movies settings

Motion Detection settings in MotionEye
In this section you can play as long as you want to reach your perfect Motion Detection. Most of the options are self explanatory and if you struggle with anything try hovering on the question marks. You can always enable Show Frame Changes to help you with the fine tuning.
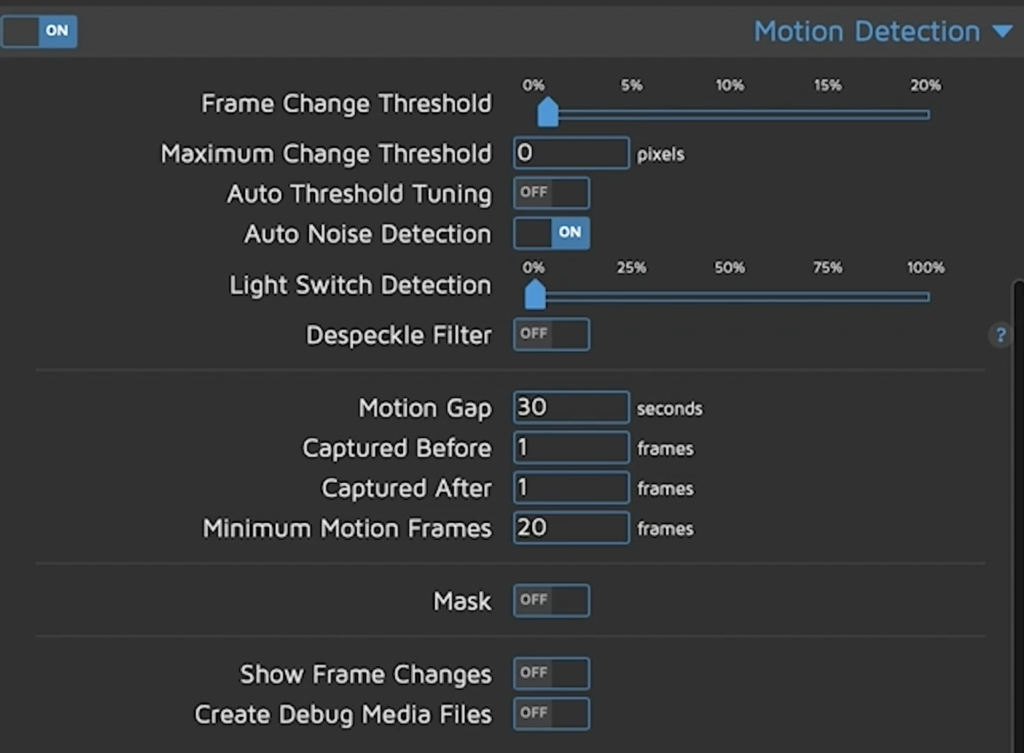
You can set the Frame Change Threshold to a percentage suitable for your camera.
Motion Notifications settings in MotionEye
I will demo Call a Web Hook option in details later in the article when setting a Home Assistant notification automation.

Send a Mail or run a command whenever motion event ends. Everything is possible from here.
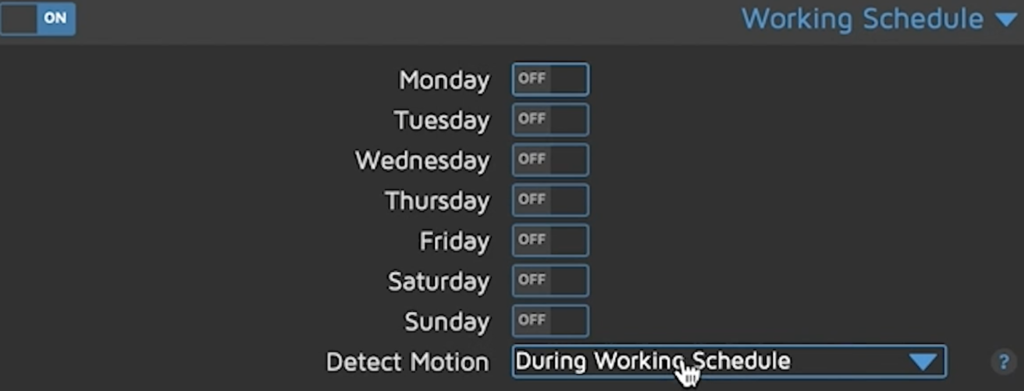
Working Schedule settings in MotionEye
From here you can easily set when MotionEye to work if you want to have a working schedule and to detect motion during or outside this working schedule.
Let’s test if the motion detection is working
If you see a red rectangles in your images that means that there is motion. detected inside this rectangle.

I was moving around and you eventually can see the red rectangle around me.
If you have enabled the Recording Mode to Motion Triggered in Still Images or Movies you will find the saved files in your Root Directory. You can find the full path in File Storage section.
If you are using MotionEye within Home Assistant, you can use the Samba Share add-on available in the Home Assistant Add-On store to access your Root Directory.
Creating a Home Assistant Automation and configuring MotionEye web hook
Now I want to show you the cherry on top of the cake of this article.
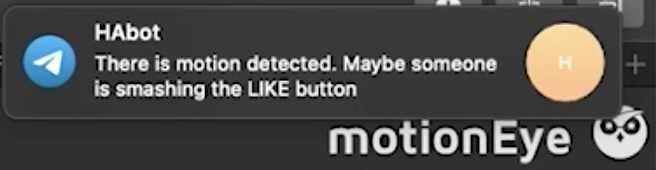
I will create a Home Assistant Automation that will use web hook trigger to send a Telegram notification when motion from MotionEye is detected.
For this I will open the automations.yaml file in my Home Assistant configuration using File Editor add-on (again available in Home Assistant Add-on store) and I will paste the following YAML text inside it.
# add this in automations.yaml
# MotionEYE Automation test
- alias: Receive Telegram when MotionEye webhooks
  trigger:
    platform: webhook
    webhook_id: 123321
  action:
  - data:
      message: 'There is motion detected. Maybe someone is smashing the LIKE button'
    service: notify.telegram
The important parts of this simple Home Assistant automations are:
- webhook_id – should be an unique number
- action section – is what will happen if MotionEye invoke the web hook. In my case a Telegram message will be sent.
Of course you can customise this automation to suite your needs.
Next I will save the changes in automations.yaml and I will reload the automations from Configurations -> Server Control -> Reload Automations.
To test if this automations is working before putting it in the MotionEye configuration I will open a Terminal and I will execute the following command:
curl -d "" http://YOUR_HA_IP:8123/api/webhook/123321
Don’t forget to change the ID in the URL above with the one that you set in automations.yaml file under the webhook_id.
If everything is OK you should receive a message from Telegram messenger. If you configured something else in your action section of the automation it should be executed.
If the step above is successful, you can copy the URL in the last part of the curl command and paste it inside your MotionEye settings under Motion Notifications section.

Just like that!
Click on the “Apply” button. And start moving in front of your configured in MotionEye camera 😂
Now hopefully if you set everything right you will receive your Telegram notifications very shortly.
Next Steps
Just an idea for you if you want to continue to play with cameras and Home Assistant:
You can integrate the cameras that you already added in motionEye in Home Assistant and then you can enable some AI image recognition using Amazon Rekognition services. If you don’t know how to do that check this article of mine.
Support my work
Any sort of engagement on my blog or my YouTube channel does really help out a lot with the Google and YouTube algorithm, so make sure you hit the subscribe, Like and Bell buttons If you enjoy this video article.
Also feel free to add me on Twitter by searching for @KPeyanski. You can find me on my Discord server as well.
I really hope that you find this information useful and you now know how to install MotionEye and add all of your cameras.
Thank you for reading, stay at home, stay safe and see you next time.
Like!! I blog quite often and I genuinely thank you for your information. The article has truly peaked my interest.
I use Contacam from Contaware, a Windows based nvr, but looking for alternatives on Linux.
Hello, thanks for your topic, but I have a matter with the webhook. I follow all your steps but, to connect to my home assistant the address is https://192.168.1.XX:8123, I use duckdns service. So each time I try in terminal, I receive
curl: (60) schannel: SNI or certificate check failed: SEC_E_WRONG_PRINCIPAL (0x80090322) – Le nom principal de la cible n’est pas correct.
More details here: https://curl.se/docs/sslcerts.html
curl failed to verify the legitimacy of the server and therefore could not
establish a secure connection to it. To learn more about this situation and
how to fix it, please visit the web page mentioned above.
have you got an idea ? Thanks for all your job