
This is part 2 of my old RV to Smart RV conversion series and today I will add a Tp-Link 4G wireless router, a Raspberry Pi 4, and I will install a Home Assistant and a Garmin navigation + Garmin BC40 wireless backup camera.
I will try to show you the software and the hardware part of all of this, so if you happen to like what I did, you will be able to do the same or better in your RV, your boat, your home or whatever else you have.
Table of Contents
The Lineup
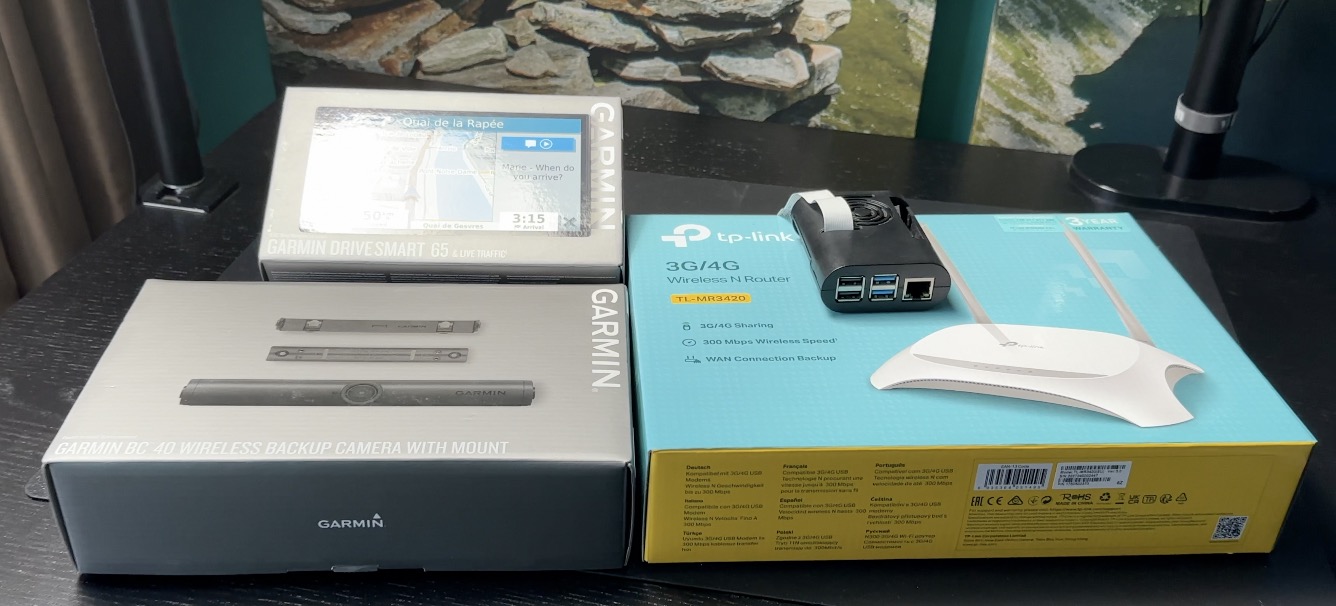
This is the lineup of the things that I’m about to add in my RV. Namely: Garmin DriveSmart 65 Navigation, Garmin BC40 backup camera, Tp-Link TL-MR3420 4G Wireless router + 4G modem & Raspberry Pi 4 for the Home Assistant. Of course, some fuse boxes, circuit breakers and wires.
With that being said let’s start discussing them one-by-one:
Circuit Breaker
First thing is the Circuit Breaker with fuse reset – I will connect that immediately after my RV batteries.

What I like about this fuse breaker is that it looks very solid, it have a versions from 30A to 300A, it is cheap and I can cut the power to everything that will be connected after it with a push of a button. Then I can restore it by moving the little handle on it.
I bought that from AliExpress for around 6 dollars:
30-300A Auto RV Circuit Breaker Fuse Reset (AliExpress Affiliate) – https://s.click.aliexpress.com/e/_DF97zvt
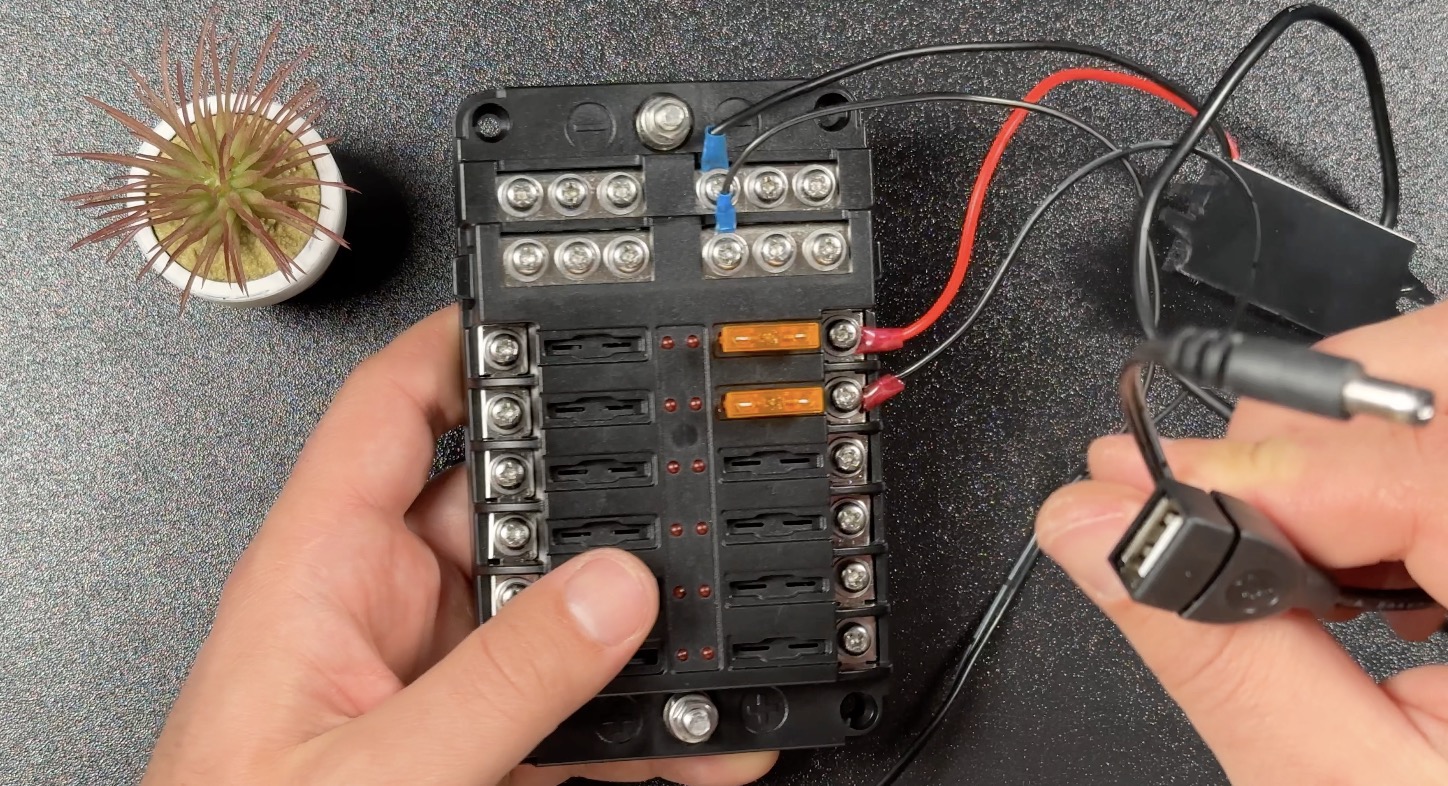
Fuse Box 12 slots
Next is this 12 slots fuse box – I will connect this fuse box after the above Circuit Breaker and I will connect my Wireless Router and my Raspberry Pi here.
This box is again from AliExpress, it cost me around 18 dollars. There is a more compact version with 6 slots that I should probably had to choose, as I’m not sure that I’ll use all 12 slots, but as they say the more the better.
12 Way Fuse Box Plastic 12V 32V (AliExpress Affiliate) – https://s.click.aliexpress.com/e/_DDnprO7
Wireless 4G Router (Tp-Link MR3420)& 4G Modem
Next thing for my Smart RV conversion is a 4G/LTE wireless router from Tp-Link and a 4G modem from Huawei (exact model is K4505).
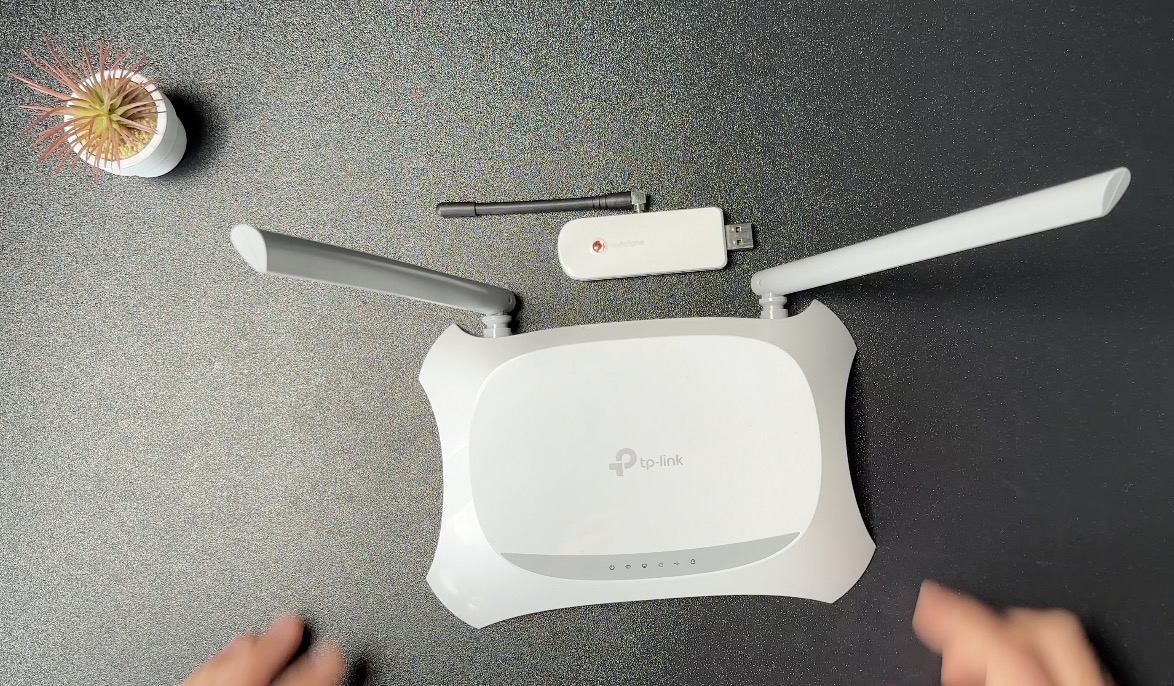
This router is cheap, it is around $25 and it can work on 12V.
- TP-LINK TL-MR3420 3G/4G Wireless N Router – https://amzn.to/3WimxsB
- Vodafone K4505 HUAWEI 3G/4G Modem – https://s.click.aliexpress.com/e/_DDdhxeF
- 4G LTE Antenna with CRC9 Connector For Huawei – https://s.click.aliexpress.com/e/_DC1Narh
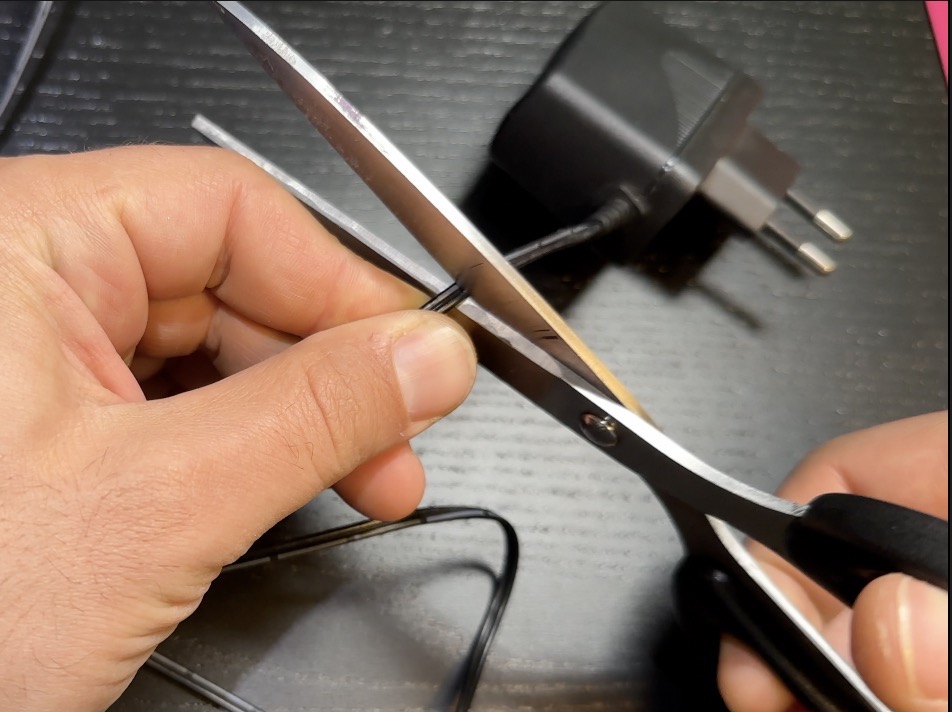
I will cut the power cord and I will connect the router directly to my RV batteries which is a big plus.
I considered some more expensive wireless router options, like:
- NETGEAR 4G Router MR1100 – https://amzn.to/3HAEMVL
- Maxview Roam 3G/4G antenna – https://amzn.to/3YlPaqs
But then I decide otherwise, as this Tp-Link router is confirmed working good by me 🙂
I’m using such router in my villa for years on AC and it is working pretty stable. On top, there is a nice looking Home Assistant Tp-link integration that I can use to send SMS-es, which is going to be great for a notification service in my future Home Assistant automations.
Update: I quickly checked the Home Assistant Tp-Link LTE integration and unfortunately, it is not working as expected. If you manage to make it work – let me know in the comments.
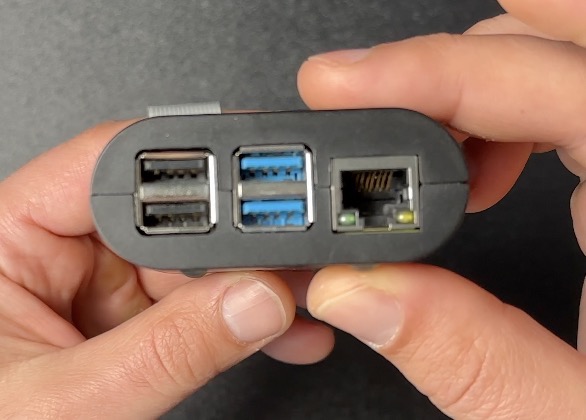
Raspberry Pi 4 (for the Home Assistant)
The brain of our operation is coming! It is a Raspberry Pi 4 with 4GB of RAM. This is going to be the main Smart Hub of my RV.
- Raspberry Pi 4 Starter Kit – https://amzn.to/3iSpYaJ
- Case for Raspberry Pi 4B (optional) – https://s.click.aliexpress.com/e/_DmmdomJ
- Raspberry Pi Camera v1.3 (optional) – https://s.click.aliexpress.com/e/_DeqQPCX
I will connect it to TP-Link Router with a LAN cable and to power it up I will use this 12V to 5V and 3A converter that I bought here in Bulgaria for around 6 euros.
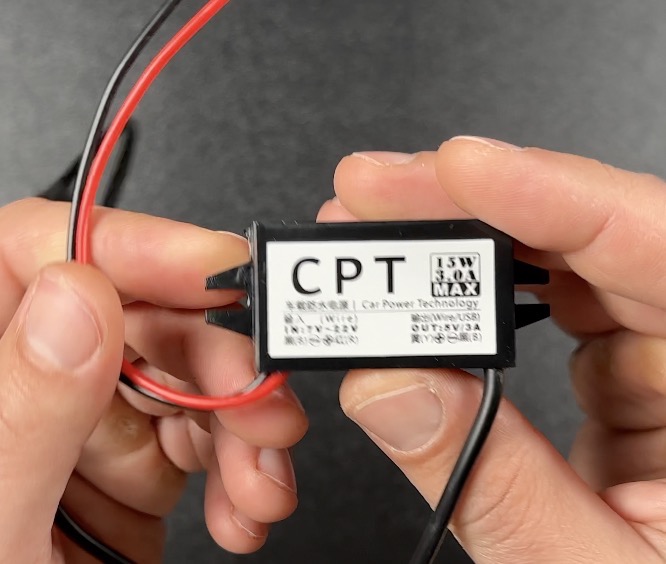
Nevertheless, I’m pretty sure that this is coming from AliExpress as well and I found a link for you if you are interested:
12V to 5V dc dc converter power supply – https://s.click.aliexpress.com/e/_DEfqdQL
SD Card (Storage)
I will use a SD card for the Raspberry Pi storage, but a good one – SanDisk Extreme.
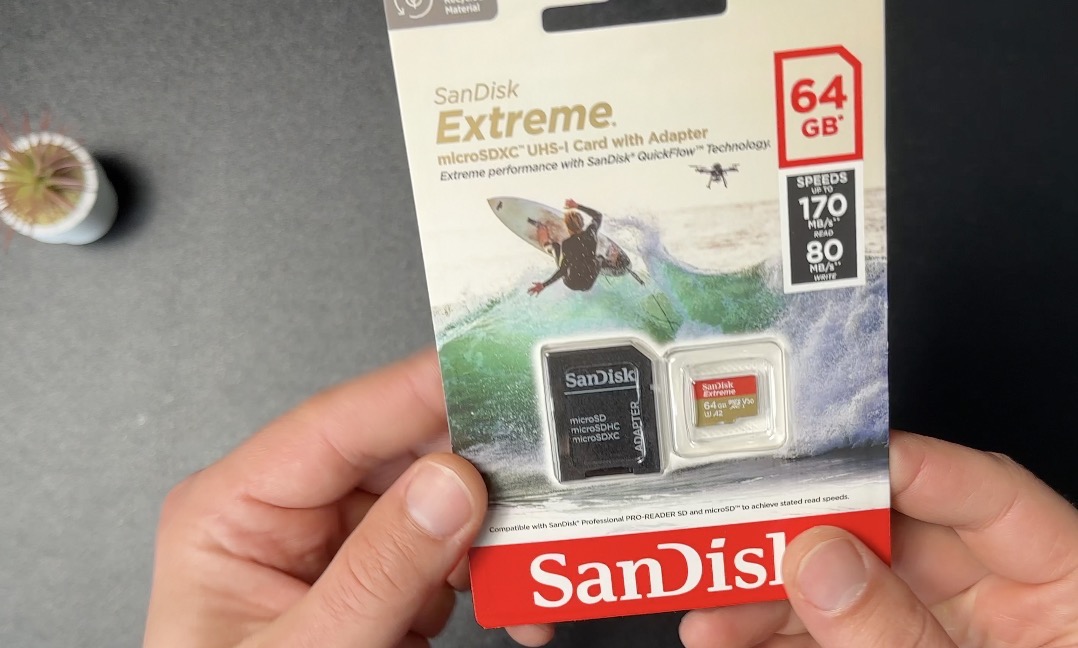
SanDisk 64GB Extreme Memory Card with Adapter – https://amzn.to/3FtONBF
This SD Card cost me around 15-16 dollars. I will not use SSD drives for this Raspberry in the RV as I’m not after some extreme speeds and I don’t need much disk space for the Home Assistant.
Preparing everything possible in advance for the RV
Before I install the router and the Raspberry in the RV, I will prepare everything in my home, and by everything I mean that I will connect the circuit breaker, fuse box and 12v to 5v converter, I will configure the router and I will install the Home Assistant on the Raspberry Pi.
Connecting the wires
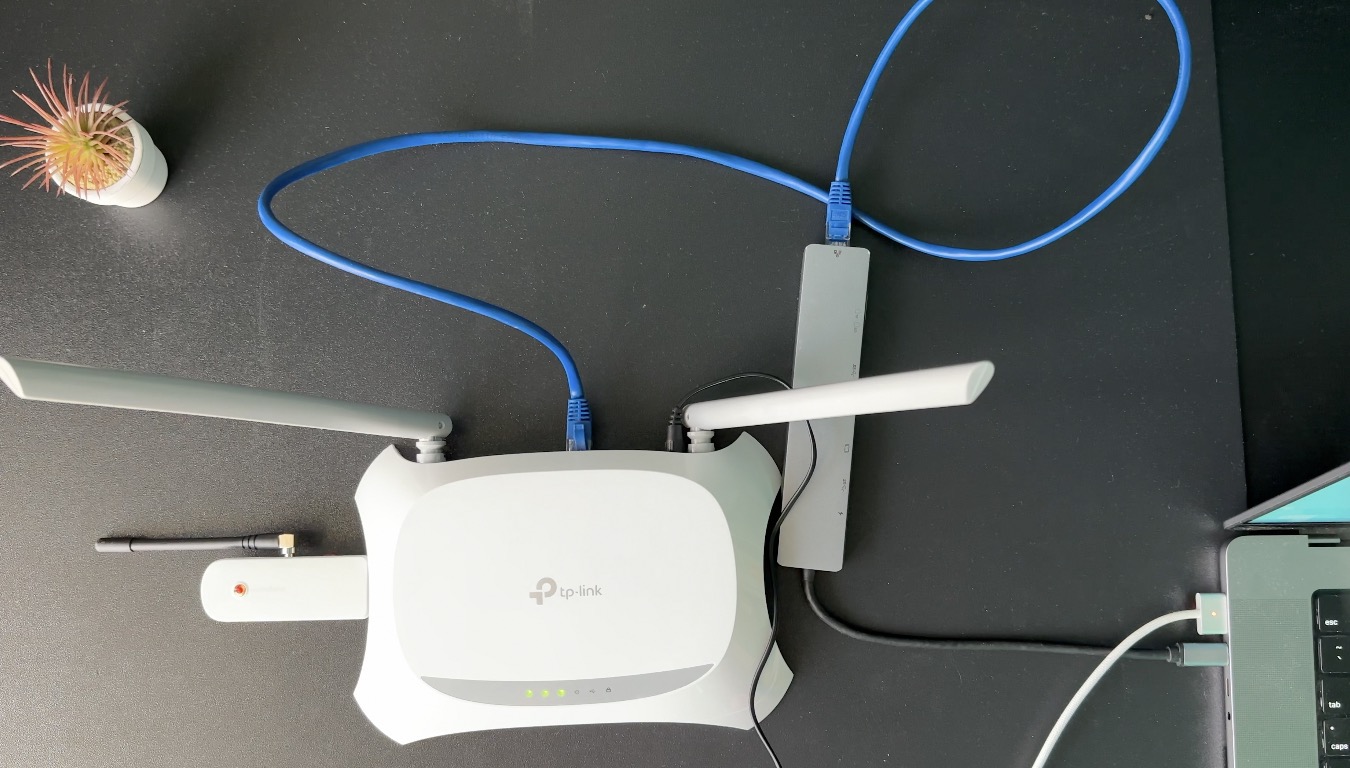
I cut the positive cable that will be connected to the batteries of the RV and I placed the 30A circuit breaker there. The negative cable from the batteries will be connected directly to the fuse box. And on the fuse box I connected I connected the 12v to 5v converter for the Raspberry Pi and the power cord for the Tp-Link 4G Router

Configuring the Tp-Link 4G Router
Nothing unusual here, I inserted the Huawei 4G modem into the USB port of the Tp-Link Router and I connected the router to my laptop.
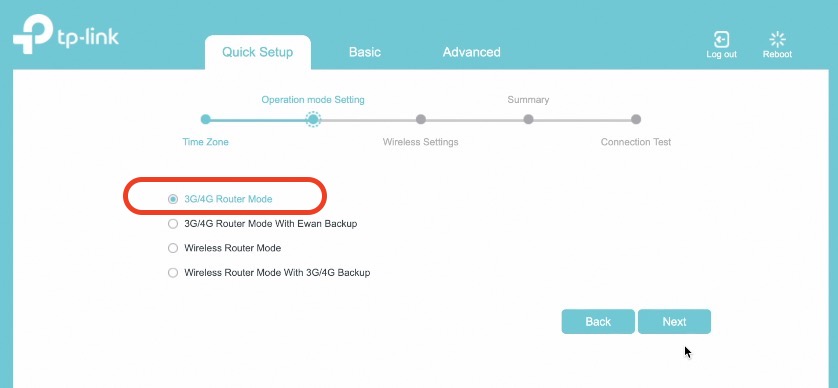
Then, I opened the web interface of the router (available at 192.168.1.1 address) and I followed the instructions. One of the most important steps here is to select the 3G/4G Router mode during the setup.
The guidance of the Tp-Link Router Interface is very helpful and straightforward. During these initial steps I set my WI-FI name and password and basically everything that is needed. If you face some difficulties setting up this router – share them in the comments and/or watch the video for more details.
Installing Home Assistant on the Raspberry Pi
Time to install the Home Assistant on the Raspberry Pi. I will use the Home Assistant OS method, which is the most popular way of doing that, but I have to say that this method it is not the only possible way.
There are three other official and supported methods of Home Assistant installation and I’ll talk about all of them in my Home Assistant Webinar, as well as their pros and cons. On top, in the Webinar you can see one super simple way to get Home Assistant on your PC in under 5 minutes.
The Webinar registration is now open and it is completely free, so go and register right now on my other website:
My Home Assistant Webinar – https://automatelike.pro/webinar
Anyways, here are the steps to install Home Assistant OS on a Raspberry Pi 4.
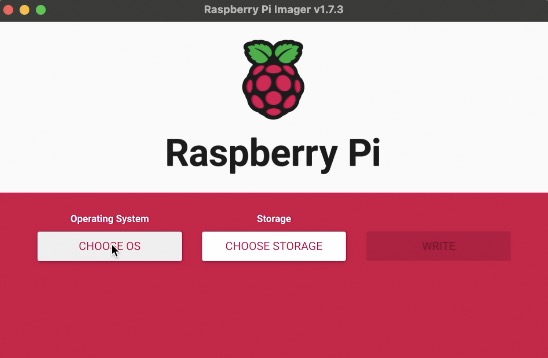
- Download Raspberry Pi Image software from https://www.raspberrypi.com/software/ and install it.
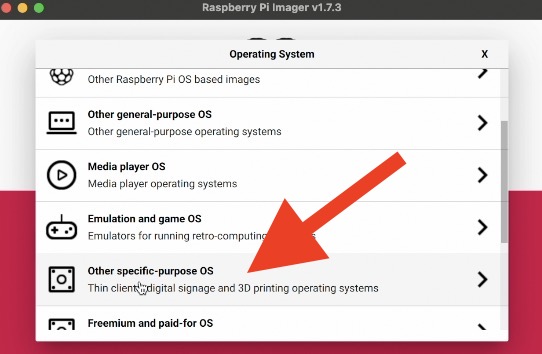
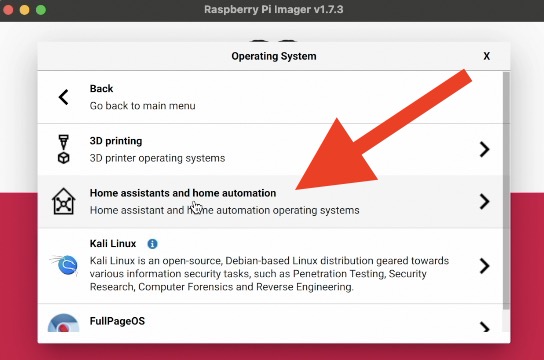
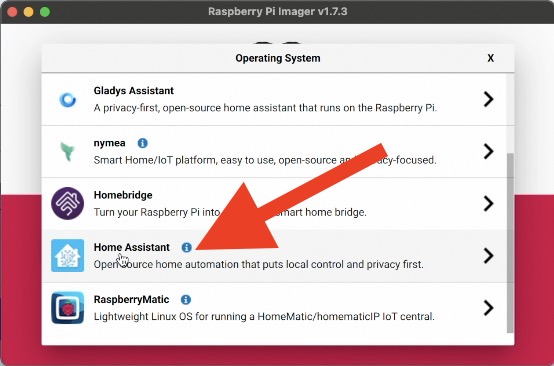
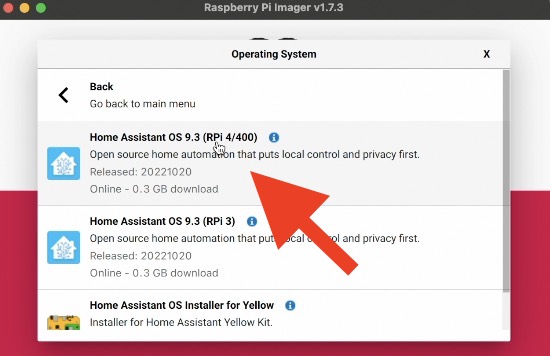
- Start Raspberry Pi Imager, click on Choose OS and select Other specific-purpose OS > Home assistants and home automations > Home Assistant > Home Assistant OS (RPI 4/400)
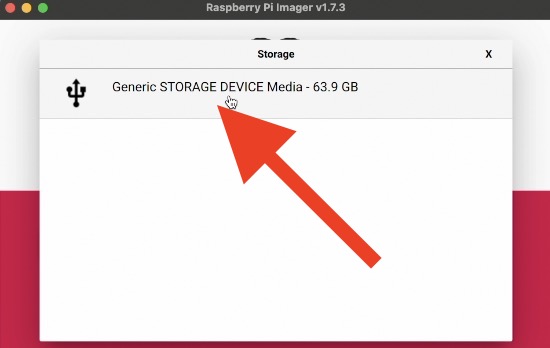
- Insert your SD card into your SD Card slot or SD card reader connected to the computer where Raspberry Pi imager software is started.
- Click on Choose Storage button and select your SD Card.
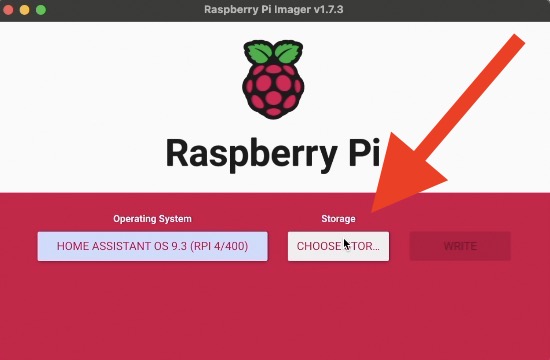
- Finally, click on Write button on the Raspberry Pi Imager and wait for the process to finish.
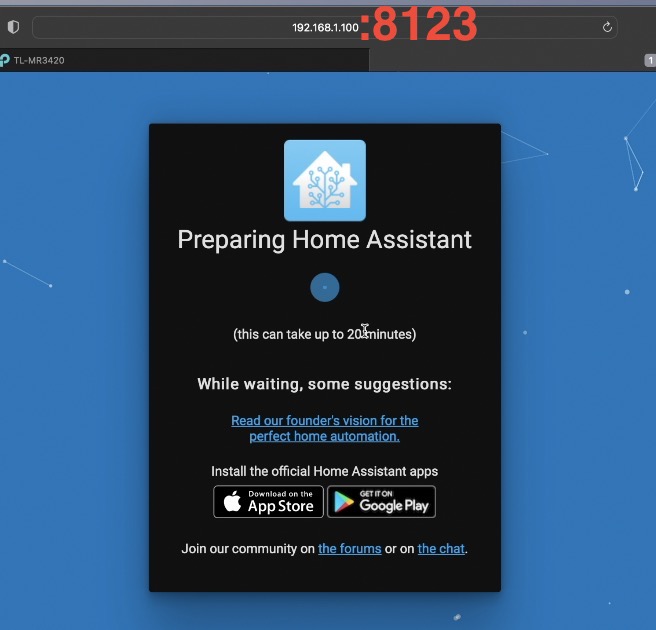
- Insert the SD card in the Raspberry Pi 4 and power it up.
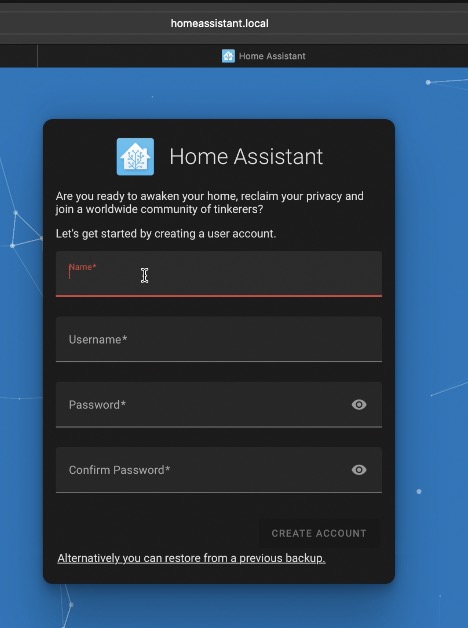
- Check the assigned IP of the Raspberry PI in your Router Interface and type it in a new browser or tab followed by the :8123 (ex: 192.168.1.100:8123 or you can try http://homeassistant.local:8123)
- You have to see the Home Assistant Preparing Screen and after some minutes the onboarding wizard of the Home Assistant.
As I said in the beginning this Home Assistant installed on my Raspberry Pi will be the brain of my RV. My goal is to connect everything possible to the Home Assistant and I will add some smart sensors in the next parts of these series.
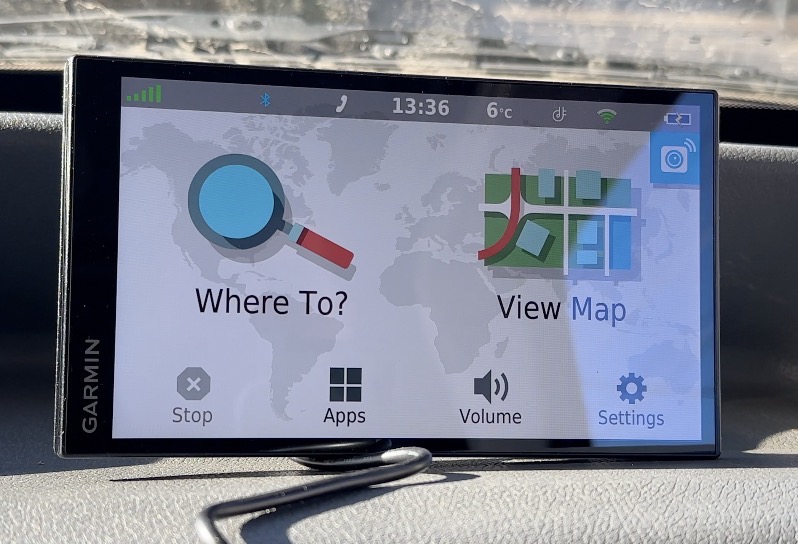
Garmin Navigation & Backup Camera for the RV
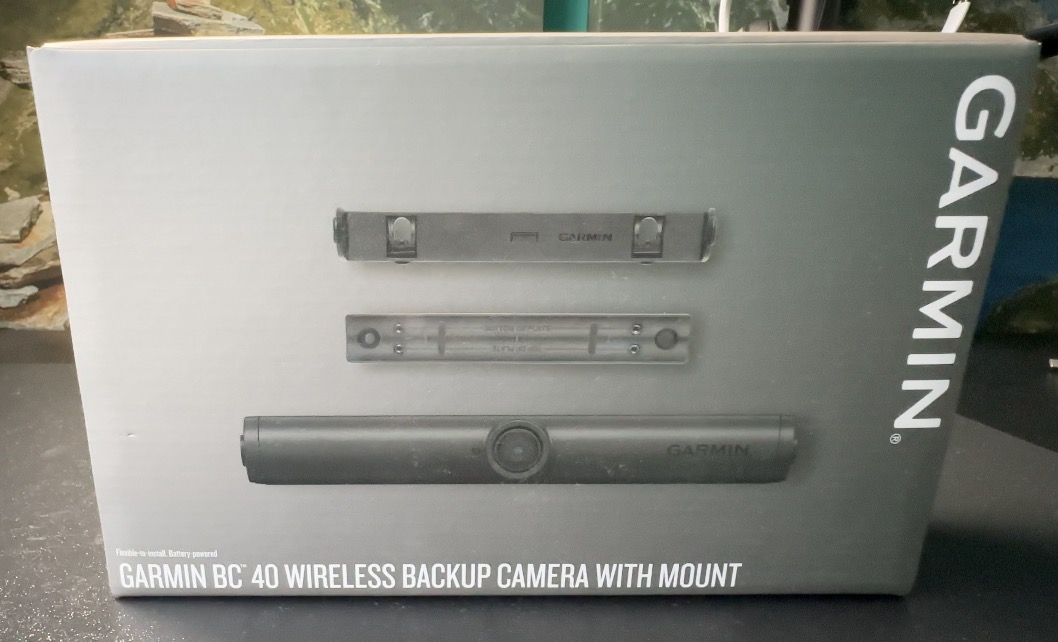
The final things (for this part) that I’m about to install are the Garmin DriveSmart 65 Navigation and a Garmin BC40 Backup Camera.

To be honest here, I mainly use my phone for navigation and I bought these Garmin stuff, only because of the backup camera. The Garmin BC40 camera cannot work with Smart phones and it is only compatible with Garmin navigations. To be precise, only with some specific models. And the Garmin DriveSmart 65 navigation is in the list of compatible ones.
The installation of the Garmin backup camera and navigation is extremely easy, but unfortunately a potential unwanted removal of the camera a.k.a theft is extremely easy as well.
The best thing about this setup is that no wires are required for the installation Тhe only thing that I don’t like about that camera is that it can be stolen in under 2 seconds.

But the good things are a lot. The camera resolution is higher than the usual backup cameras, as it can go up to 720p. I must say that the video quality and the video angle are quite good.

And Having a good image after all, can be the difference of hitting something or not hitting it when driving in backwards direction. Avoiding just one obstacle, due to the better video quality can save you a lot more money than the price of the camera and the navigation itself, don’t you think?
Also, this camera is a battery powered with two regular AA batteries and it is stated that can last up to 3 months with them.
To show the camera image I have to power on the Garmin DriveSmart navigation and to press this button.
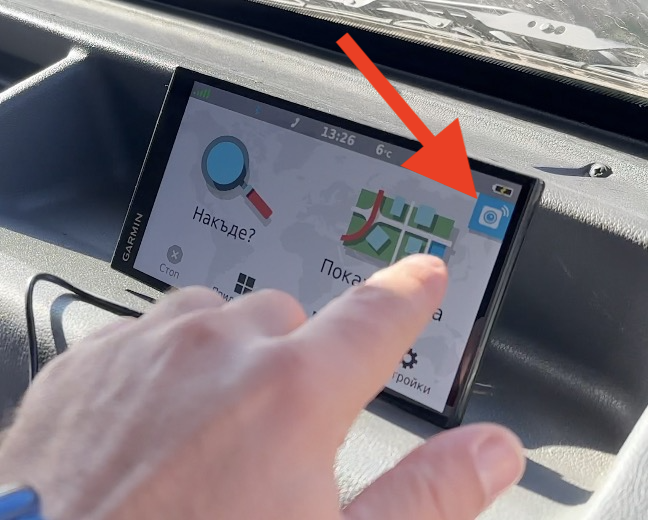
Voice commands are also supported. You just have to say: show/hide video or Hey Garmin, show/hide video.
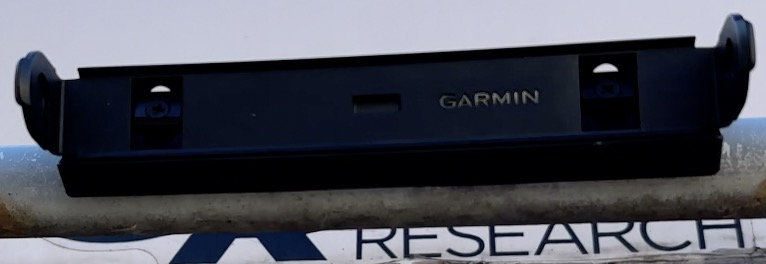
I bought the Garmin BC40 Backup camera with a camper mount, but there is also a mount for license plates and tubes mount, so it is versatile enough to mount it on almost every vehicle out there.
You can see the current prices of the Garmin navigation and the BC40 Backup camera below:
- Garmin DriveSmart 65 Navigation – https://amzn.to/3WdaJaT
- Garmin BC 40, Wireless Backup Camera – https://amzn.to/3HAIwGW
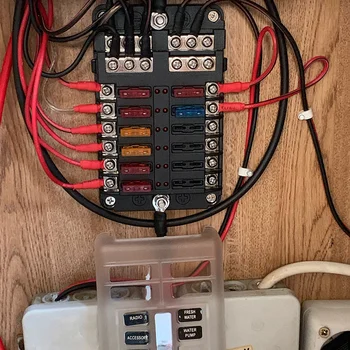
Mounting everything so far in the RV
And this is the final result of my Smart RV conversion so far:
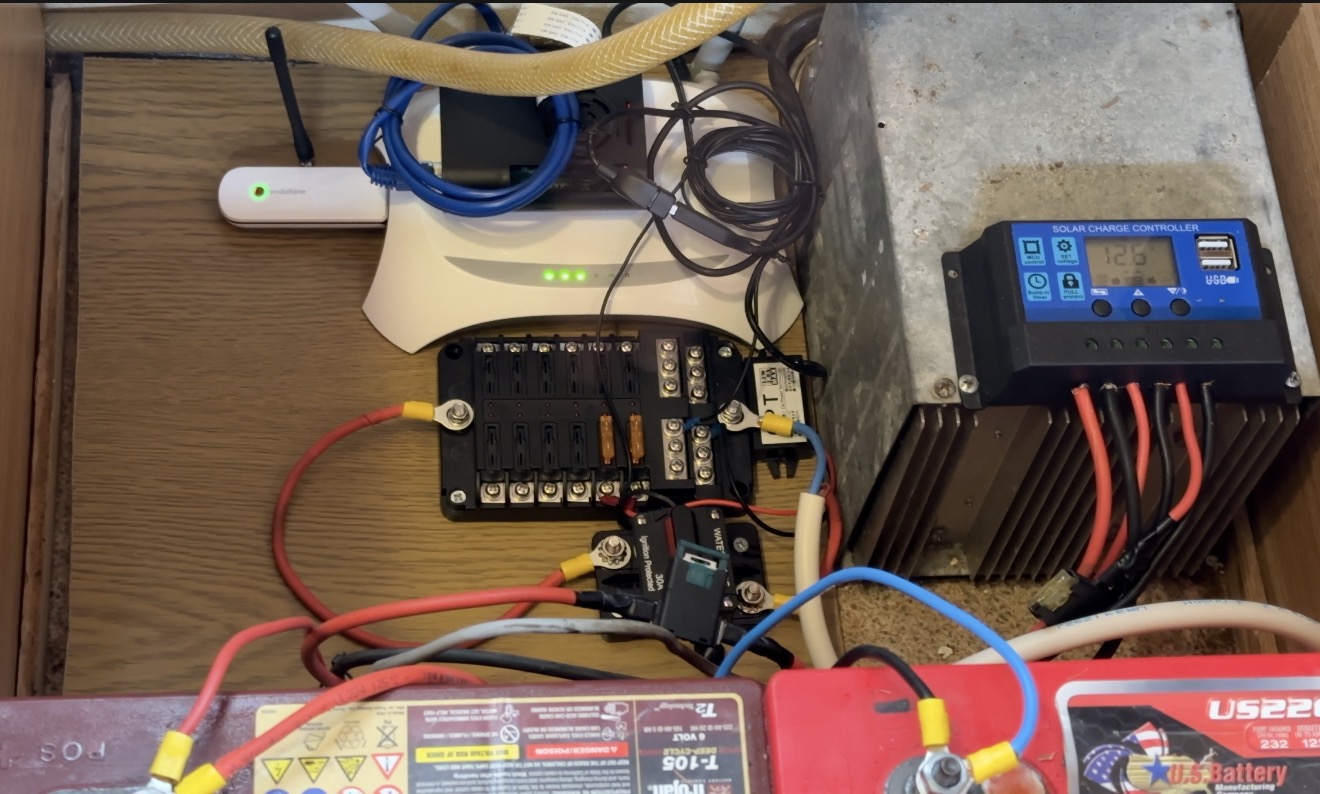
The circuit breaker connected to the batteries, the fuse box connected to the circuit breaker, the router & the Raspberry Pi (The RPI is connected to the 12v to 5v converter) which are powered from the fuse box.
And now my RV is having a Home Assistant inside and it is Smart Sensor Ready.
Smart Home Glossary
From the next part the things will finally start becoming Smarter.
Meanwhile, you can download my Smart Home glossary which is full of simple, but useful explanations of the most common Smart Home words and abbreviations.
You can download the Smart Home Glossary free of charge from my other website – https://automatelike.pro/glossary
Thanks, but I need more help!
Many thanks for all the messages & comments that I received after the part 1 of my Smart RV conversion series. This helps a lot, as I have some experience with Home Assistant, but I have very little experience with the RVs, so any help and advice from you is highly appreciated.
Here is for example something that bugs me at the moment:
First, can you recommend me a GPS device that is confirmed working good with Home Assistant?
Second, the RV bathroom needs renovation. I found a technique called Retrobrite where Hydrogen peroxide (H2O2) and an ultraviolet Sun light Is used to brighten the plastic to a degree that it looks like new.
I bought some Hydrogen peroxide, but clearly I cannot expose my RV bathroom to the Sun and now I’m looking for a suitable UV-A light. If you happen to know about such UV light or even better if you did something similar – share that in the comments.
Anyways, If you missed the first part of this Smart RV conversion go check it out right here – I bought an old RV and I will turn it into a Smart RV pt.1 | Current state & Price
I’m sharing there the current state of my Camper, its price + what are my plans, dreams & intentions.
In the next part, which will be the third one, I’m planning to add some Smart Sensors in the RV and to add these sensors in Home Assistant, so I can control them and make automations.
I also have plans for a lot more things about the RV that you are about to see soon. Subscribe for my Newsletter if you don’t want to miss them.
I’m Kiril and I’m done writing for today. Bye!