The latest security camera ANNKE C800 True 4K with Sony Sensor is here. I will connect the camera to ANNKE NVR (Network Video Recorder) which goes effortlessly, but it is interesting to see. And because the camera & NVR bundle supports RTSP I will connect them to Home Assistant where I will try to expose the Camera motion sensor and I will try to create some Home Assistant automatons.
Table of Contents
ANNKE C800
ANNKE C800 is a Power over Ethernet camera which means you can power it up with only one cable and that is the LAN cable. It is also a 8MP Camera supporting 4k resolution (3840 X 2160@15 fps) at 15 frames per second, the view angle is 102° and it has 2.8mm lens, built in mic and many other capabilities.
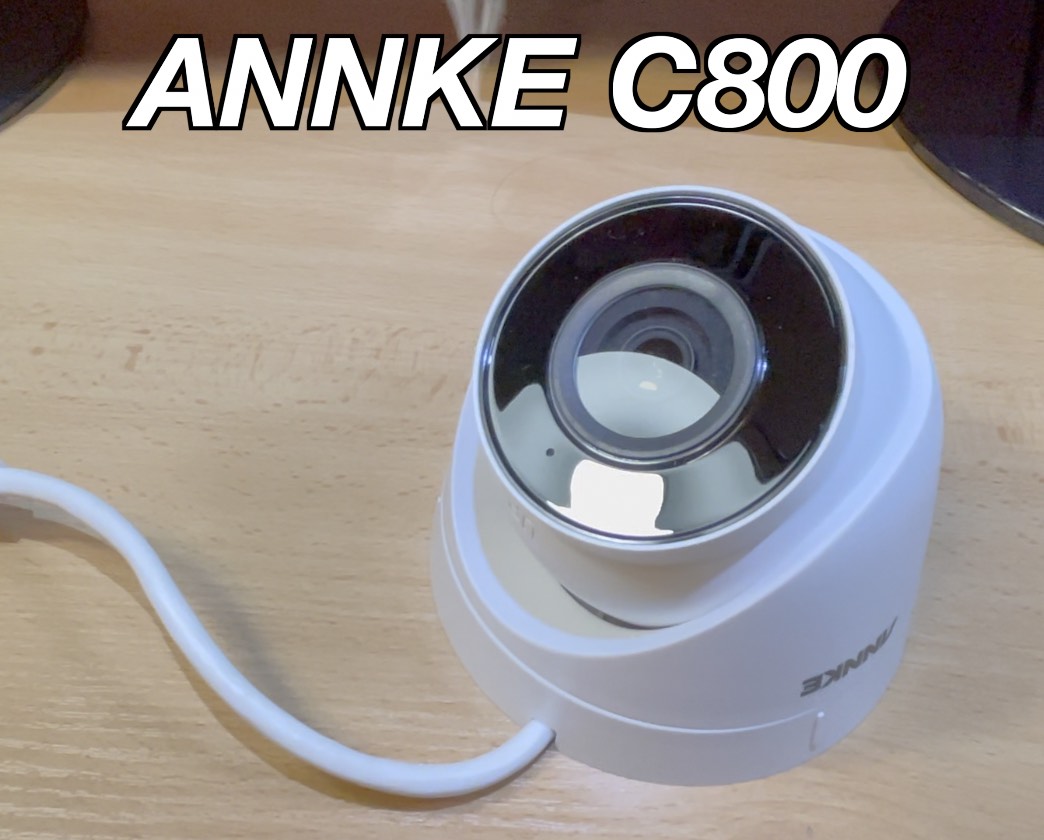
However, the most interesting feature to me is the Home Assistant Integration. This is exactly what I’m going to do later in the article by connecting the ANNKE C800 and the NVR to the Home Assistant, but first let’s quickly talk about the ANNKE NVR.
ANNKE NVR
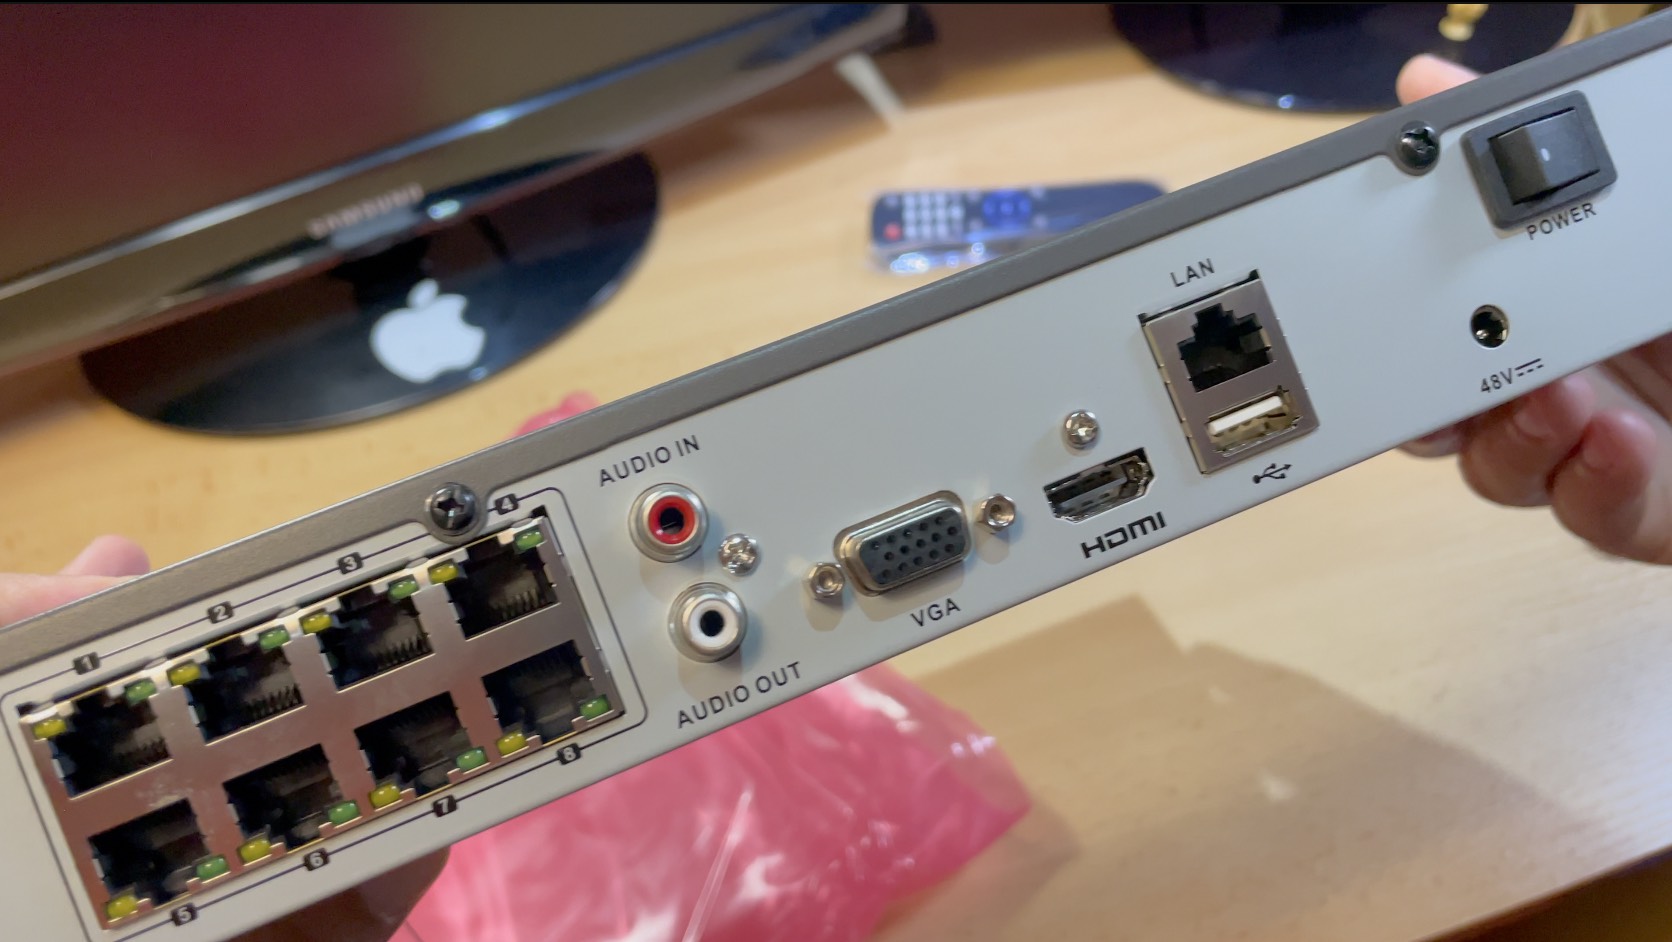
The exact model I have is ANNKE N48PAW and it can handle 4k. On the front part of the NVR we have control buttons and some LEDs as well as one USB port. On the back you will find 8 LAN ports that supports PoE (Max 25.5W for single port), HDMI, VGA, another USB port, audio in & audio out and power switch.
Beauty isn’t it? Everything clicks, but let’s see how much can cost such security system. Afterwards I will add Home Assistant to the picture absolutely for free.
TIP! The above sentence is about how the Annke C800 & Annke NVR works together after the initial setup. Which can be seen in the video!
How much ANNKE C800 and ANNKE NVR cost?
You can buy the ANNKE NVR without storage for around $140 or you can add from 1 to 4TB of storage staring from $194.99.
The ANNKE C800 come in 3 different form factors, bullet, turret or dome. Where the the bullet & turret cost $99.99 and dome cost $30 more, not sure why is that exactly, but if you happen to know the reason leave a comment below as I would love to understand.
By using a calculator we can see that a regular security system of one 1 NVR with 1TB storage plus 4x 4K Annke C800 cameras will cost you $594.99 dollars or $10 less if you buy the 4 cameras together. You will also receive 24 months warranty for free.
If you are interested to buy such gear you can use the affiliate links below. That way you will support my work with no additional cost for you.
NEED YOUR INPUT HERE! I can’t decide about the prices! Are they high or low I’m not quite sure. Please share your thoughts in the comments as I want to interact with you. I want to see that there are some real people here as I’m also real, not a robot, a robot can’t give you five like that ✋
So I will be waiting in the comments section and I’try to answer every comment as best as I can.
ANNKE RTSP & ONVIF support
The Annke C800 Camera supports RTSP and ONVIF. These strange at first acronyms means that your hands are completely united. You can use the ANNKE C800 camera with any third-party software & apps that support RTSP or ONVIF (like Blue Iris, motionEye, Shinobi, Home Assistant, etc.)
The ANNKE NVR also support ONVIF and you can add cameras complying with that standard. To expose the cameras outside of the ANNKE NVR you can use the RTSP protocol. Here is how to do that.
Expose ANNKE cameras from NVR using RTSP
Open the ANNKE NVR interface and go to:
Configuration > Security > Default IP Camera Password Management & enter a Default IP Camera Password of your choice.
Then check Sync. IPC Password and Save the changes.
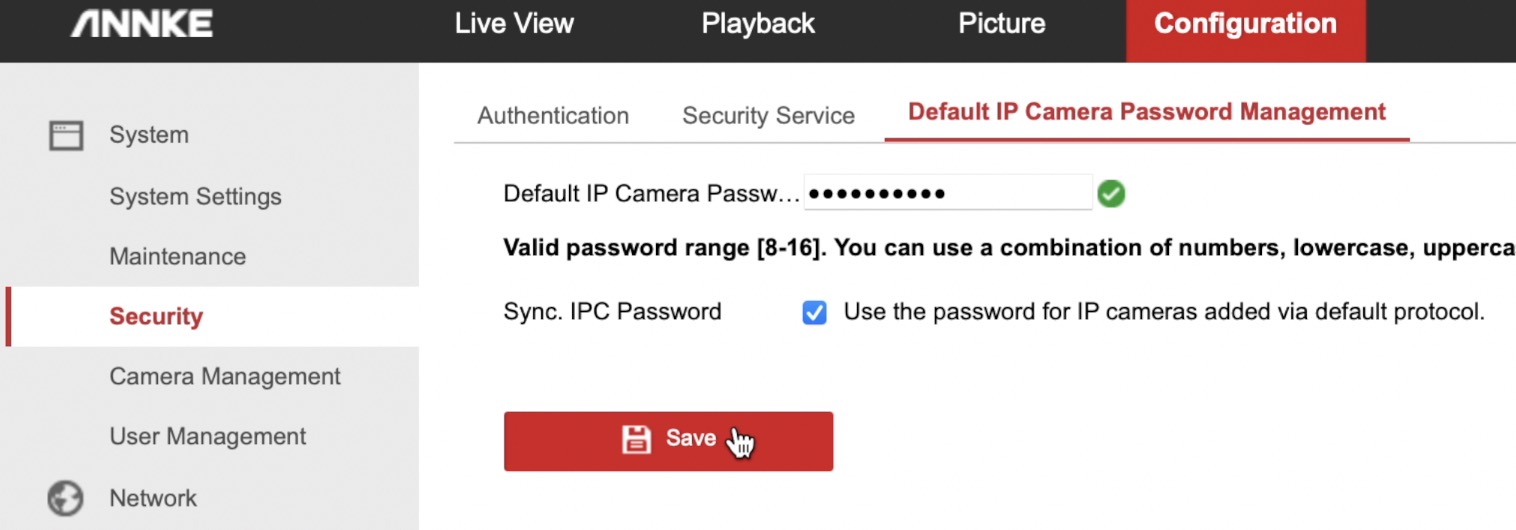
That is needed to set a password to access the camera later using a RTSP link.
Test the RTSP link in VLC
It is a good idea to test if your RTSP link is working before proceeding further. Here is how.
Download the VLC player and open it.
Go to File > Open Network. In the dialog paste the following RTSP link:
rtsp://admin:[email protected]:554/Streaming/Channels/402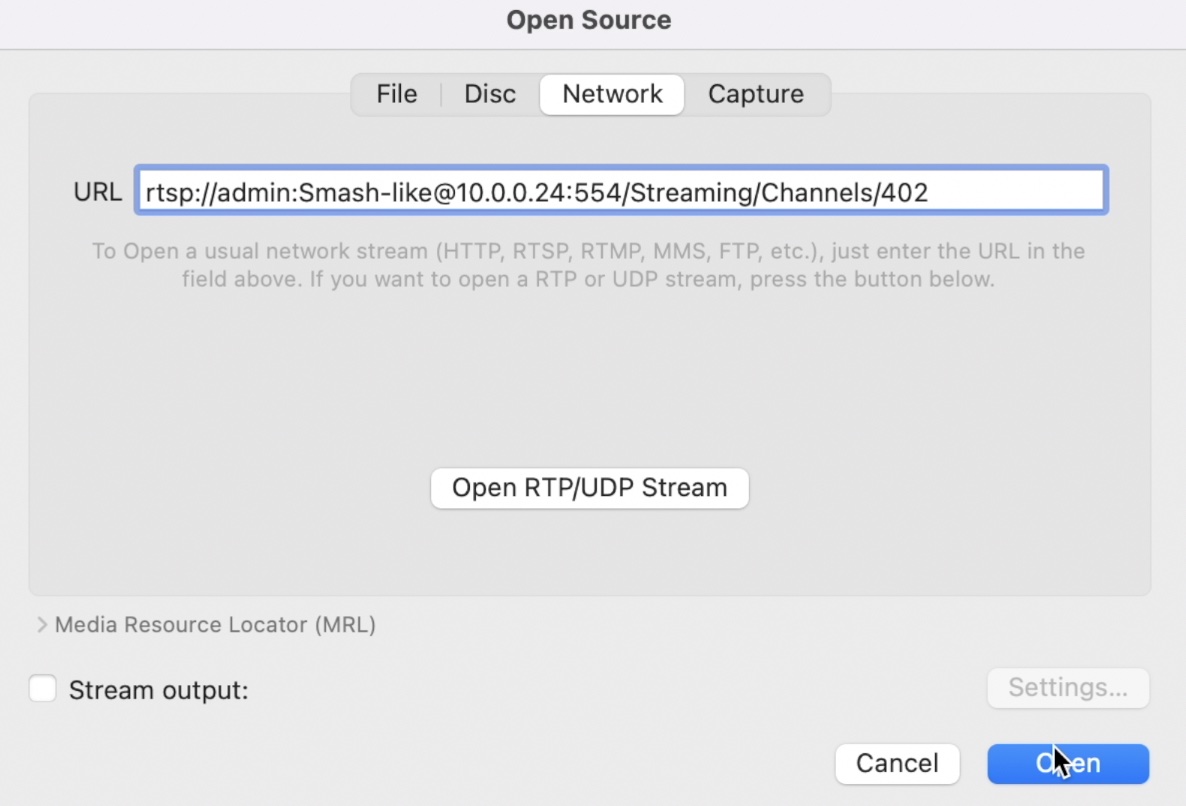
Before you click on the Open button change the Smash-like with your password (the one that you set in the previous section). Change the 10.0.0.24 with the IP of your NVR. And 402 with a number that suit your setup. Where 4 is the port where camera is connected and 02 is the sub stream (sub stream is the optimised camera stream).
If your camera is connected to the first port of your NVR you should change 402 with 102. Okay?
TIP!: If you use 01 instead of 02 (ex. 401) you will open the main stream which is the full quality stream of the camera!
Now let’s start the fun and free part by integrating the ANNKE C800 and ANNKE NVR with Home Assistant.
Add ANNKE camera to Home Assistant with RTSP link
After we have the RTSP enabled and tested we can add the camera to the Home Assistant using the RTSP link. Open the configuration.yaml file in your favourite editor or plug-in (like File Editor) and paste the following lines inside:
camera:
  - platform: ffmpeg
    name: ANNKE_C800_sub
    input: -rtsp_transport tcp -i rtsp://admin:[email protected]:554/Streaming/Channels/402  #sub stream
  - platform: ffmpeg
    name: ANNKE_C800_main
    input: -rtsp_transport tcp -i rtsp://admin:[email protected]:554/Streaming/Channels/401  #main stream
Don’t forget to adapt your RTSP link as instructed in the section above. Then save the changes and restart your Home Assistant.
After Home Assistant has started you can add the camera image to your HA Dashboard by following steps in GIF below (which is a extract from my video).
Preparation for ANNKE/Hikvision Home Assistant integration
Okay we have the camera image, but that is not enough to make useful automations – we need the camera motion sensor as well. To add the motion sensor I will use the Hikvision Home Assistant integration.
Now, you may wonder why Hikvision when we are talking about ANNKE all of the time? I have to say that I’m not quite sure about the ANNKE and Hikvision relationship, some are saying that the only differences between them are the logos and the names and others are saying that these are two totally different companies.
I will just say that I will try to make Hikvision & ANNKE to work together, let’s see what will happen. BTW If you know the truth about ANNKE & HIKVISION share it with us in the comments.
Enough sweet talks lets get back to work:
Open your ANNKE interface and enable motion detection for your camera(s) that you want to add in Home Assistant. You also need to activate continuous 24/7 arming schedule and Linkage Action to Notify Surveillance System. The GIF below will show you where exactly are these things in the menus.
One more thing is needed – to enable the digest/basic WEB Authentication in Configuration > System > Security menu. Again you can see the exact instruction in the GIF below or in my video.
ANNKE Home Assistant integration
We are ready with the configs in the ANNKE NVR now we have to add some YAML in Home Assistant.
IMPORTANT! This integration is tested and confirmed working on the following ANNKE NVRs:
- N46PCK (Annke H800 4K NVR)
- N48PAW (Annke 4K NVR)
If your NVR is different model – please, test it and share the result. I promise to add it to list above! Thanks in advance 🙏
Open the configuration.yaml file and paste the following lines inside:
binary_sensor:
  - platform: hikvision
    host: 10.0.0.24 # change this with your NVR IP
    username: admin      # change this if your user is different
    password: Smash-like # use your NVR pass here
Save the changes and reboot your Home Assistant. After Home Assistant boot up again you can test if there is a new binary motion sensor coming from the Hikvision platform. It should end with a digit representing the NVR port number to which the camera of interest is connected.
You can test the binary motion sensor before proceed with the automation in the next section, but I’m too lazy right now to describe the full details here 🤪
Just watch my video from time 15:08 till the end. Actually, you better watch the entire video 😉
Creating ANNKE Motion Sensor Automation in Home Assistant
With the integrated ANNKE camera and the working motion sensor it is a breeze to make automations in Home Assistant. Let’s create one.
Open your configuration.yaml file and paste the following code inside:
homeassistant:
  allowlist_external_dirs:
    - "/tmp"
Save the changes and reboot the Home Assistant. This is to allow writing in the /tmp folder of the device where Home Assistant is installed. The automation that follows will write in that tmp folder the temp camera images (snapshots) and then it will send these snapshots to a mobile device using Telegram messenger.
Next, either use the Home Assistant graphical interface as I’m showing in the video or open the automations.yaml file in a text editor and paste the following YAML code:
alias: When ANNKE C800 sensor is activate
description: ''
trigger:
  - platform: state
    entity_id: binary_sensor.network_video_recorder_motion_4 #change this with your sensor
    to: 'on'
condition: []
action:
  - service: light.turn_on
    target:
      entity_id: light.first_led_hardware_instance
  - service: camera.snapshot
    data:
      filename: /tmp/annke_c800.jpg
    target:
      entity_id: camera.annke_c800_sub
  - service: notify.telegram # this Telegram service should be enabled first before use.
    data:
      message: motion is detected by ANNKE C800
      data:
        photo:
          - file: /tmp/annke_c800.jpg
mode: single
Save the changes and reload the automations from the Server Cotntrol menu in Home Assistant. If everything works correctly, from Now every time when movement is detected by the Annke C800 camera, a new Telegram message will be sent to you containing the camera snapshot. Isn’t that great?
Some Camera & NVR cons
Everything until now everything was only pros (especially the Home Assistant integration), but let’s talk about some cons as it is impossible for any product not to have such.
- The first thing is the 15fps of the ANNKE C800 camera which is kind of average. The human eye can handle 24 frames per second and watching a video with lower rates results in choppy images when there are fast moving objects. For example cars, bicycles, and so on. I understand that this is not a high end vlogger camera, but a security camera, nevertheless I think this is important.
- I also wish this camera to have local Person & Vehicle detection so you can be able to reduce false alarms to minimum. However there is a nice fix. You can use the Frigate or DOODS software along with Home Assistant and my tutorials to achieve this. Other than that everything else seems fine with the camera and we are moving to the NVR.
- I would just say that NVR with integrated storage would be superb. I can’t imagine any member of my family to manage to install the hard drive inside the NVR. It’s not so hard, but they are just not such kind of people. Love you guys! ❤️ So plug and play option of the NVR with integrated storage will be very nice option for many non technical people. Other than that I have no complains so far.
Outro
Make sure that you subscribe to my channel and hit that notification bell. It is quick, easy and free and I will be thankful forever.
Follow me on Twitter and join my Discord server, stay safe and don’t forget – Home Smart, but not Hard!
Thank you for reading and I will see you next Wednesday.