We are going to use Home Assistant and DOODS to detect objects in camera images locally. That means no Cloud services or internet connection is required for the image recognition part it’s just Home Assistant, DOODS and your camera.
Table of Contents
What is DOODS?
DOODS stands for Dedicated Open Object Detection Service. DOODS is a service that detects objects in images Home Assistant stands as the best open source smart home hub out there. You can prove me wrong in the comments below. And camera stands for… I’m kidding.
What will you see in the Article?
The idea of Home Assistant local image recognition from the cameras added in Home Assistant and creating automations based on the result excites me a lot. If you can relate then stick with me till the end of this Home Assistant DOODS How-to and you won’t regret it.
How to run DOODS?
The DOODS software needs to be running before you can add it to Home Assistant.
There are two options to run the DOODS software:
And because I know that you will smash that subscribe button for my weekly newsletter I will show both options so you can choose the one that suits you best.
Run DOODS in Docker
To run DOODS in a Docker container is just a matter of few steps:
- Download and Install Docker client for your Operating System – link
- Running this command in a Terminal/command prompt:
docker run -it -p 8080:8080 snowzach/doods:latestRun DOODS as Home Assistant Add-on
The other option is to run DOODS as Home Assistant add-on, which I’m going to demonstrate you right now in details:
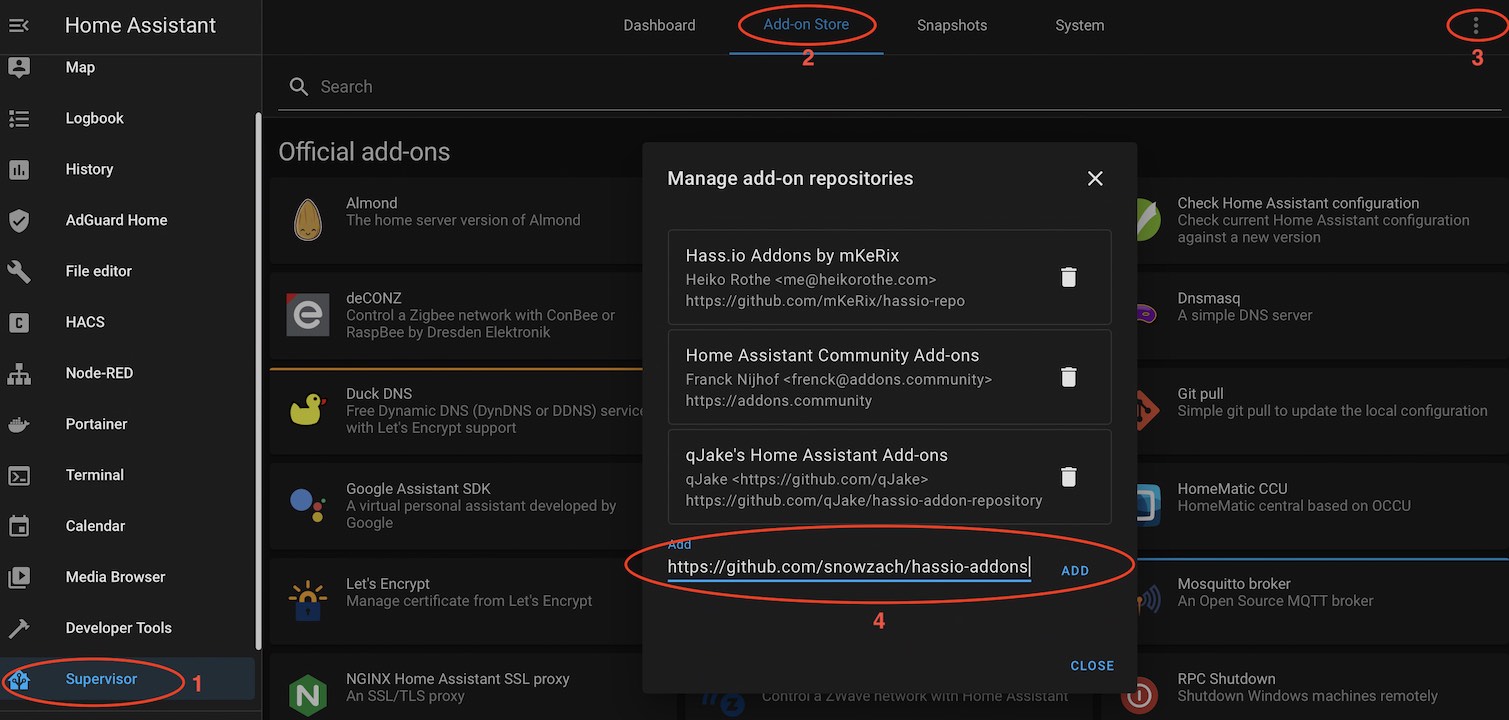
Go to Home Assistant > Supervisor > Add-on Store
or click on this link:

Click on the three dots menu (upper right) > Repositories
Paste:
https://github.com/snowzach/hassio-addons And click ADD to add the snowzach/DOODS repo:
After that search for “doods” and install one of the following:
- DOODS-amd64 – if your host machine is having AMD64 with SSE4.2 instructions
- DOODS-cuda – if your host machine is having x86_64 CUDA.
- DOODS – in any other case (I’m using Raspberry Pi 4 and I have installed this)
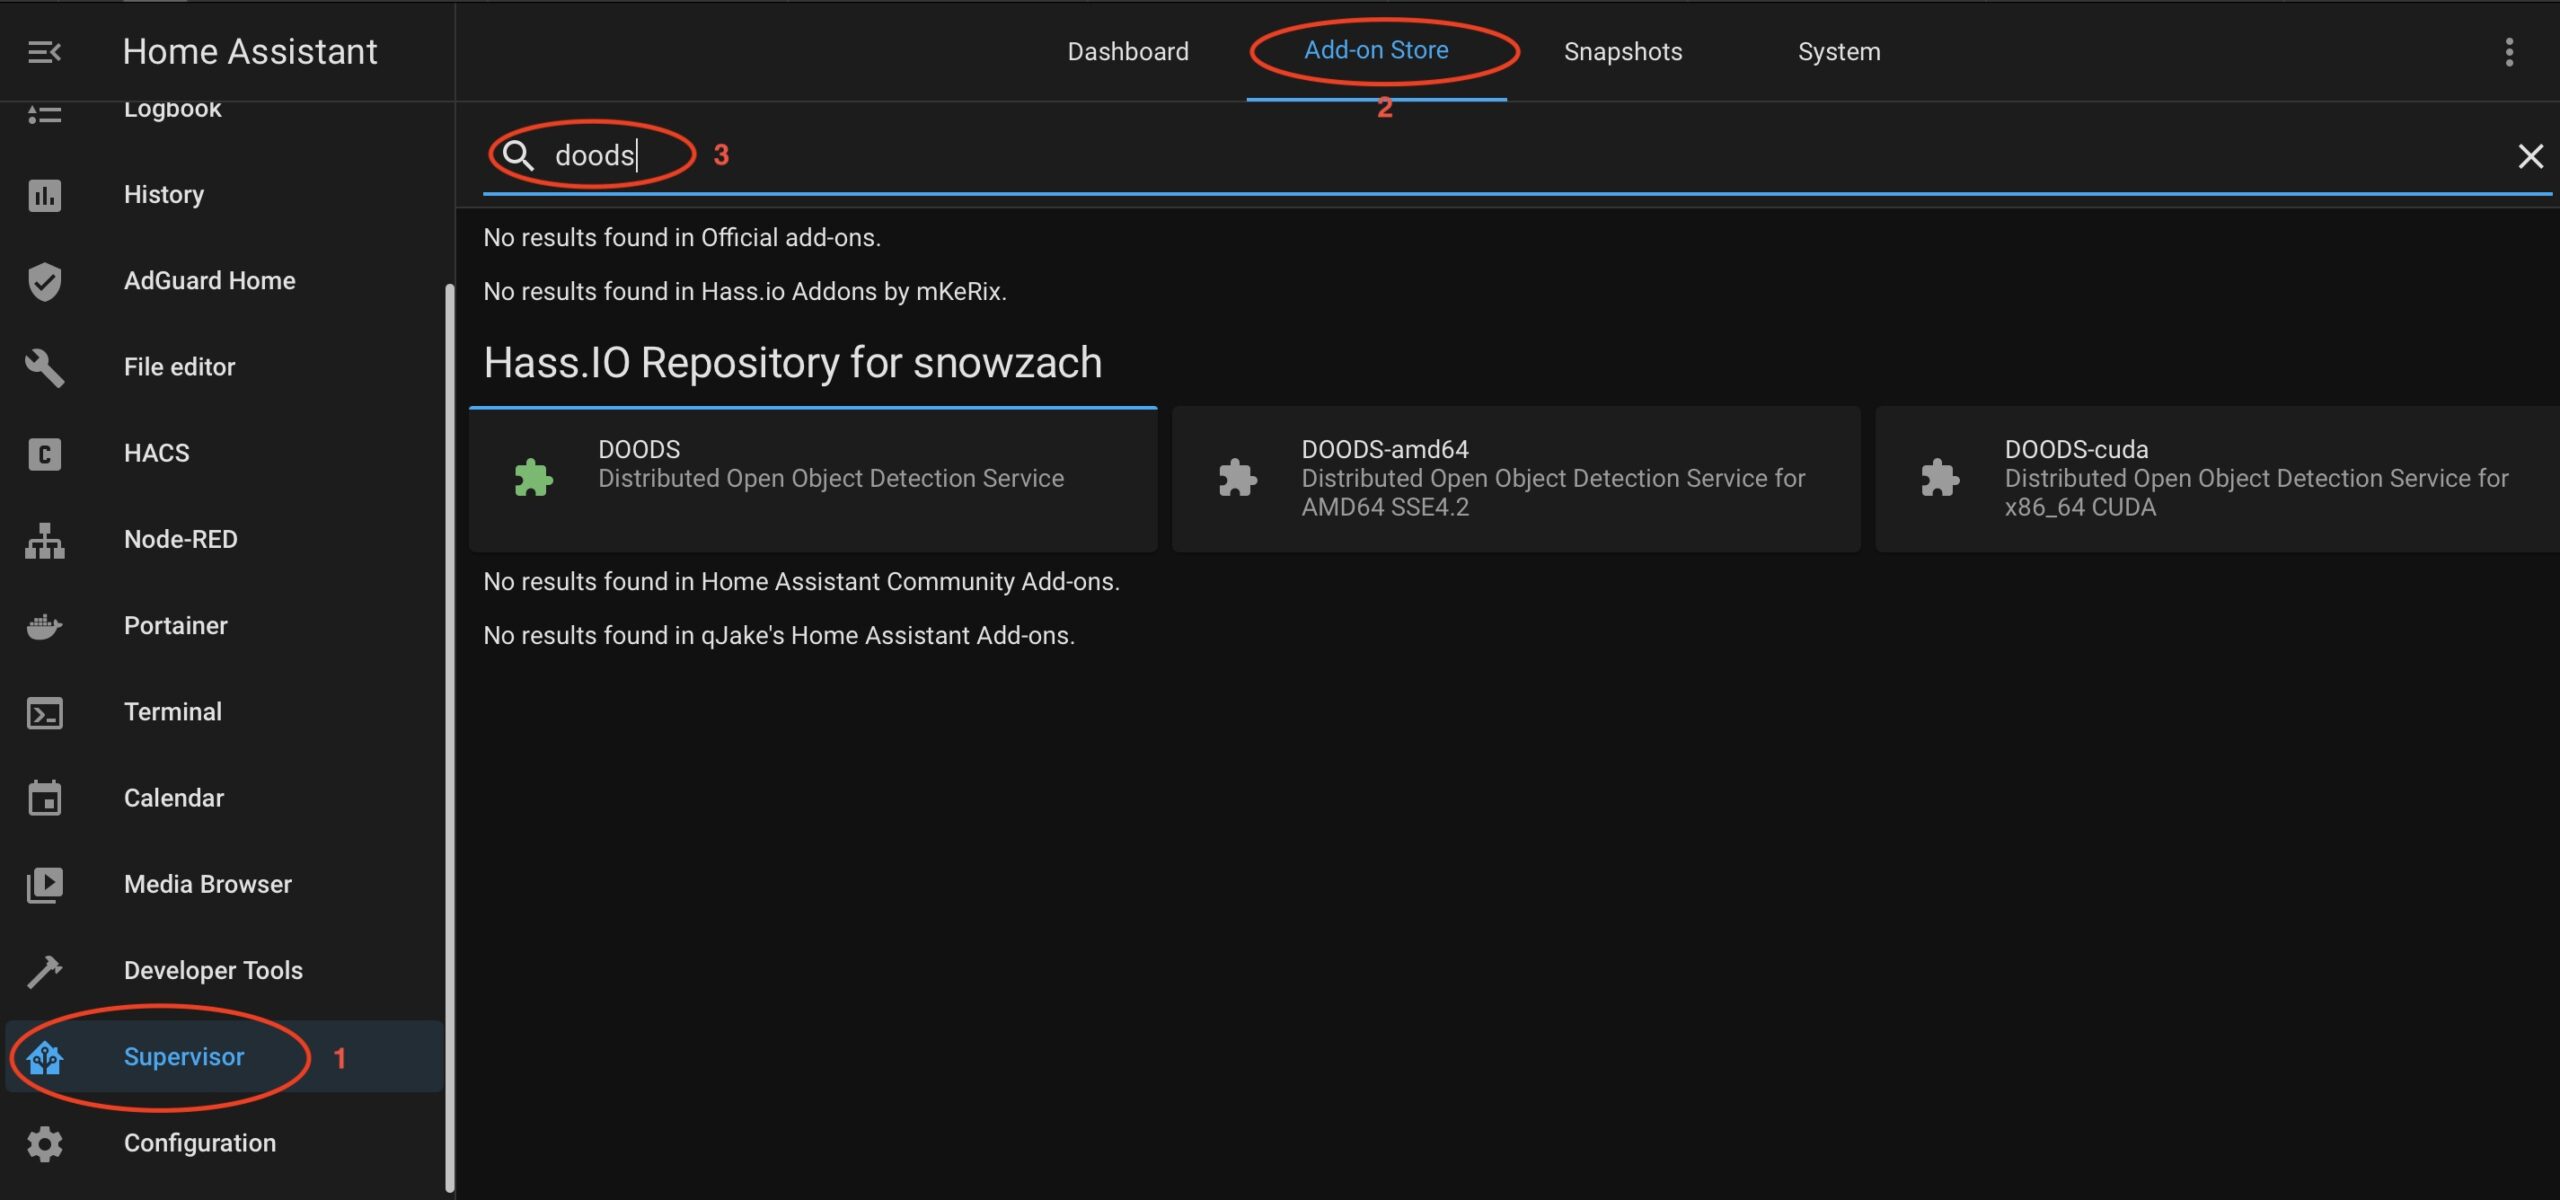
Click on your DOODS version of your choice and then click on Install button and then on Start button of this add-on.
Camera in Home Assistant?
The end goal from the steps above is to have DOODS service up & running and ready to scan images (listening on port 8080 by default).
Except DOODS service you will also need at least one camera added in Home Assistant.
This is how I configured my RTSP enabled Sonoff Camera in my Home Assistant.
camera:
  - platform: ffmpeg
    name: Sonoff Cam
    input: -rtsp_transport tcp -i rtsp://USER:[email protected]:554/av_stream/ch0
You can use the same approach for most of the RTSP cameras. You just need your user & password and your RTSP link.
If you need more information about adding cameras in Home Assistant check these tutorials of mine where I’m adding RTSP & ONVIF camera in details:
- Home Assistant ANNKE integration – ONVIF & RTSP – LINK
- Reolink cameras & NVR vs Blue Iris and Home Assistant – LINK
- RTSP Reolink Camera + motionEye + Blue Iris + Node-RED + Home Assistant – LINK
- MotionEye COMPLETE TUTORIAL: Installation, Configuration & Home Assistant Web Hooks – LINK
From the above article you can get a lot of hints how to add your camera in Home Assistant.
Add DOODS in Home Assistant
Now we have everything needed to start the Home Assistant Local Image Recognition from our camera(s). This is what you need to add in Home Assistant configuration (configuration.yaml):
# Example configuration.yaml entry
image_processing:
  - platform: doods
    scan_interval: 10800
    url: "http://YOUR_IP_WHERE_DOODS_IS_INSTALLED:8080"
    detector: default
    source:
      - entity_id: camera.YOUR_CAMERA_ENTITY
    file_out:
      - "/media/{{ camera_entity.split('.')[1] }}_latest.jpg"
      - "/media/{{ camera_entity.split('.')[1] }}_{{ now().strftime('%Y%m%d_%H%M%S') }}.jpg"
    confidence: 50
    labels:
      - name: person
        confidence: 40
      - car
      - truck
The things that you need to change are the url: “http://YOUR_IP_WHERE_DOODS_IS_INSTALLED:8080” with the address & ports where DOODS is installed. Also change camera.YOUR_CAMERA_ENTITY with your camera entity.
Then save your configuration.yaml file and restart your Home Assistant.
Test if DOODS in Home Assistant is working
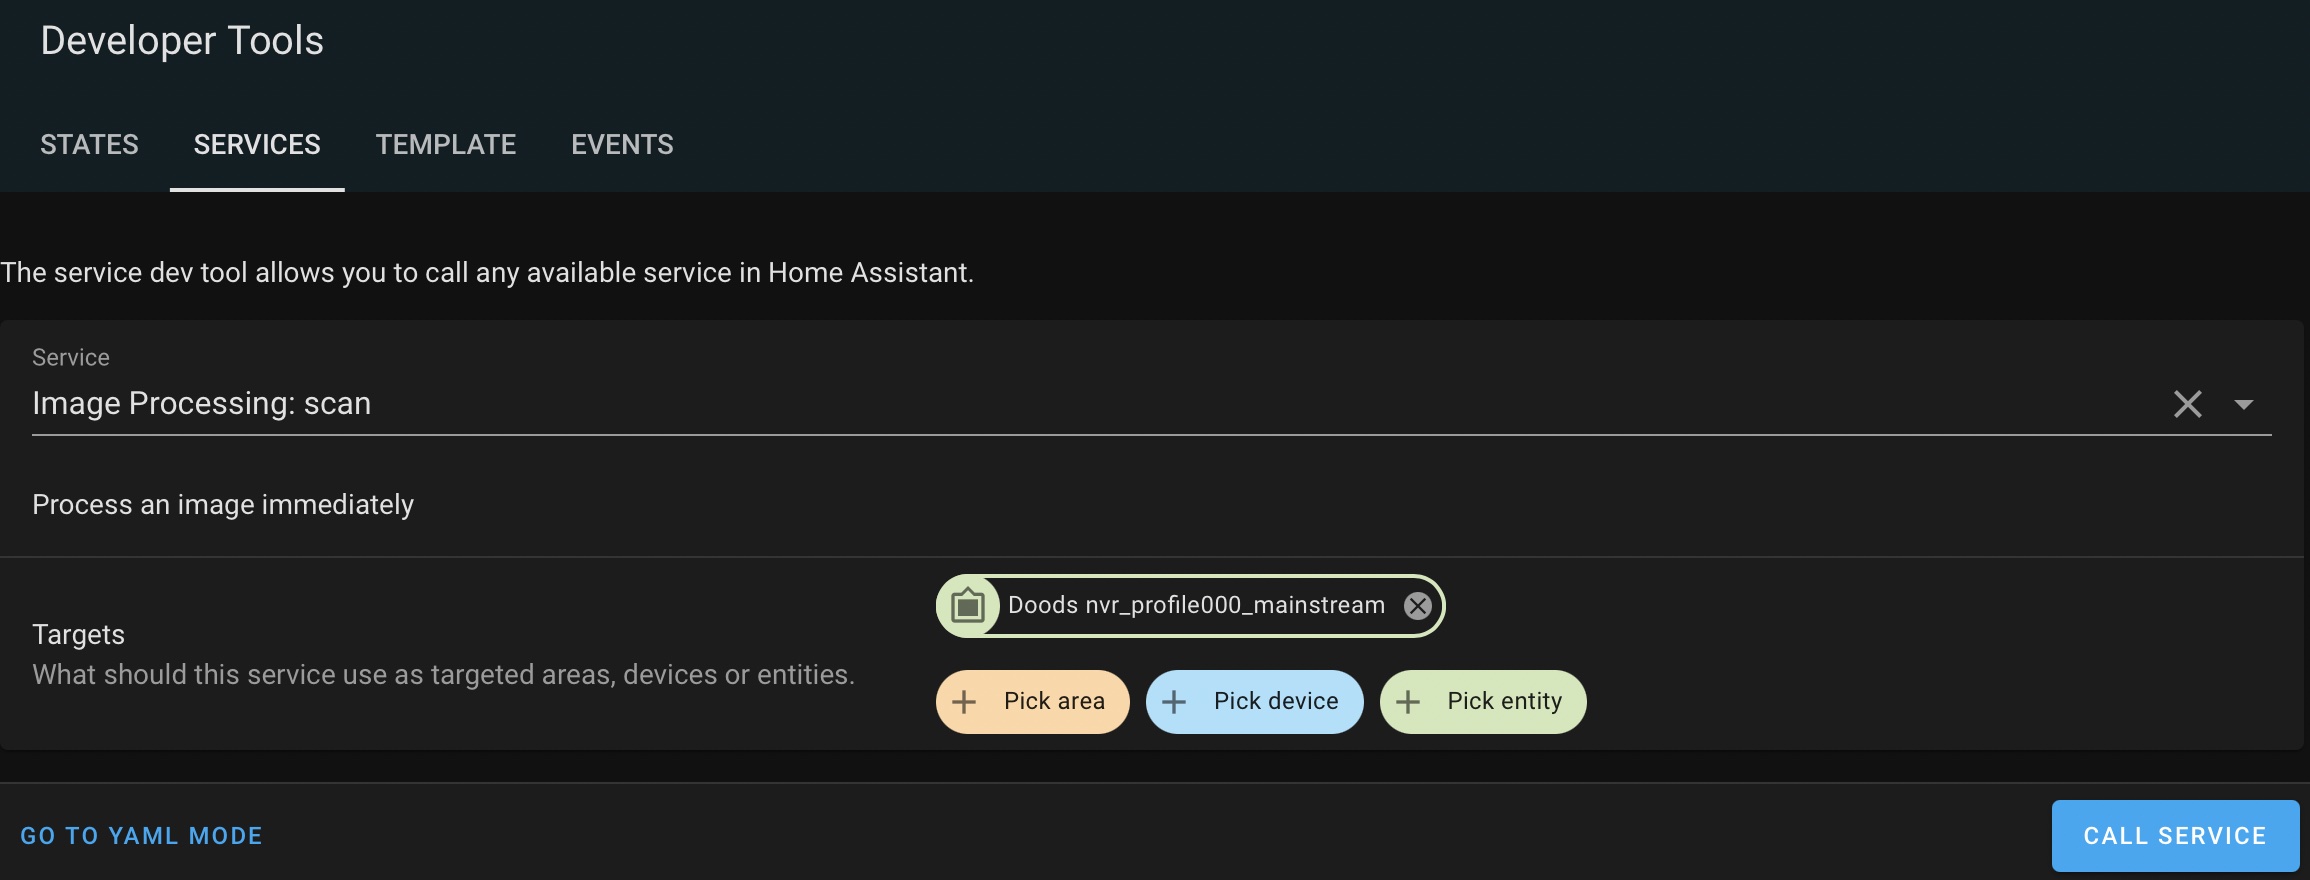
After the Home Assistant is restarted you can test if everything is working as expected by open the Developer Tools > Services.
or click the link below:

Then select Image Processing: scan as Service, Pick entity and search for your newly created Doods entity. If you don’t see any Doods… entity then probably there is a problem with your DOODS config and I recommend to go back and re-check everything until now again.
To see the result you should go to the States and search for your Doods entity.
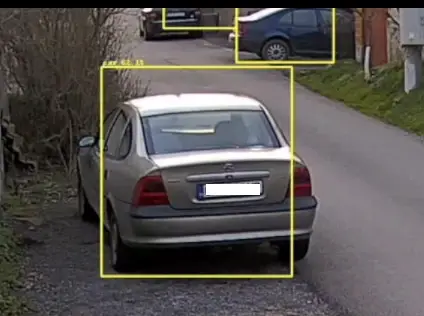
In my case the DOODS software detected 2 cars from the camera image with confidence score above 50%.
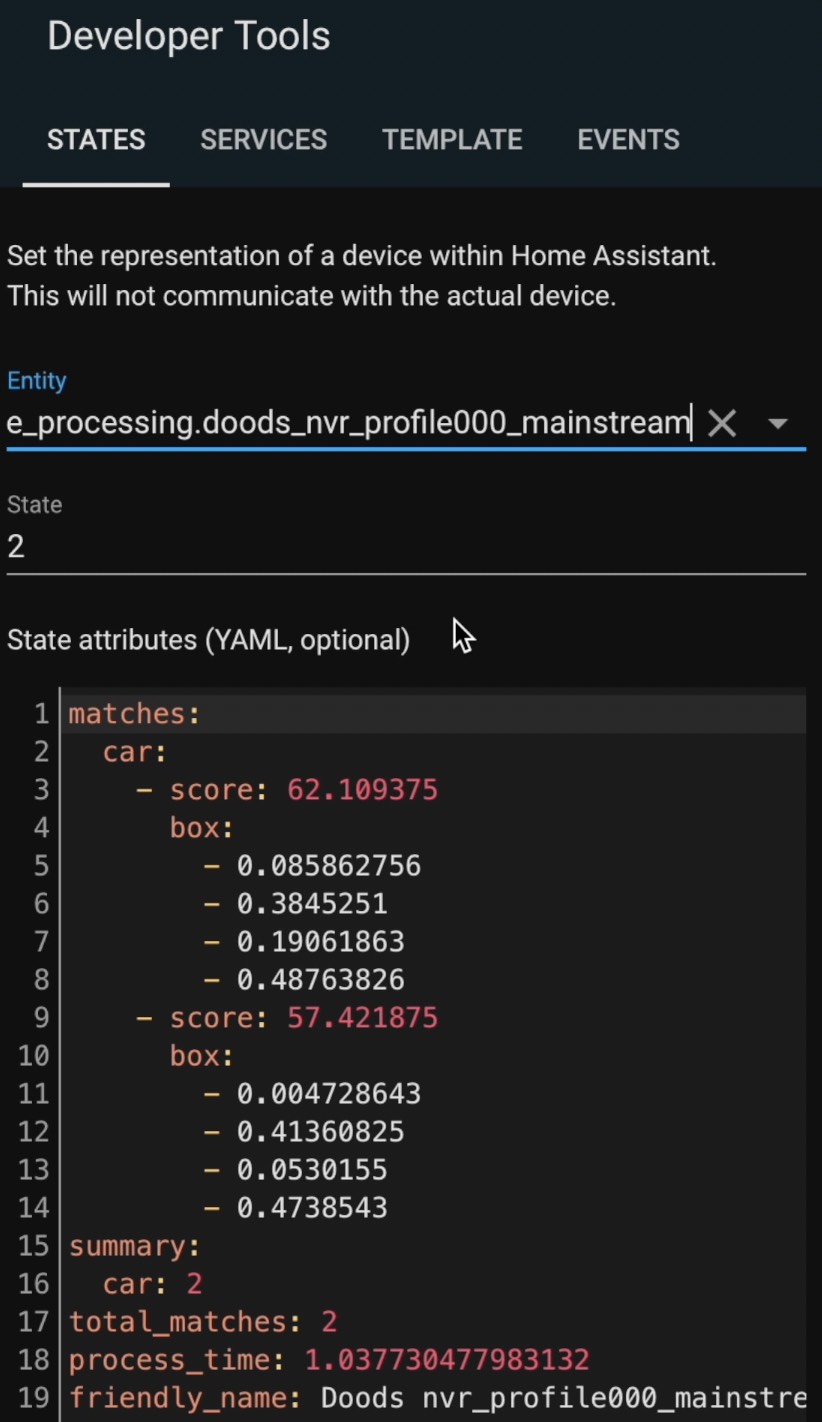
Which is very nice proof of concept that everything so far is working.
Home Assistant DOODS automations
We can make a Home Assistant and DOODS automation that will be triggered when a motion sensor is activated and if there is a person, car or truck detected in the camera image. The automation will send a still image to telegram messenger. Absolute beauty. I always wanted this in my home and now is the time to finally implement it.
Let’s go:
Open the automations.yaml file in your favourite text editor or add-on like File editor and paste the following automations:
- id: f53090b5497946ccb0faac9295458cad
  alias: Motion is detected - driveway
  trigger:
  - platform: state
    entity_id: sensor.isshellymotiondetected
    to: 'True'
  condition: []
  action:
  - service: image_processing.scan
    entity_id: image_processing.YOUR_DOODS_ENTITY
  mode: single
- id: d00ds
  alias: Dudes who likes DOODS
  trigger:
  - entity_id: image_processing.YOUR_DOODS_ENTITY
    platform: state
  condition:
  - condition: or
    conditions:
    - condition: template
      value_template: '{{ ''car'' in state_attr(''image_processing.YOUR_DOODS_ENTITY'',
        ''summary'') }}'
    - condition: template
      value_template: '{{ ''truck'' in state_attr(''image_processing.YOUR_DOODS_ENTITY'',
        ''summary'') }}'
    - condition: template
      value_template: '{{ ''person'' in state_attr(''image_processing.YOUR_DOODS_ENTITY'',
        ''summary'') }}'
  action:
  - data:
      data:
        photo:
        - caption: Motion is Detected
          file: /media/YOUR_CAMERA_ENTITY_latest.jpg
      message: Motion is Detected
    service: notify.telegram
Currently the first automation will trigger image scan when motion sensor is activated and the second automation will be triggered by the first one. If there is a car, truck or person detected on the camera image a Telegram message will be sent wi the text “Motion is Detected” and the camera still image attached.
Example result from Home Assistant Local Image Recognition with DOODS
Don’t forget to adapt the automations for your needs or at least change the entities with capital letters with yours. Save the file and reload your automations.
Final words
Many thanks to my digital friend Alex who bring DOODS to my attention. You can meet us both in my Discord server where we talk a lot about Smart Home stuff. This Is the Discord invite – LINK
Thank you for watching and I will see you in my next video.
can also compare image
if the car comes out the door
compare the image and open the door
Not sure about that. Maybe you have to create a custom model and train it to your need. You have to read how to do it in the TenserFlow documentation.
Nice post, Kiril, thanks!
Do you know if it is possible to customize DOODS to recognize numbers in a display? I’m planning to have a camera pointing to an old alarm display and trigger automations based on that. Could you kindly suggest a link showing how to customize DOODS image database? (to recognize other things than cars, trucks, people…)
I’m not so sure about that, you better ask in the DOODS GitHub repo.
The Add-on repository still works? It doesn´t adds neither in a RPi64 nor RPi32
Hi,
Nice tutorial thanks !
A question, what is the sensor isshellymotiondetected ?
I don’t have a sensor associated with my doods I don’t know why
bbe</a
I’ve been looking into setting up local image recognition to keep everything off the cloud. For a setup running on a standard Raspberry Pi 4, what kind of processing latency are you seeing with DOODS when a motion trigger goes off?