Wireless Reolink camera, RTSP, motionEye, Blue iris, Node-RED and Home Assistant.
Or in other words in todays article I will play with a Reolink wireless camera and I will add it to one of the most popular Software NVRs, namely: MotionEye and Blue Iris.
After that I will show you how to integrate the camera with Node-RED and Home Assistant all of that using the RTSP protocol.
Table of Contents
What you will see in this article?
I always wanted to install good cameras in my Home and to continuously record everything using a software NVR. I also wanted to have the possibility to include the cameras in my Smart Home hubs, namely: Home Assistant and Node-RED in order to make some useful automations.
And thanks to the guys from Reolink who sent me their wireless RLC-410w camera I can now test and see if I can do all that I wanted.
So you can expect to see in this article a quick unboxing and setup and then step by step tutorials for Reolink RLC-410W camera integration with MotionEye, BlueIris, Node-RED and Home Assistant.
Benefit for you!
The benefit for you will be that you can get and easily adapt the configs that I’m about to show you and directly use them for your cameras. That includes any recent Reolink or other RTSP enabled cameras.
Let’s go
Buying Reolink RLC-410W camera
If you are interested in buying the Reolink RLC-410W that I used in this video/article please consider using the affiliate links down below.
I will receive a small commission with no additional cost for you.
Amazon – https://amzn.to/2YfcVSQ
Shareasale – http://shrsl.com/2bqm1
My ALL IN 1 page – https://www.amazon.com/shop/kpeyanski
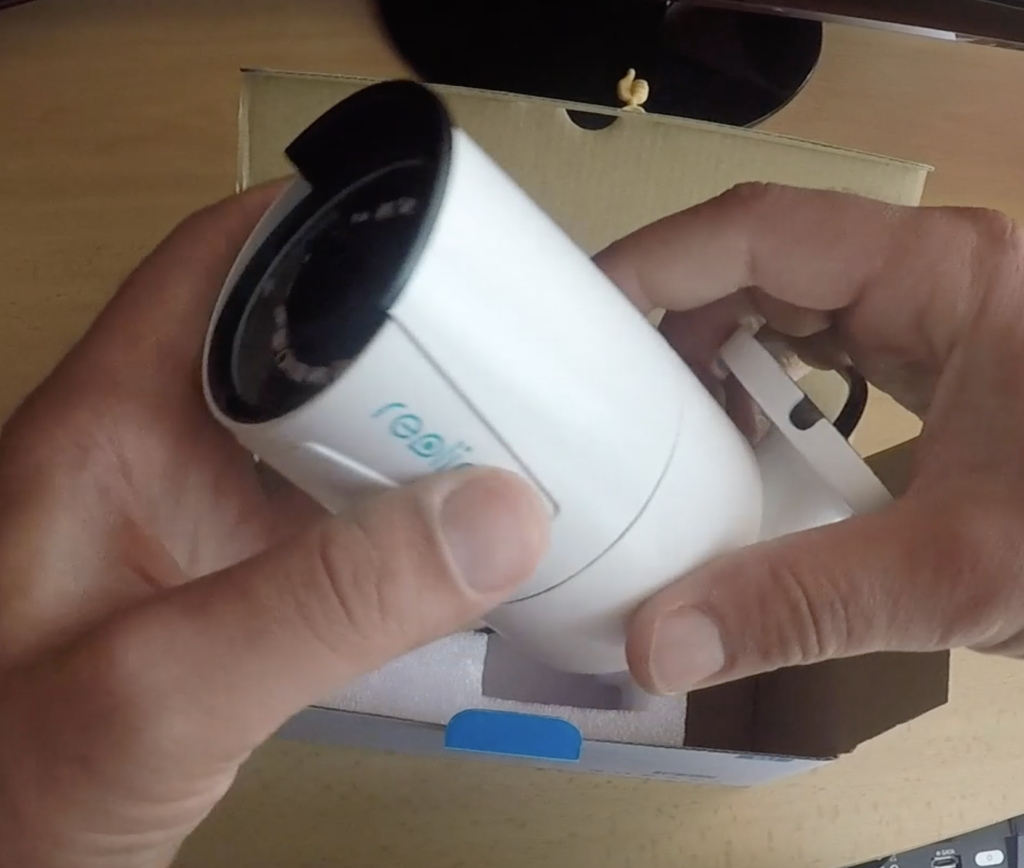
Unboxing & Specifications
These are the camera specs:
| Image Sensor 1/2.7″ CMOS Sensor | Effective Pixels 2560×1440 (4.0 Megapixels) |
| Lens f=4.0mm F=2.0 | Angle of View Horizontal: 80°, Vertical: 42° |
| Day/Night Mode Auto Switchover | Min. Illumination 0 Lux (With IR Illuminator) |
| IR Distance 30 Meters (LED: 18pcs/14mil/850nm) | Backlight Compensation Supported |
| Noise Reduction 3D DNR | Storage Micro SD socket, support motion detect record |
| Video Compression H.264 | Resolution Main Stream: 2560×1440, 2048×1536, 2304×1296; Sub Stream: 640×480 |
| Bitrate Main Stream: 1024Kbps ~ 8192Kbps, Sub Stream: 64Kbps ~ 512Kbps | Maximal Frame Rate 25fps |
| Audio Interface Built-in Microphone | Network Protocol HTTPS, SSL, TCP/IP, UDP, UPNP, RTSP, SMTP, NTP, DHCP, DNS, DDNS, FTP, P2P |
| Network Interface One 10M/100Mbps RJ45 | Wireless Standard IEEE 802.11a/b/g/n |
| Max. User Access 20 Users (1 admin account & 19 user accounts); Support up to 12 simultaneous video streams (10 substreams & 2 mainstreams) | Power Consumption <8W |
| Working Environment -10℃~+55℃(14°F~131°F), 10%~90% | Ingress Protection IP66 |
| Dimensions Φ67 x 186mm | Weight 425g |
The Reolink guys have put a LAN cable inside the box of a wireless camera. And you’ll eventually need the cable only once during the initial setup after that you can throw it away.
Also they put not 1, but 5 stickers like you bought 5 cameras. That is what I’m talking about in my UniFi Dream Machine article.
When I see something like this that means to me a lot, there is attention to the details and small things like this immediately makes me trust the brand more. Good job Reolink I really like that now let’s continue.
Question for You!
What is the most important feature for you when you are choosing a security camera?
Is it the megapixels, the night vision, wireless connectivity, the Brand or the price or maybe something else?
Let me know in the comments below.
Camera setup instructions
We saw what’s in the box.
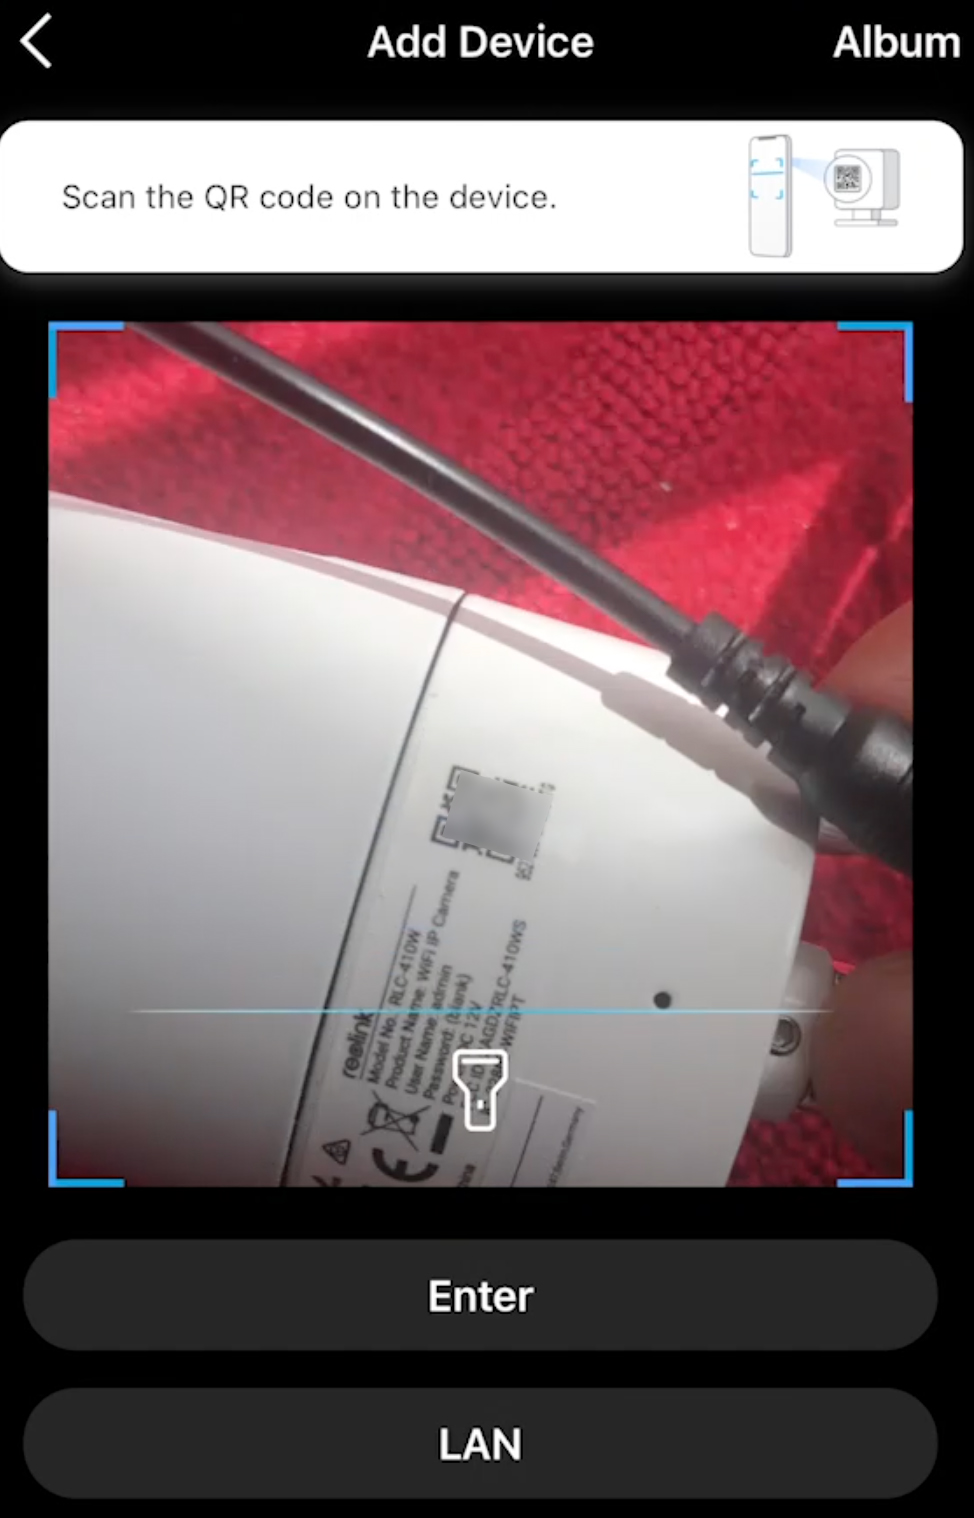
To setup the camera just connect it to your router with the LAN cable, download the Reolink app from your phone store and scan the Barcode on your camera from within the reolink app.
Initial setup is as easy as walk in the park.
Reolink App User management
One of the most important part besides smashing the Subscribe button for the YouTube algorithm is to get the username and password for the camera, so we can use it for the RTSP link.
I will show you where to find these credentials If you like forget your camera password.
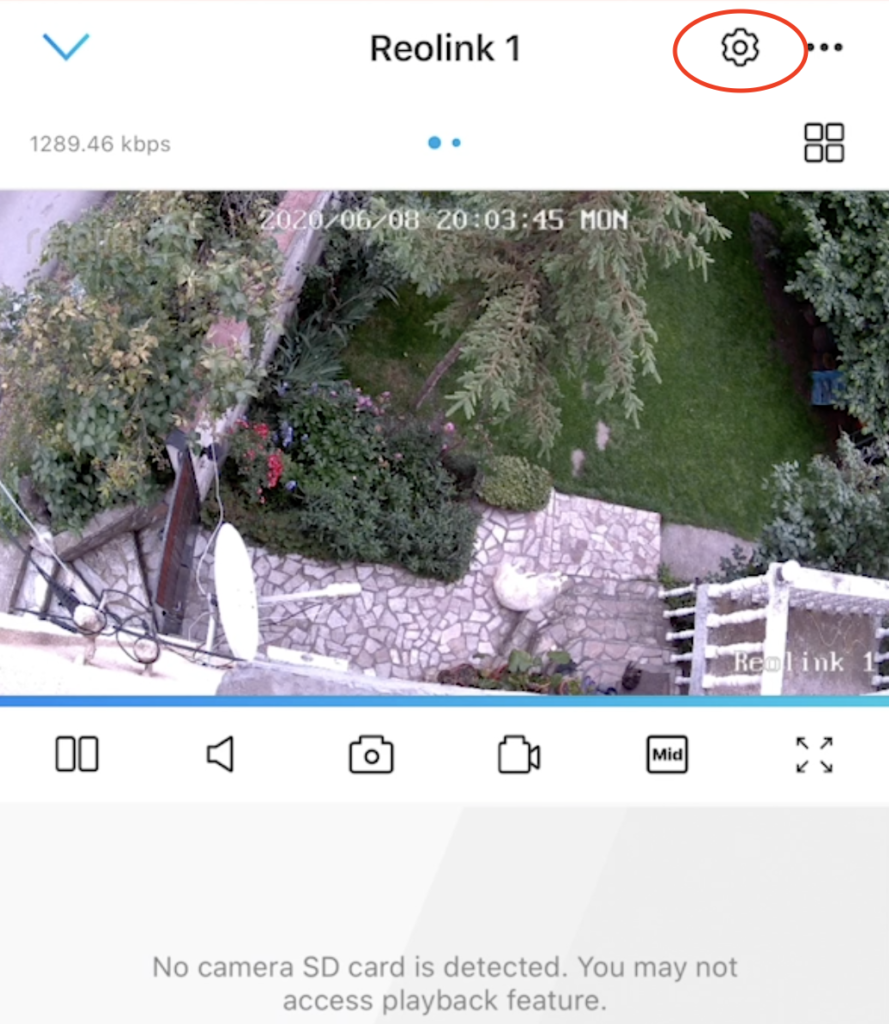
Click on the Gear Wheel button in the upper right corner
Then go to Advanced > User Management.
In this menu you can add or remove Administrators and normal Users.
RTSP Links for Reolink RLC-410W
The Real Time Streaming Protocol (RTSP) is a network control protocol designed for streaming. Every camera that support RTSP can be eventually added to the Systems described below.
For the RLC-410W camera the RTSP links are:
STREAM URLs:
Sub stream (small window)
rtsp://YOUR_USERNAME:YOUR_PASSWORD@YOUR_CAMERA_IP:554/h264Preview_01_sub
Main stream (big window)
rtsp://YOUR_USERNAME:YOUR_PASSWORD@YOUR_CAMERA_IP:554/h264Preview_01_main
SNAP URL:
http://YOUR_CAMERA_IP/cgi-bin/api.cgi?cmd=Snap&channel=0&rs=abc123&user=YOUR_USERNAME&password=YOUR_PASSWORD
Of course you have to replace YOUR_CAMERA_IP, YOUR_USERNAME & YOUR_PASSWORD with yours in the links above.
To test if everything is working before you continue further you can try to open the RTSP links in VLC player.
Reolink with MotionEye over RTSP
We have all that we need from the Reolink app let’s now add the camera to motionEye
Just log in to your motionEye with admin user and add a new network camera. If you need additional instructions for that check this article of mine about motionEye.
For the URL you can use this link:
rtsp://YOUR_CAMERA_IP:554/h264Preview_01_main
Don’t forget to enter your Username & Password in the fields below the URL.
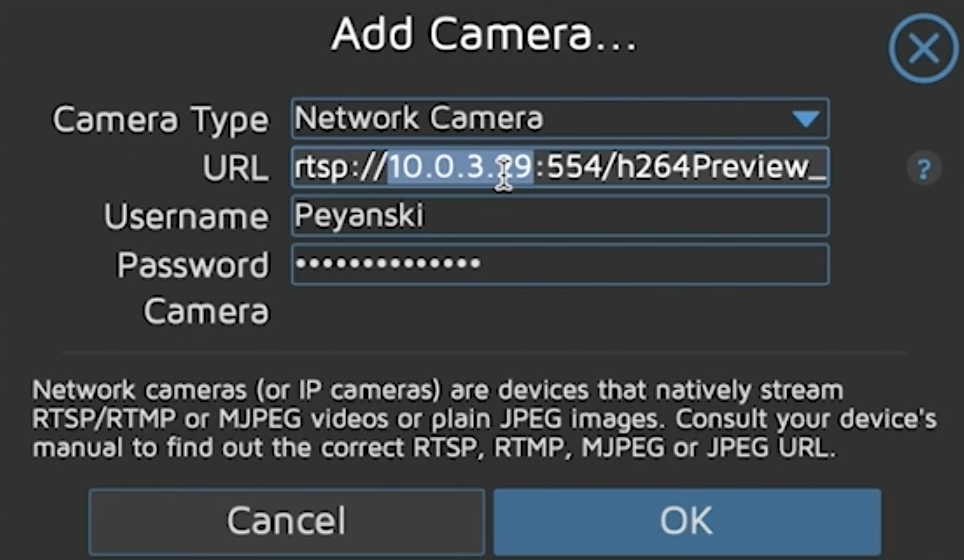
If everything is right you will see the camera stream from within the motionEye interface.
As I said above if you need more info about the available options go read/watch my motionEye article.
Like buttons and Smashing are working great, off sorry I meant MotioneEye and Reolink rlc-410w are working great. Let’s just go ahead.
Subscribe
Hey if you are new here consider subscribing
[sibwp_form id=2]
now let’s continue.
Reolink with Blue Iris over RTSP
Before we continue further I just want to let you know that Blue Iris is a paid product and it is considered as one of the best in class.
The current Blue Iris version is 5 and it cost around $70. I’m using the legacy version 4 of the product, but the described approach below should be similar if not the same.
The good thing is that you can try the product before you buy as they offer a 15-day demo period.
Let’s now test the Blue Iris.
Just click on the little + button in the upper right part of the Blue Iris interface.

And exactly as with motionEye add the following link as Address.
rtsp://YOUR_CAMERA_IP:554/h264Preview_01_main
As well as your Username & Password in the respective fields.
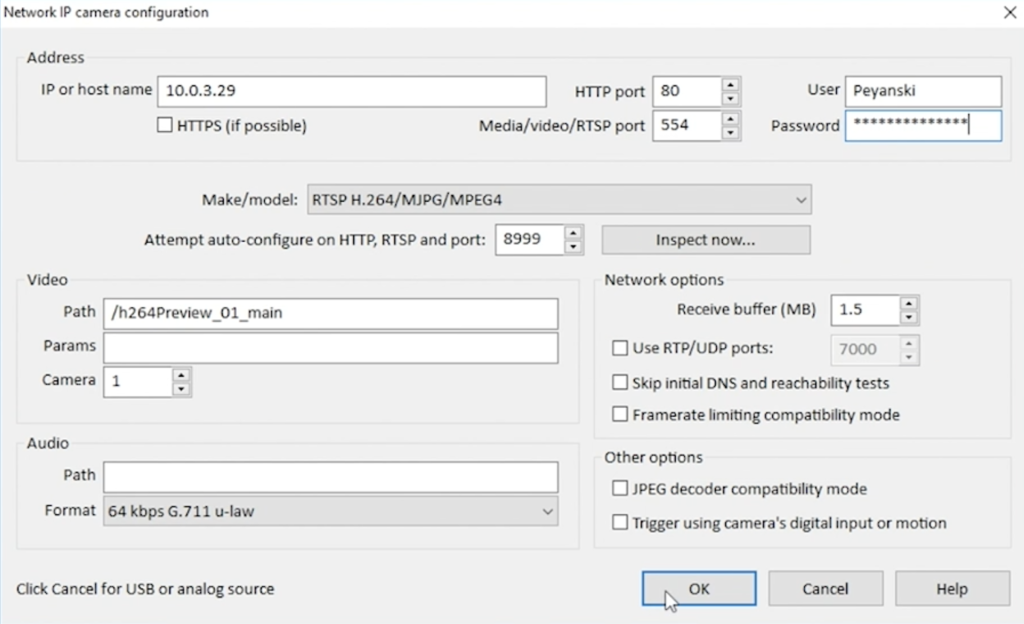
Then you have to click the OK button and you should see the camera stream inside the Blue Iris.
Reolink with Node-RED over RTSP
No issues with Blue Iris and Reolink RLC-410w, that means we can try the Node-RED.
You will need two things to test this in Node-RED.
- FFMPEG package installed
- The Node-RED add-on node-red-contrib-image-tools – available from the Manage Palette menu in Node-RED.
If your Node-RED is installed as add-on in Home Assistant you can add ffmpeg by adding the following lines in you Node-RED configuration inside the Supervisor menu.
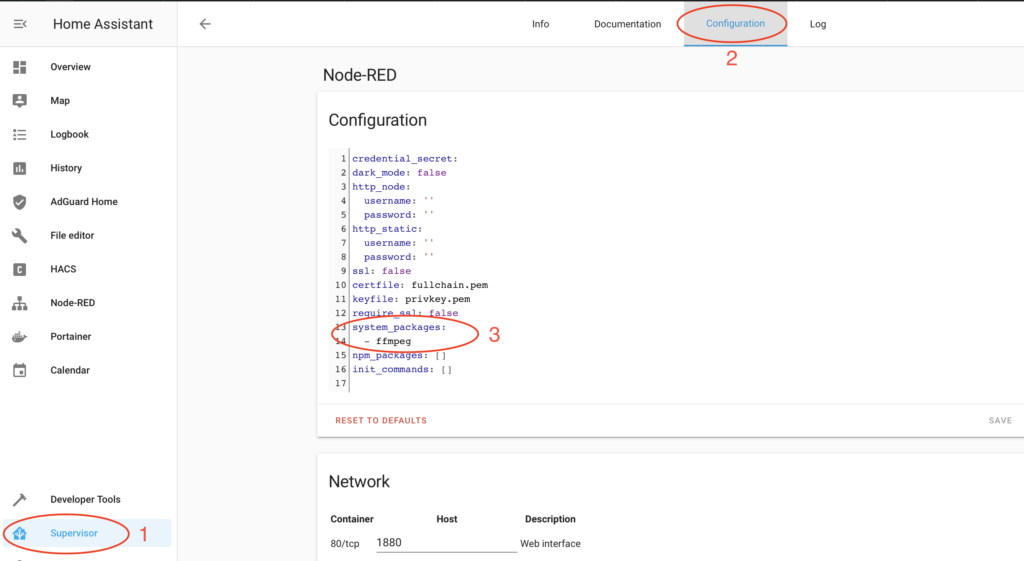
When you meet the above mentioned requirements (ffmpeg, and contrib-image-tools) you just have to import the following Node-RED flow in your Node-RED and to edit the exec node inside.
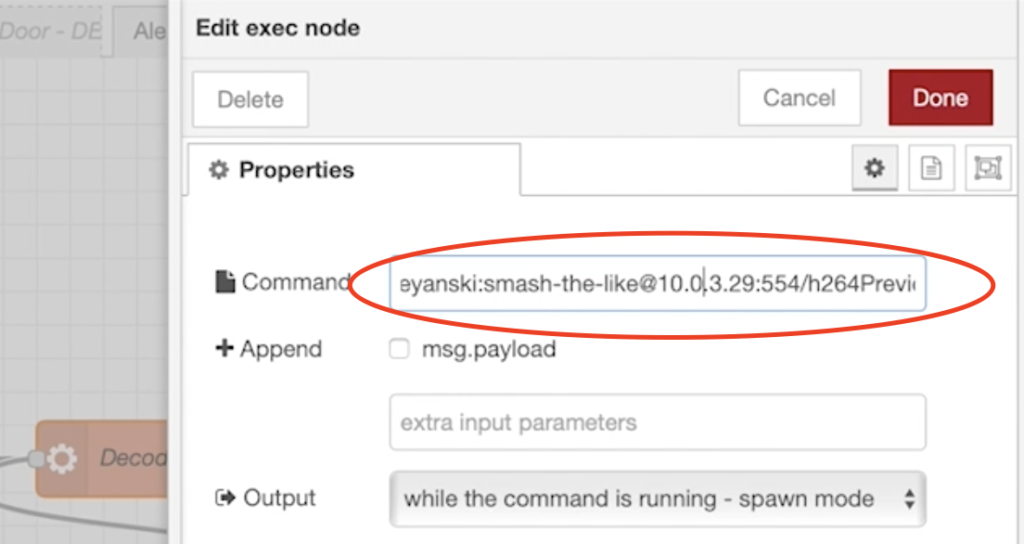
The things that you have to change again are Username, Password and IP.
Then you can click on the “Start stream” inject button and you will see the camera stream.
You can of course do many things after that like streaming your camera image to a Chromecast device like I’m showing in this article.
Reolink with Home Assistant over RTSP
Node-RED and the RTSP enabled Reolink cam are working fine let’s see how to add the RTSP enabled Reolink RLC-410W camera in Home Assistant.
You only have to add the following lines in your configuration.yaml file.
# add this to your configuration.yaml file
camera:
  - platform: ffmpeg
    name: Reolink410W_1_sub
    input: -rtsp_transport tcp -i rtsp://YOUR_USER:YOUR_PASSWORD@YOUR_CAMERA_IP:554/h264Preview_01_sub #small window
  - platform: ffmpeg
    name: Reolink410W_1_main
    input: -rtsp_transport tcp -i rtsp://YOUR_USER:YOUR_PASSWORD@YOUR_CAMERA_IP:554/h264Preview_01_main #big window
Then check your configuration for errors and if there aren’t any restart your Home Assistant.
The only thing left for you is to add a new Picture Glance Card from the three dots menu in the upper right corner of the Home Assistant Interface.
Inside the Picture Glance Card you should select your camera entities like so.
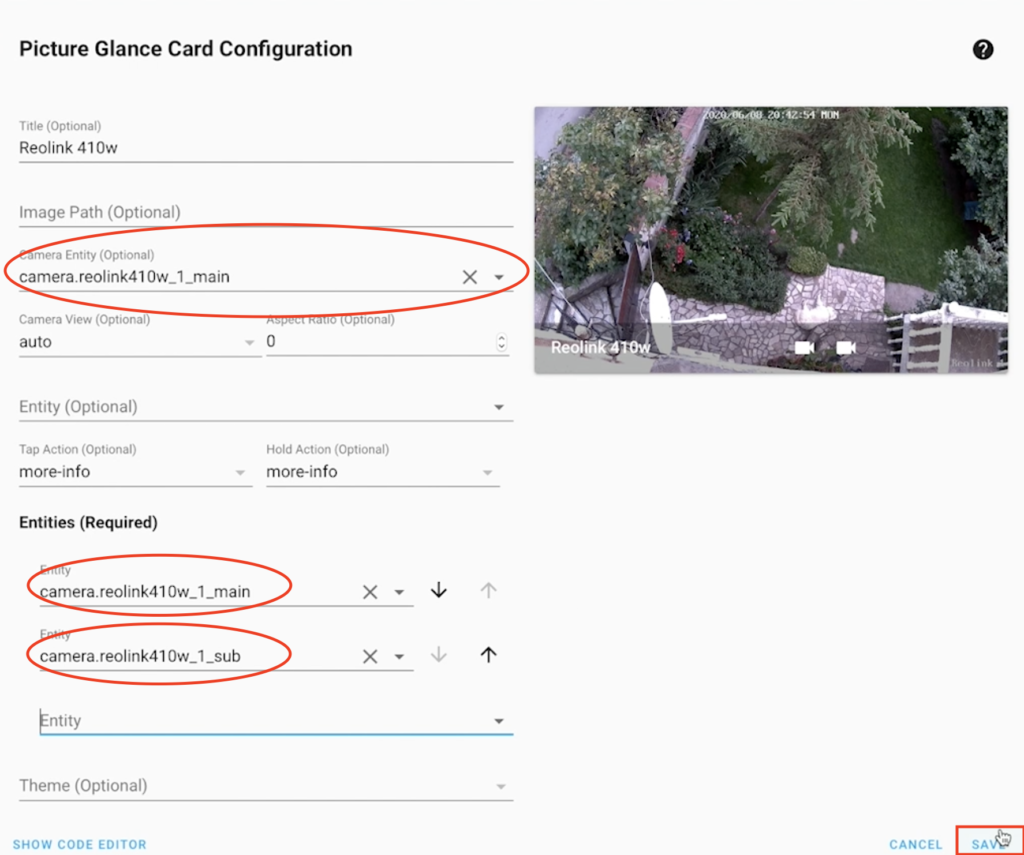
Click on “SAVE” button and your Reolink camera stream should be visible in Home Assistant.
Support my Work!
Any sort of engagement on this channel does really help out a lot with the YouTube algorithm, so make sure you hit the subscribe, Like and Bell buttons If you enjoy this article/video.
Also feel free to add me on Twitter by searching for @KPeyanski. You can find me on my Discord server as well.
I really hope that you find this information useful and you now know more about reolink cameras, rtsp, motionEye, Blue Iris, Node-RED, Home Assistant.
Thank you for watching, stay safe and see you next time.
So how can I use the temperature and humidity readings from a sensor via mqtt and node-red to display those readings on a blue iris screen. Say I have a temperature sensor in a walk in cooler and another in the chicken coop. I want the cooler temp to show on the cooler camera and the coop temperature to display on the coop camera
Hello,
thanks for perfect article! Thinking to buy this cam.
The only question – how is it with motion detection& It works like a sensor in HA?
Thanks!
Hi Greg,
Using the RTSP protocol as I’m demonstrating in this article – the motion sensor is not detected in HA. However there is an ONVIF integration as well in HA which should add all the sensors of the camera. Unfortunately I didn’t test that and I cannot confirm at 100%. Check my other Reolink cameras article + video, these are the links – https://youtu.be/Ql2PHgyfFBU https://peyanski.com/reolink-cameras-nvr-or-blue-iris-and-home-assistant/ I’m using the ONVIF integration there but not directly on camera, but on the Reolink NVR. I should try to use it directly on the camera some day to see the results. Good luck and you won’t regret with your choice I’m happy with mine!
Muchas gracias. ?Como puedo iniciar sesion?
Muchas gracias. ?Como puedo iniciar sesion?
I understand only the Muchas gracias 🙂 Thanks for your comment as well