Matter standard, which was formerly known as Connected Home over IP or CHIP is a Smart Home royalty free standard announced back in 2019.
Table of Contents
What is Matter Standard?
The main goal of Matter standard is to achieve interoperability between Smart Home and IoT (Internet of Things) devices from different vendors. In other words, using the Matter standard, devices produced by different vendors, let’s say Apple and Google will be able to talk to each other natively. This is the every maker wet dream.
Unfortunately, the Matter Standard is still not publicly released. The good thing is that the most of the major Smart Home vendors like Amazon, Apple, Google, Samsung, Ikea, Zigbee and many more are committed to help with releasing the Matter standard. Most probably they’ll also make their new generation devices Matter ready, that is why there is so much noise around the Matter standard.
Matter in Home Assistant workshop?
It is more than great that Home Assistant crew is making efforts to implement Matter inside Home Assistant at this early stage. What the Nabu Casa (HA team) actually did is a Home Assistant Matter workshop, where they show how the Matter integration is currently working inside Home Assistant. They also provided some instructions and requirements in case someone wants to try Matter and this is exactly what we are going to do In this tutorial. Let’s start.
Requirements for the Home Assistant Matter integration
These are the official Matter workshop instructions that Home assistant crew provided.
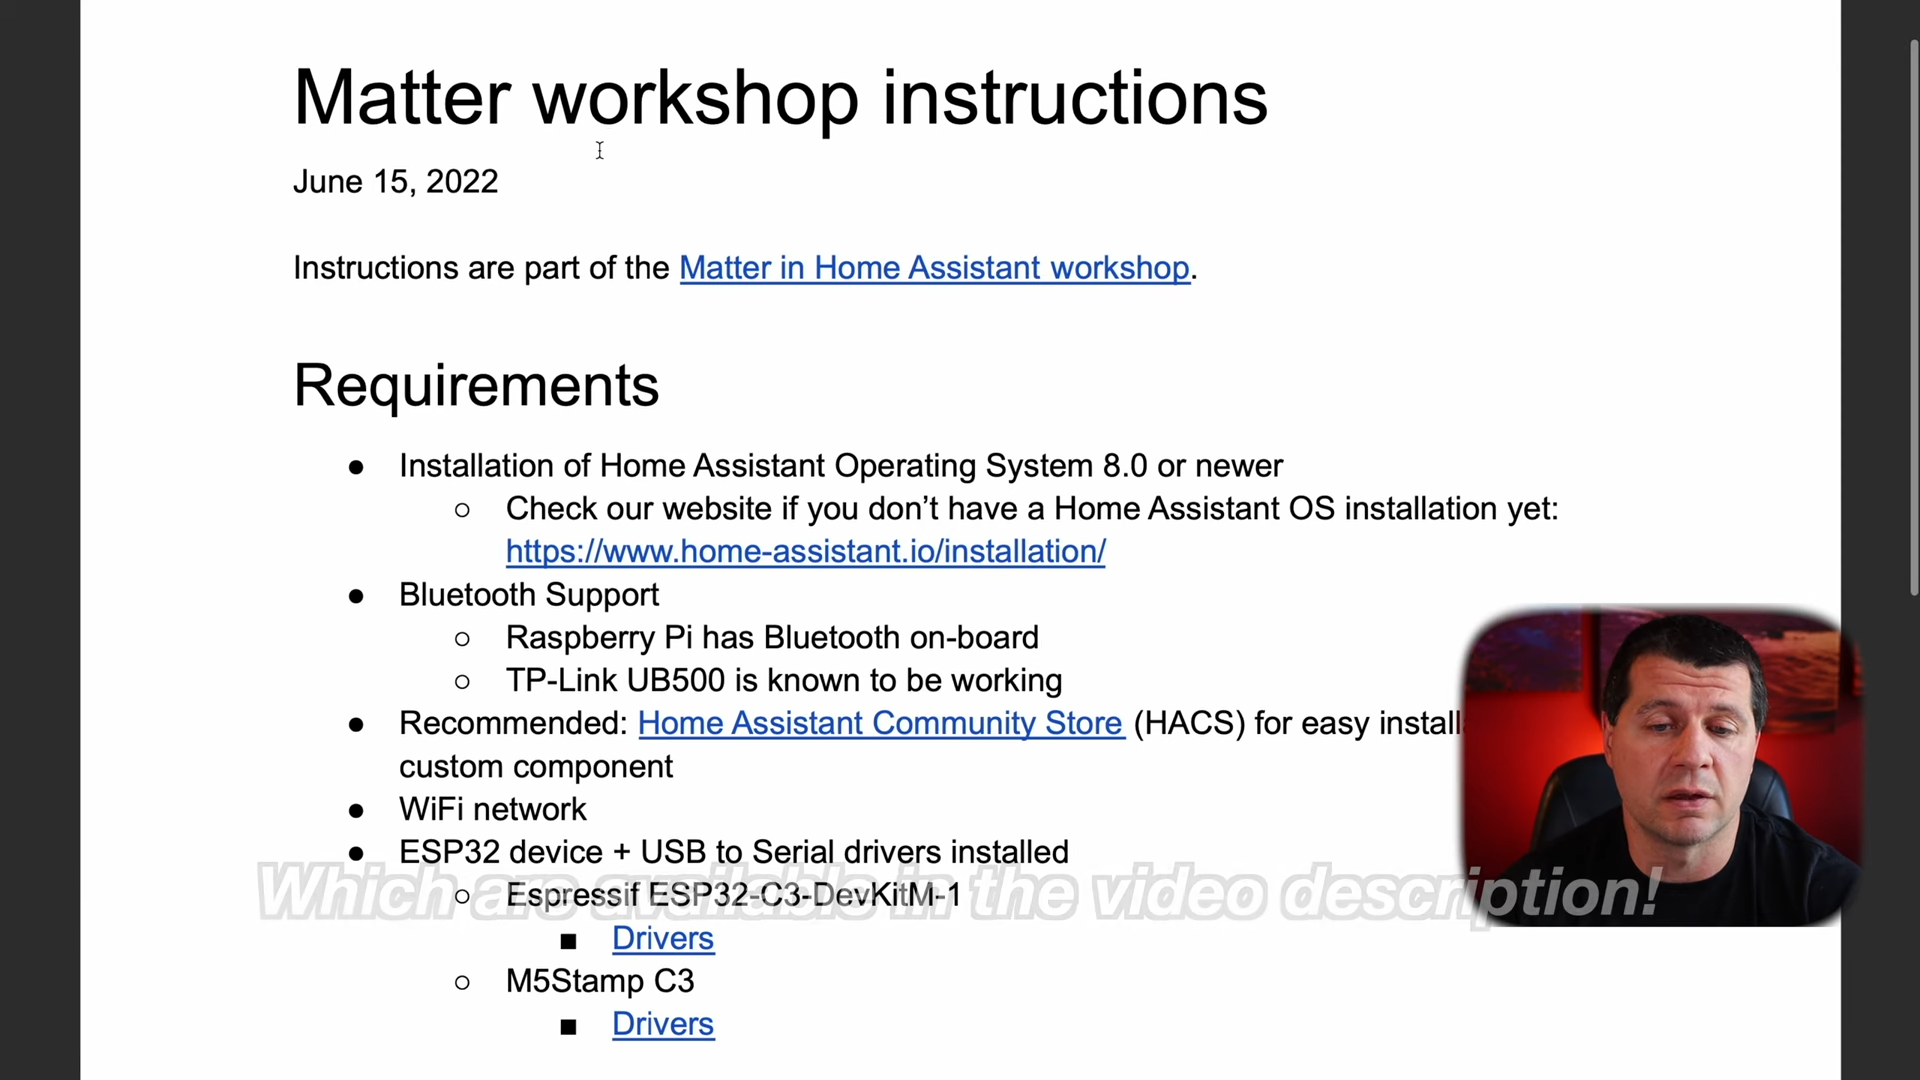
Inside the instructions we have some requirements and these requirements were announced several days before the actual workshop, so we had time to prepare for this in advance. Let’s start with the first one.
Requirement 1 – Home Assistant OS 8.0 or higher
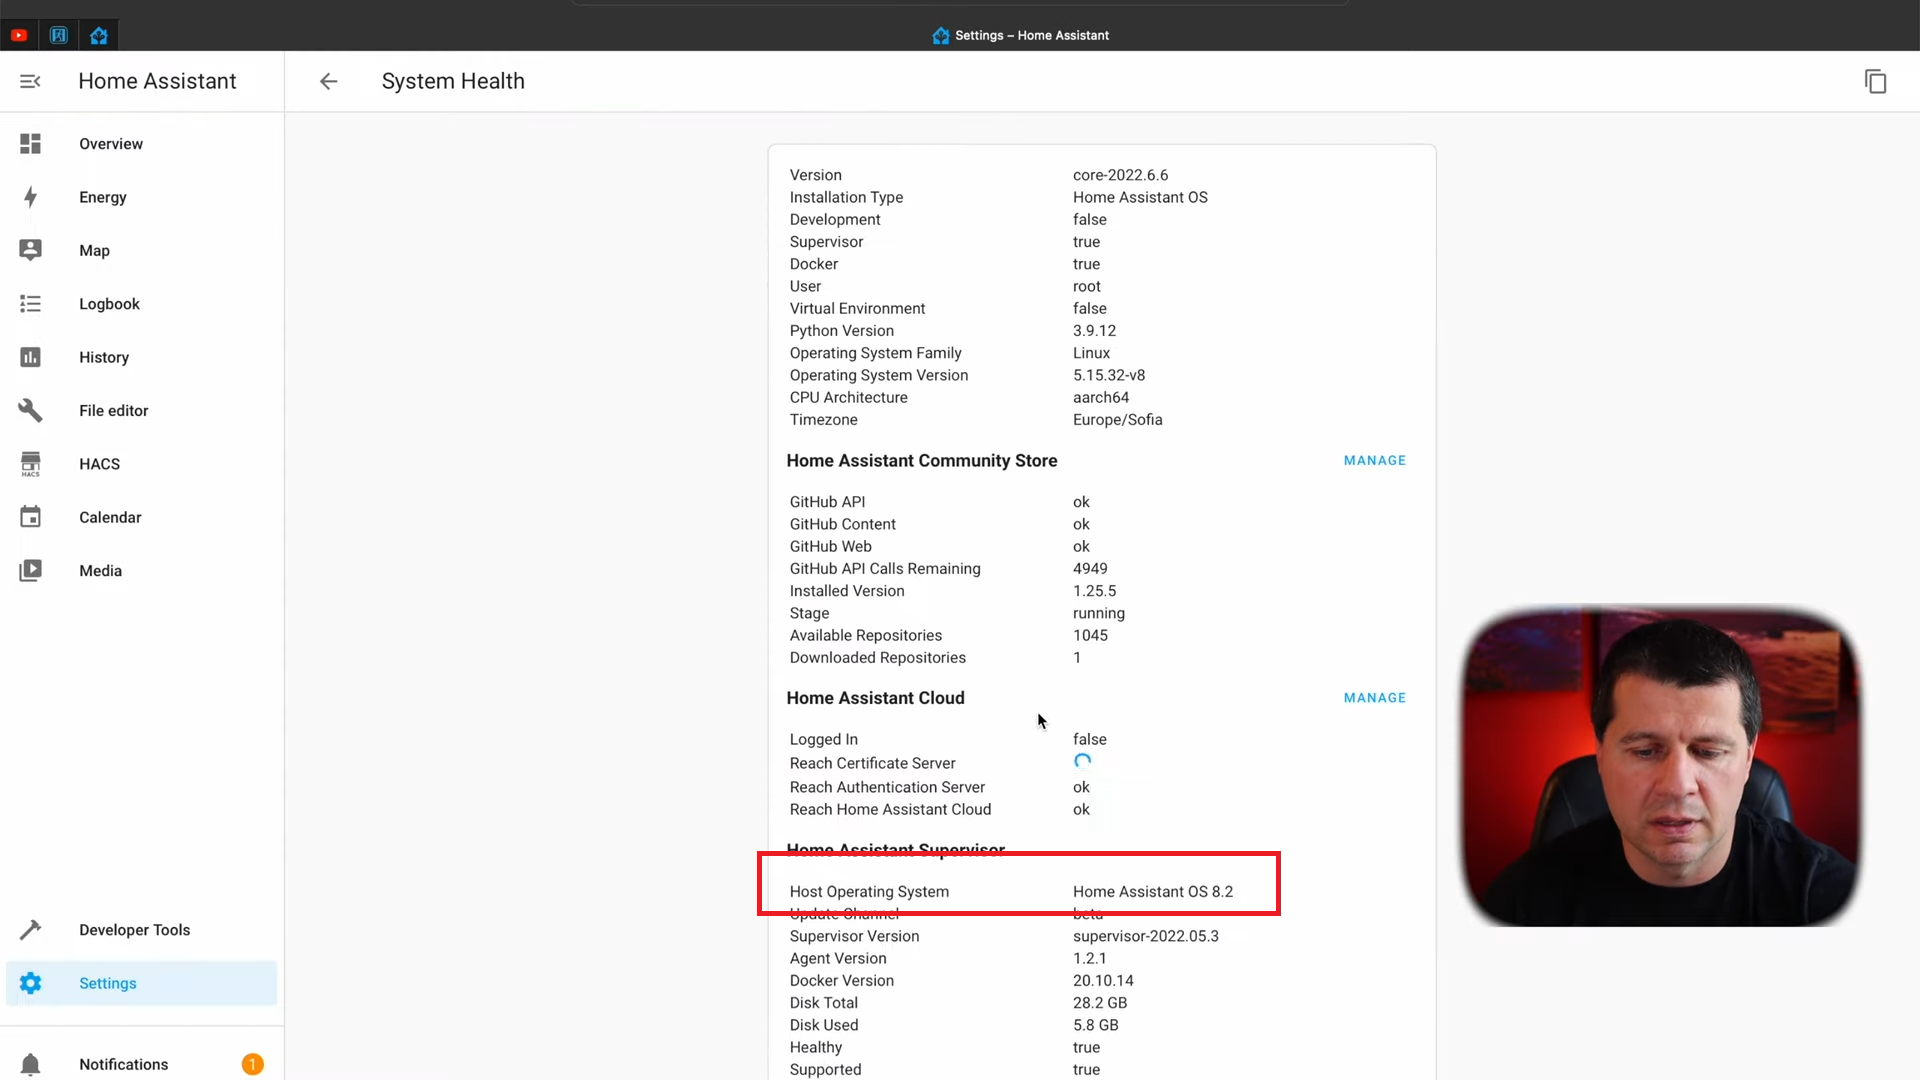
We need to have Home Assistant OS 8.0 or newer. To check this, go to your Home Assistant press the “c” button and start typing system health.
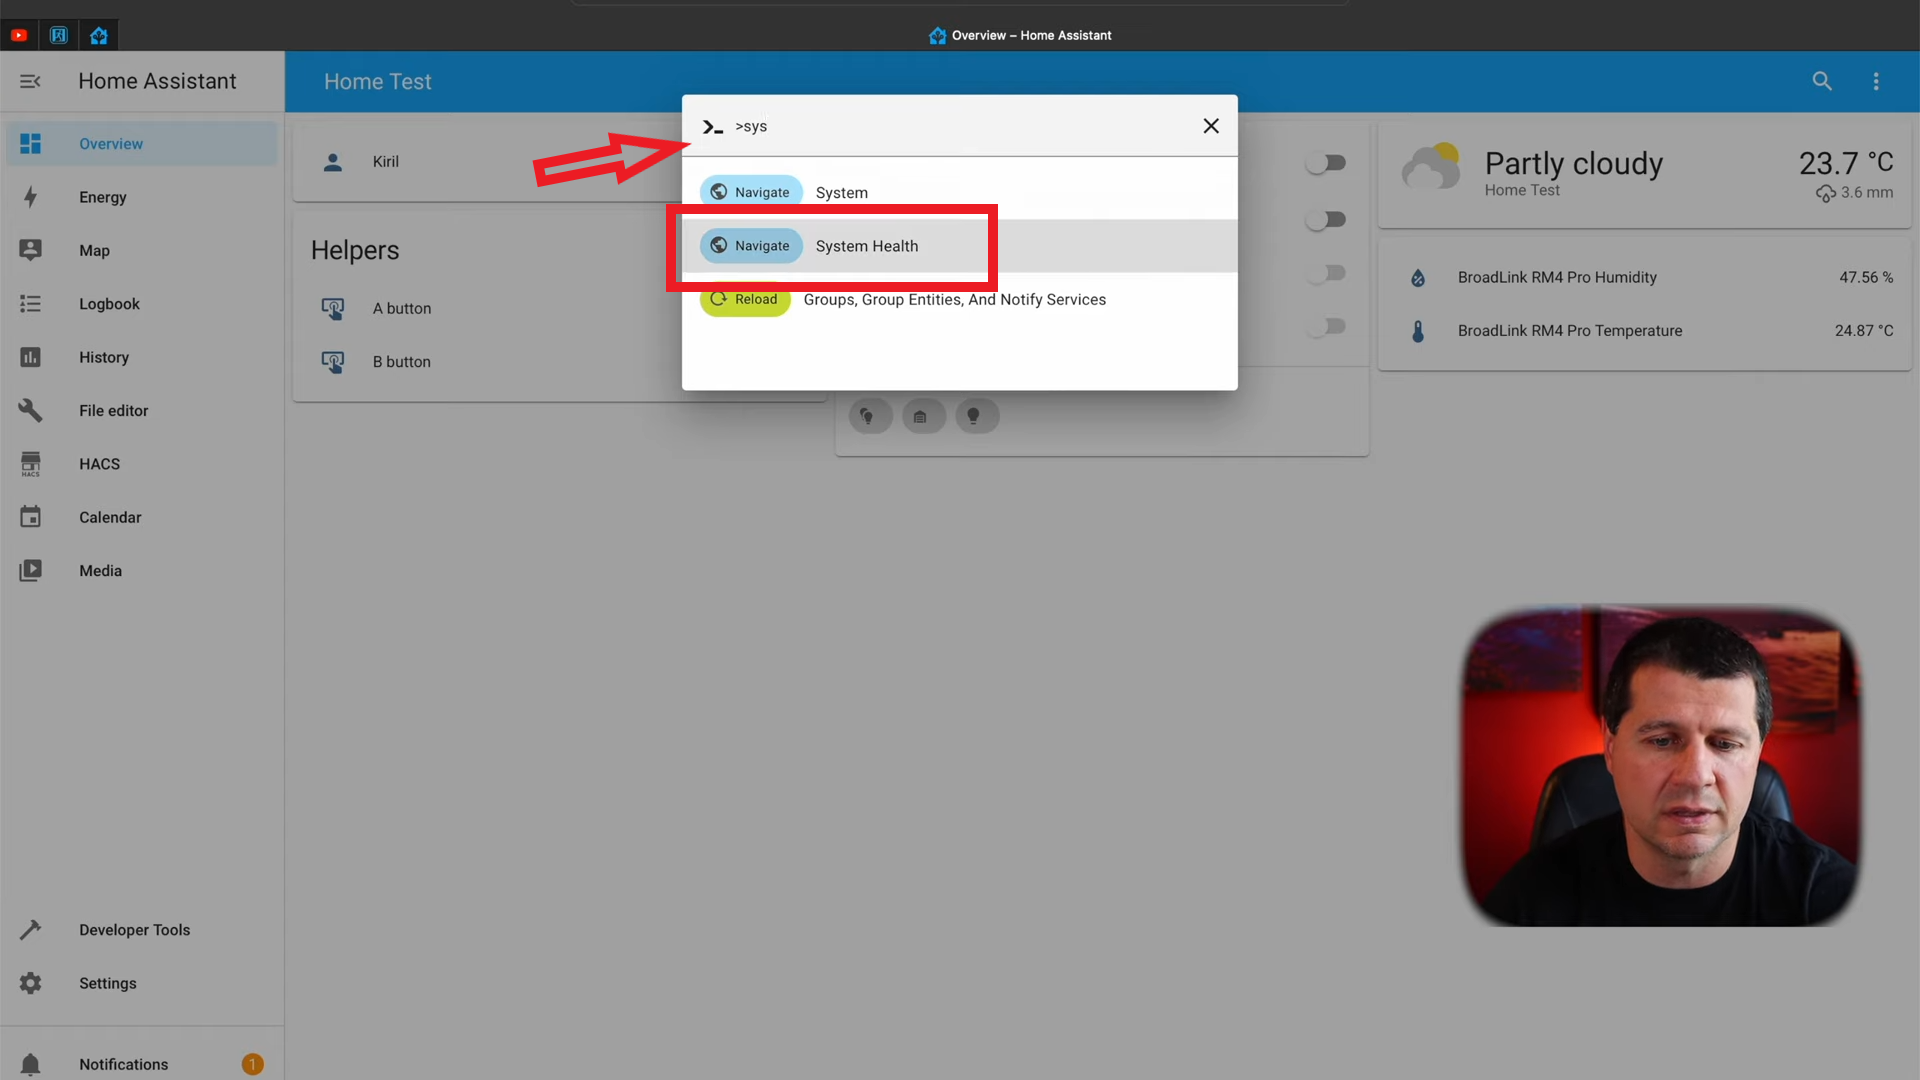
Select Navigate System Health and next to Host Operating System you will find your Home Assistant OS version.
Of course, it is totally possible that you are not using Home Assistant OS installation type at all. If you want to know more about the different installation types, check my free Webinar https://automatelike.pro/webinar where I am explaining everything about different official installation methods.
Requirement 2 – Bluetooth Support
The next requirement is a Bluetooth support. I have a Raspberry Pi, which has Bluetooth embedded on board and I’m fine with that requirement. If you don’t have Raspberry Pi or something other with embedded Bluetooth you have to buy some additional Bluetooth USB stick. For example, this TP-Link UB500.
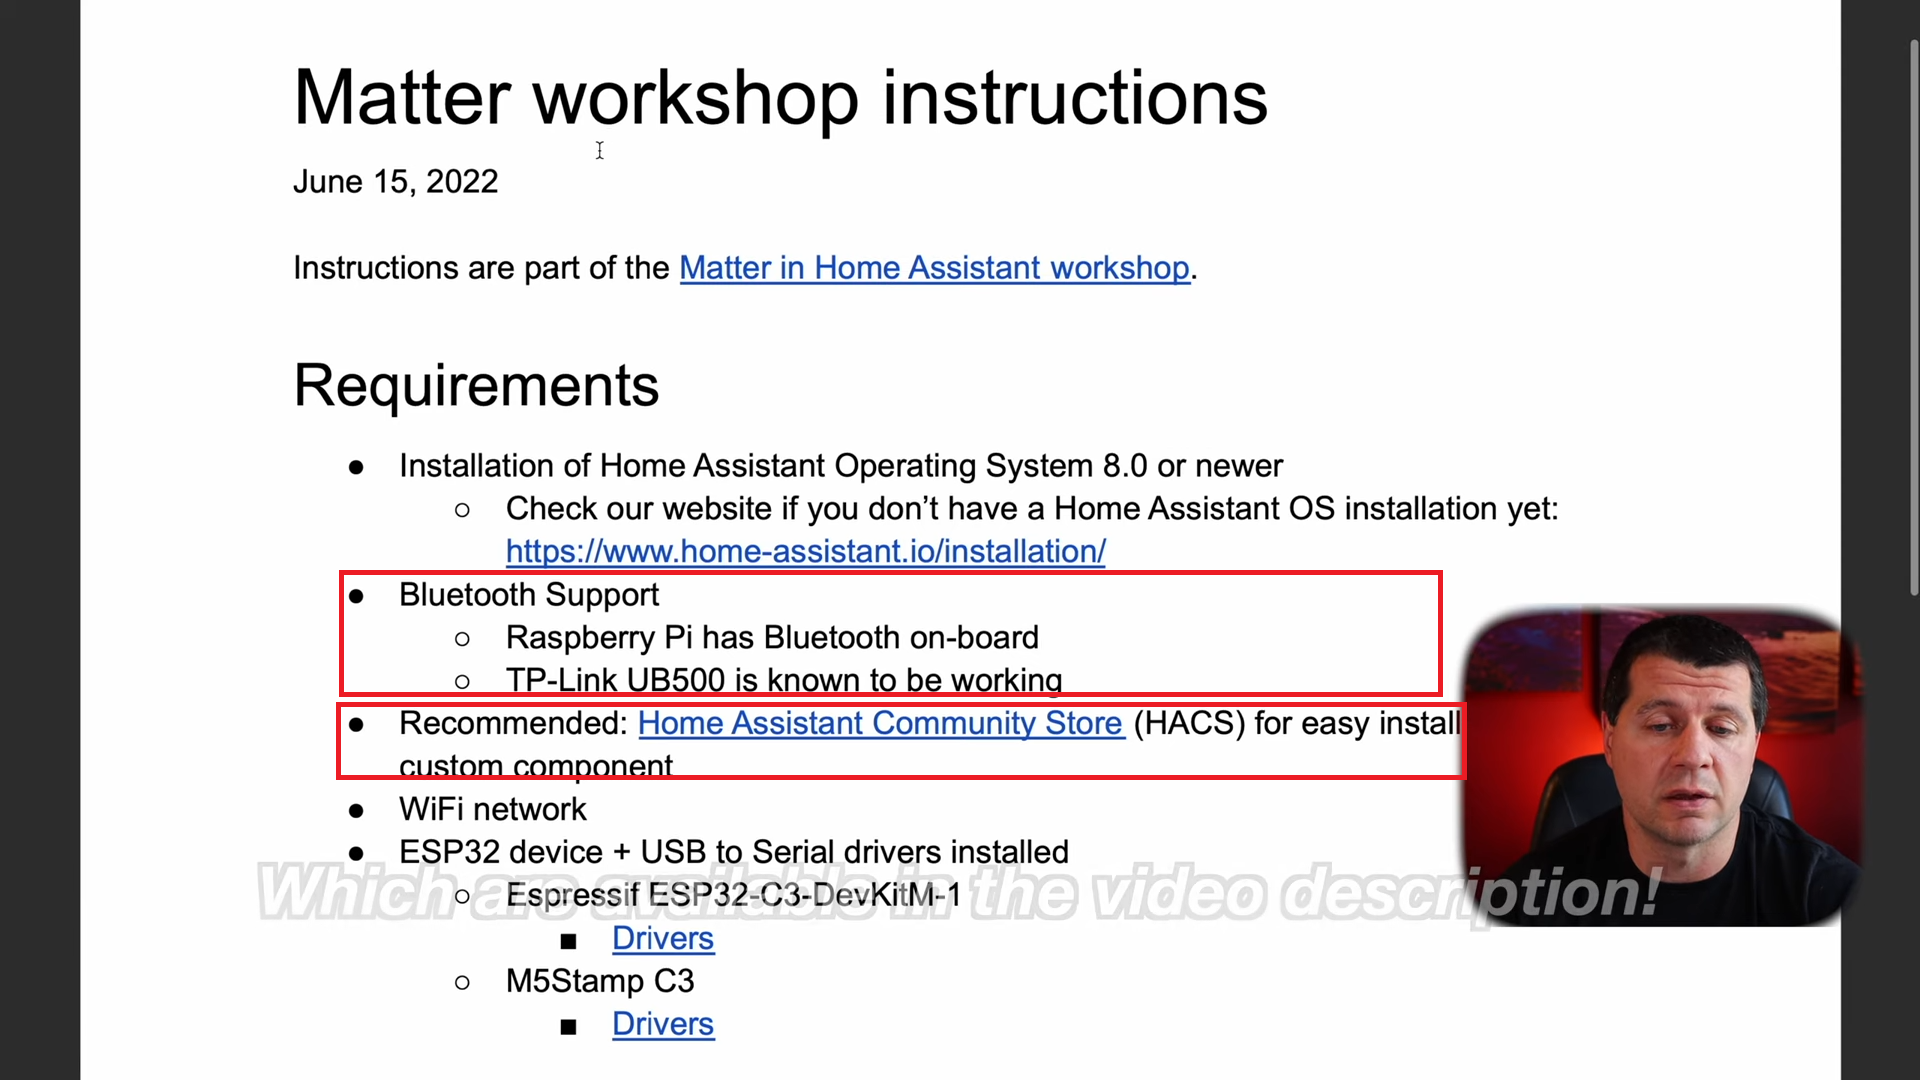
Requirement 3 – Home Assistant Community Store (HACS)
The next requirement is a Home Assistant Community Store or HACS. I have an article about how to install HACS in your Home Assistant if you don’t have it yet. Go check this article How to install & use Home Assistant Community Store (HACS) | TUTORIAL follow the instruction there and you will have HACS in no time.
Requirement 4 & 5 – Home Assistant Community Store (HACS)
Next two requirements are: WiFi network (that is trivial) and ESP32 device + USB to serial drivers installed. I will use an Espressif ESP32-C3-DevKitM-1 (ESP32-C3-DevKitM-1 in AliExpress – https://s.click.aliexpress.com/e/_A94REz ) device. The other recommended device is the M5Stamp C3.

Matter Standard is still experimental…
Once again, the Home Assistant Matter integration is still experimental. A lot of things will be probably changed until the actual release of Matter, but I believe everything will be more polished and streamlined by then. All of my respect is going to the Nabu Casa team, because they are throwing a lot of efforts even at this still experimental Matter stage, making Home Assistant even more future ready.
#Step 1: Install Matter Server Add-on
Let’s start with the actual steps that have to be implemented to test the Matter standard. The first step is to add the development repository. The fastest way to do this is using this My Home Assistant link which is generously provided by the Home Assistant crew in the workshop Matter instruction.
When you click on the above link, My Home Assistant page is immediately displayed. If you click on the Pencil button, you can edit the URL of your Home Assistant.
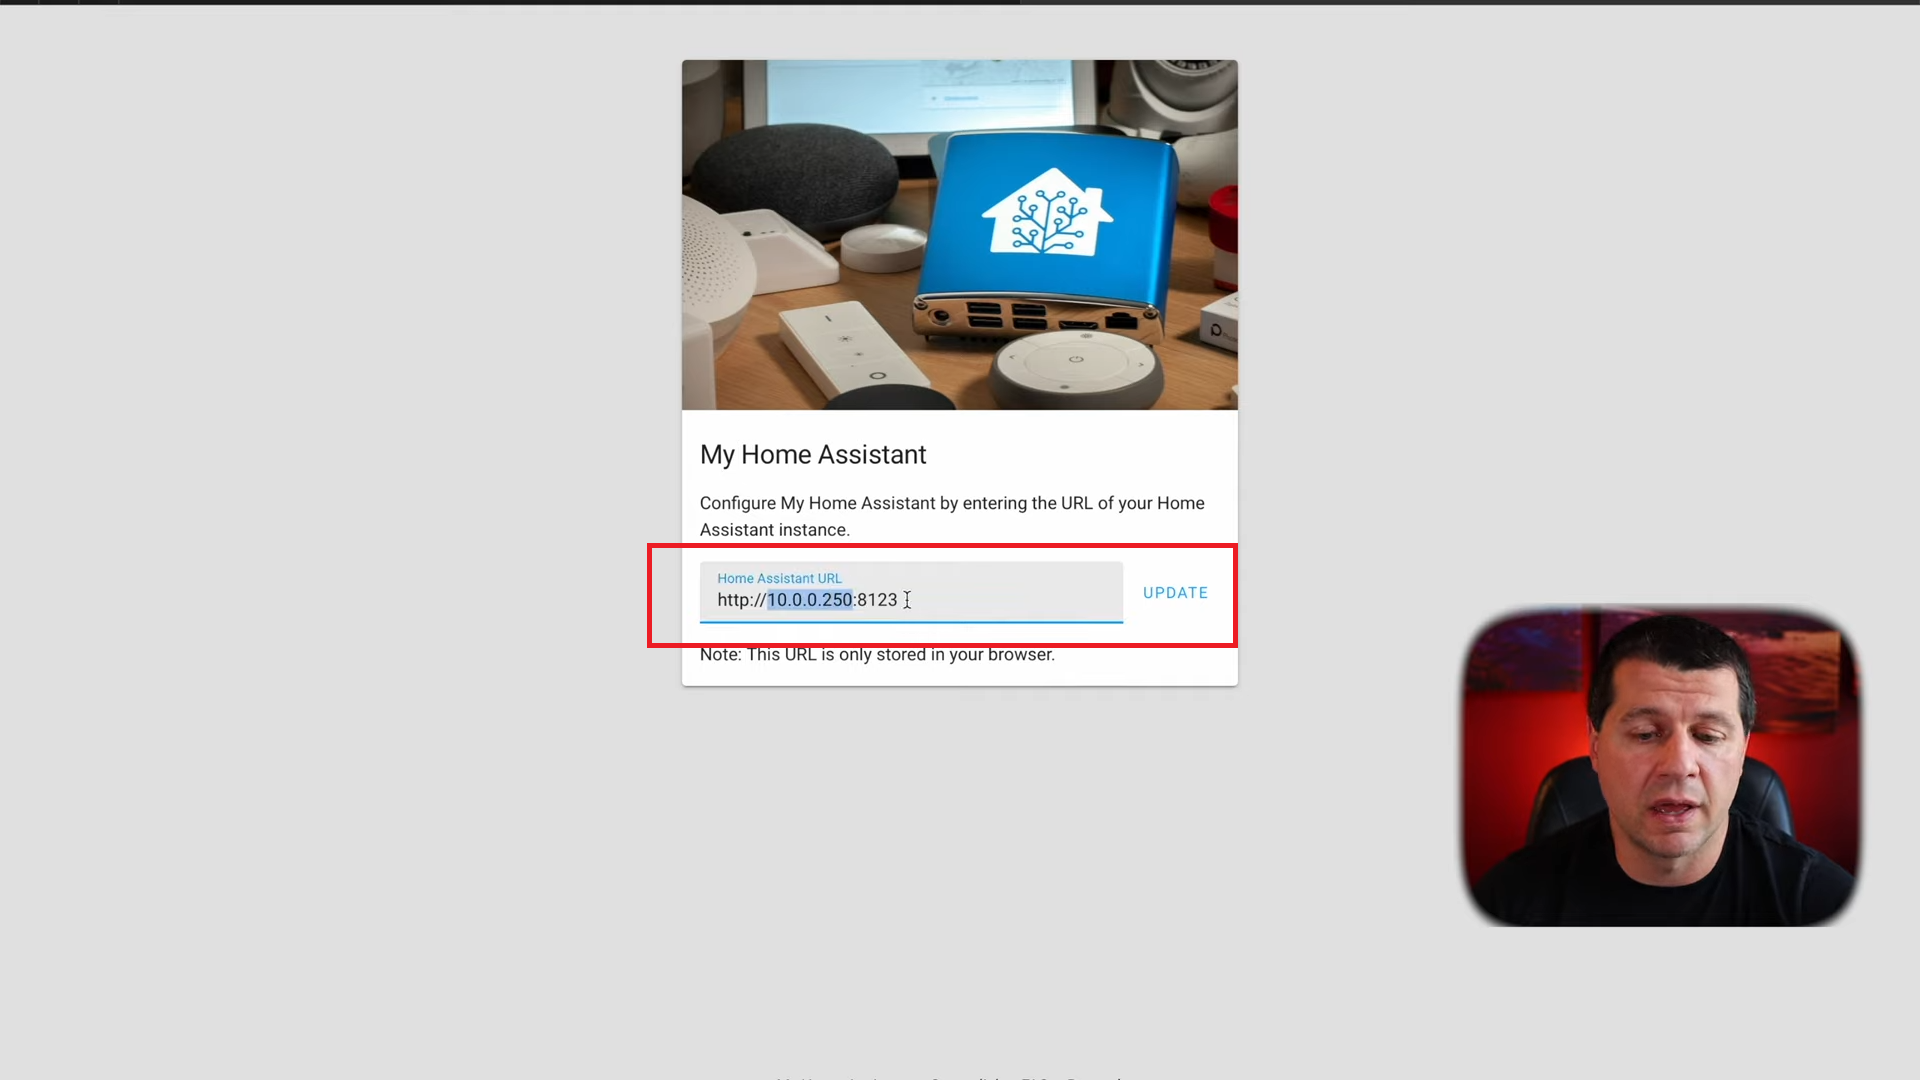
In order to make the My Home Assistant link to work, you just have to enter the IP of your Home Assistant and the port (It doesn’t matter if the IP address is local or not) and then to hit Update button. That way My Home Assistant links will work from now on for every future steps in this tutorial and not only here.
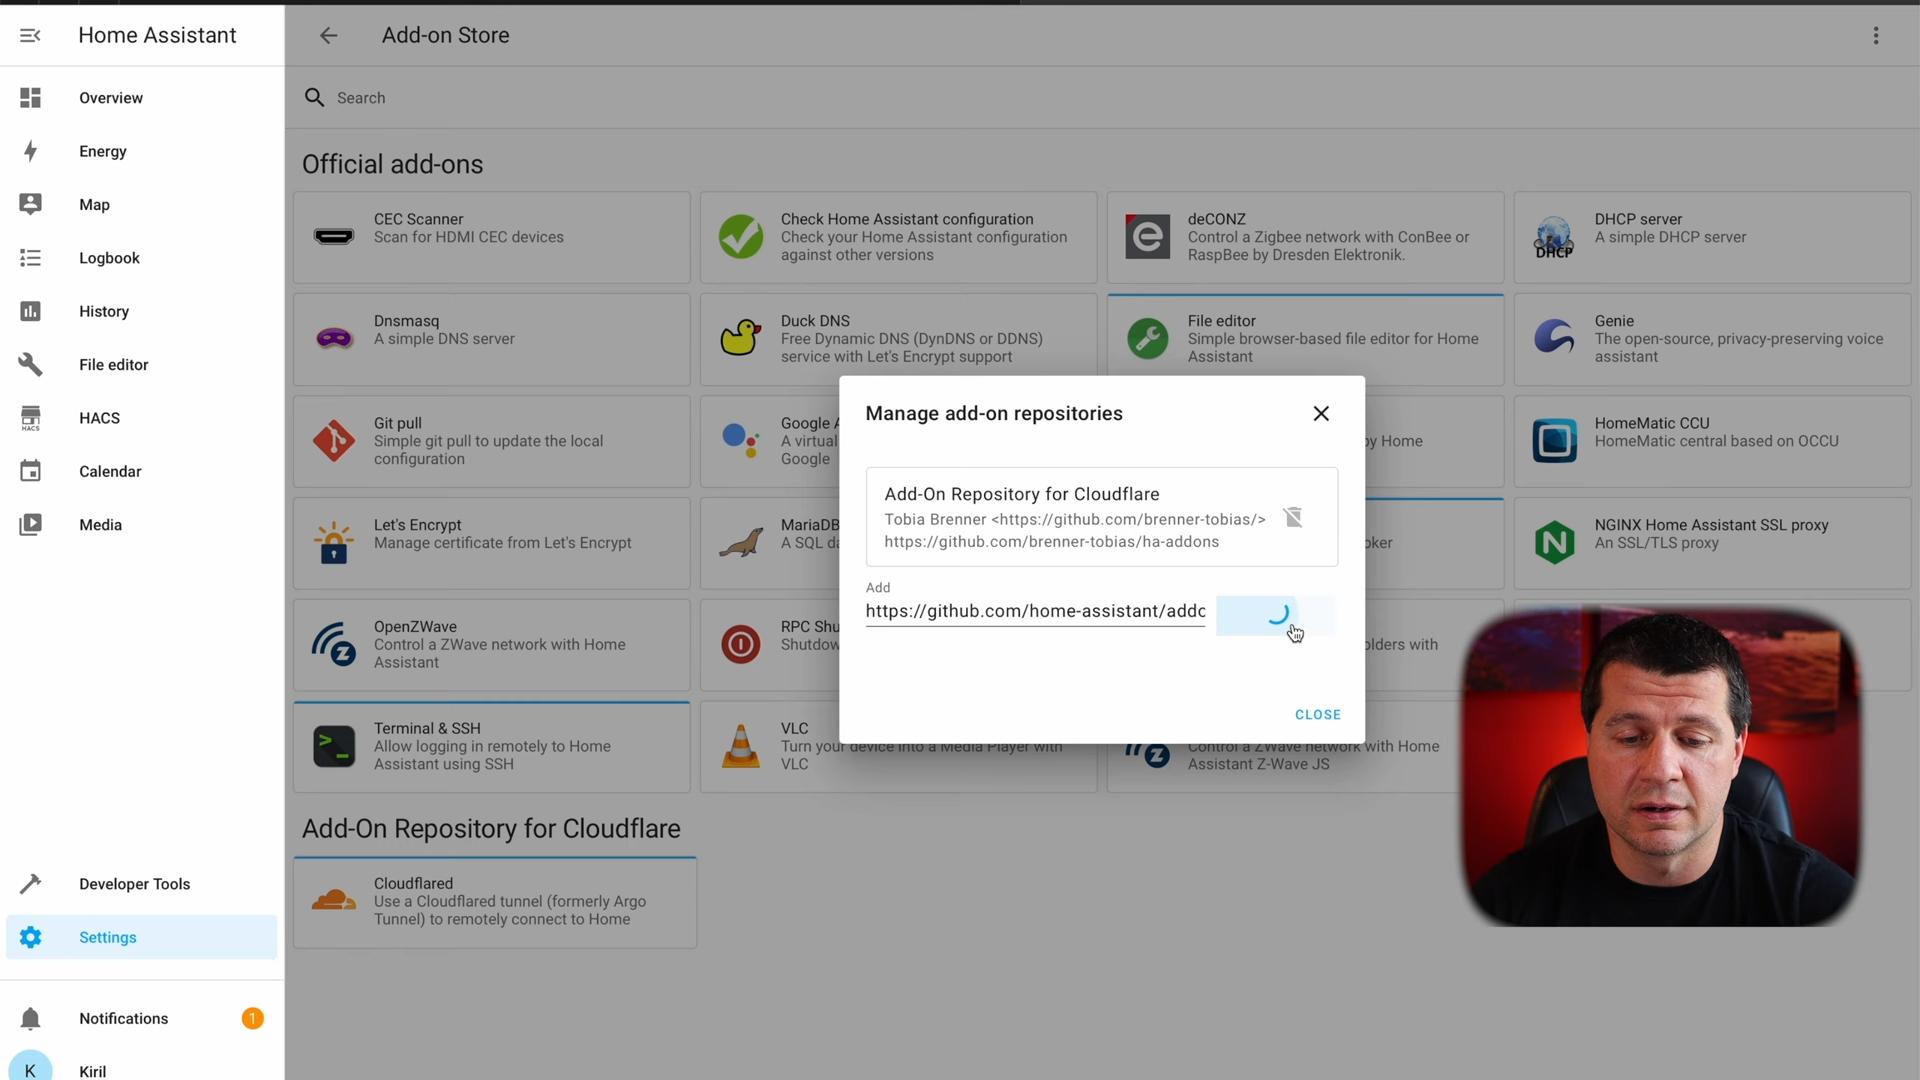
When you do that, you just have to click on Open link which will open the Manage Add-on repositories dialog with the populated repository URL (https://github.com/home-assistant/addons-development). When you successfully add this repository you will immediately see several Home Assistant Developer Add-ons, including the Matter Server add-on.
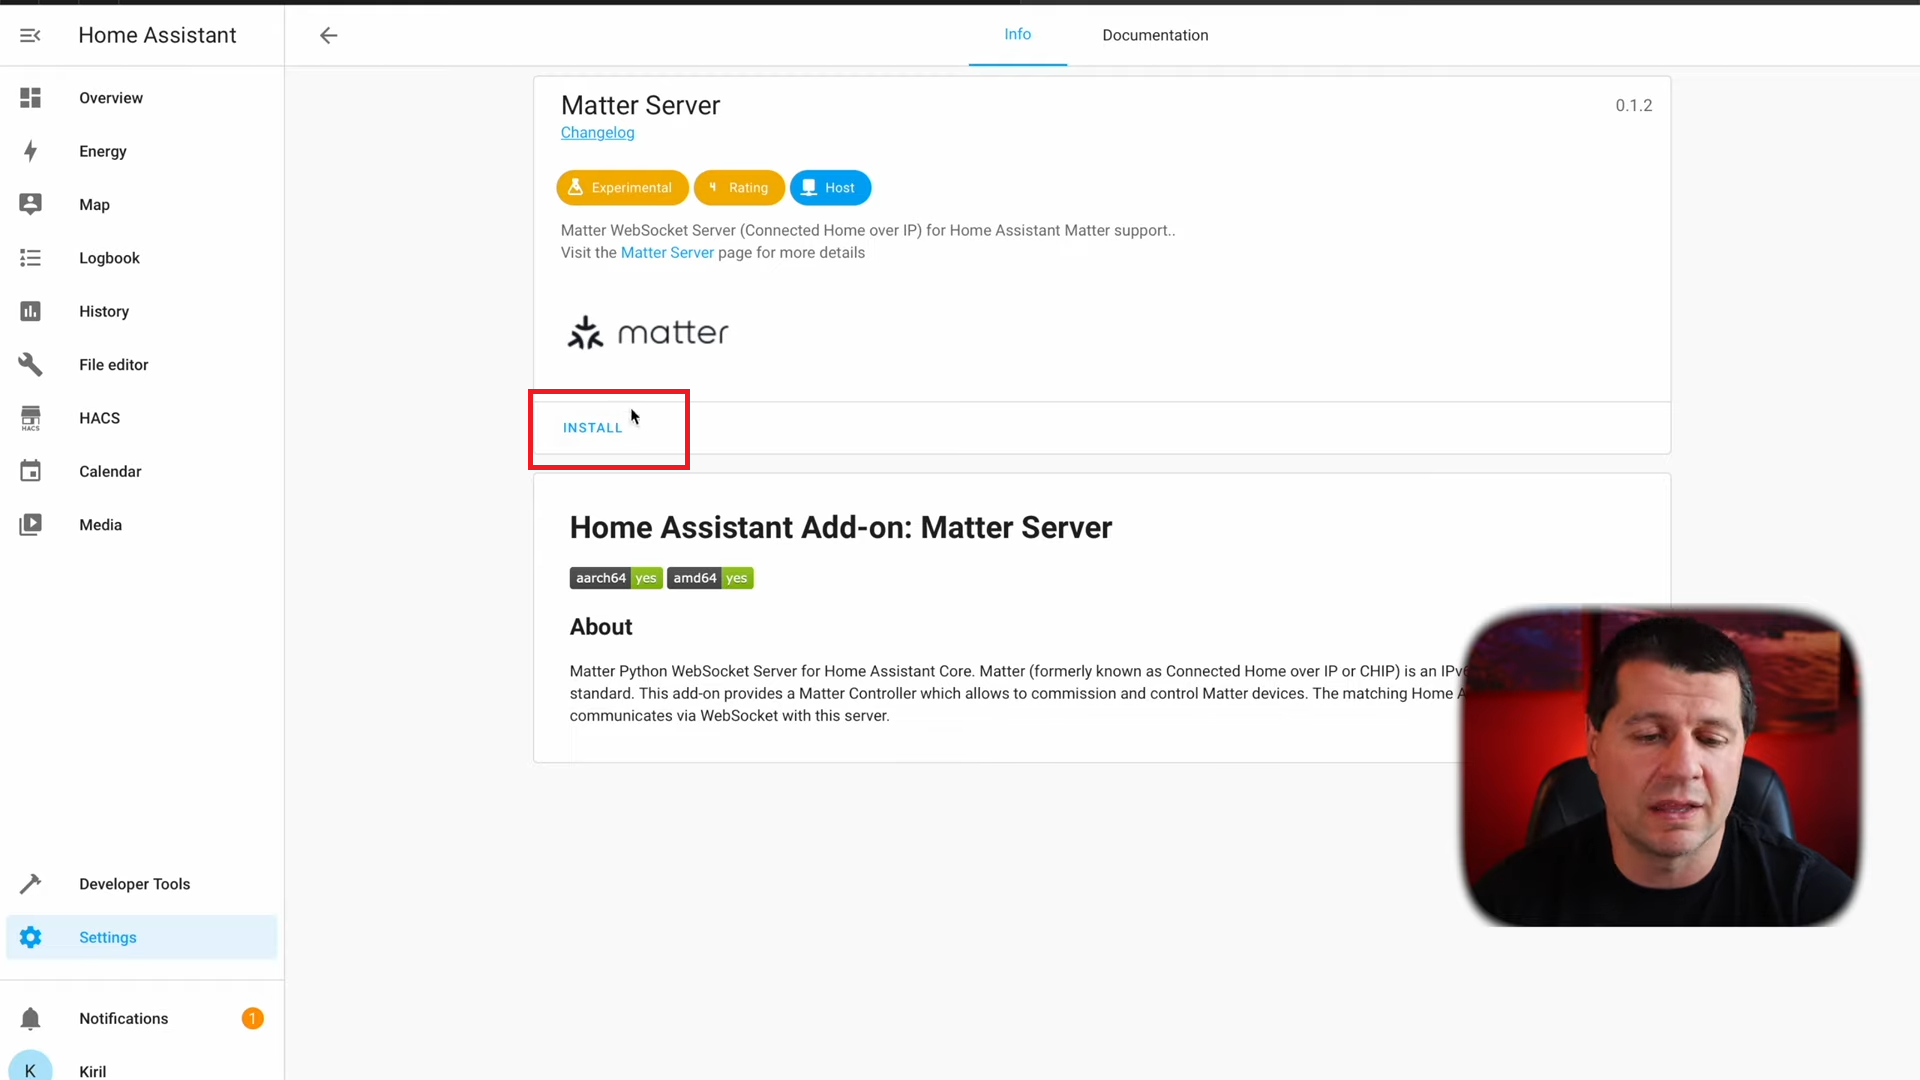
Click on this Matter Server add-on, which provides a Matter controller that allows to commission and control Matter devices – exactly what we needed.
After the Matter Add-on is installed – start it.
#Step 2 : Install Matter Integration
Next step is to install Matter integration. For that we need the Home Assistant Community Store or HACS. If you don’t have HACS yet, just go and check my tutorial about it.
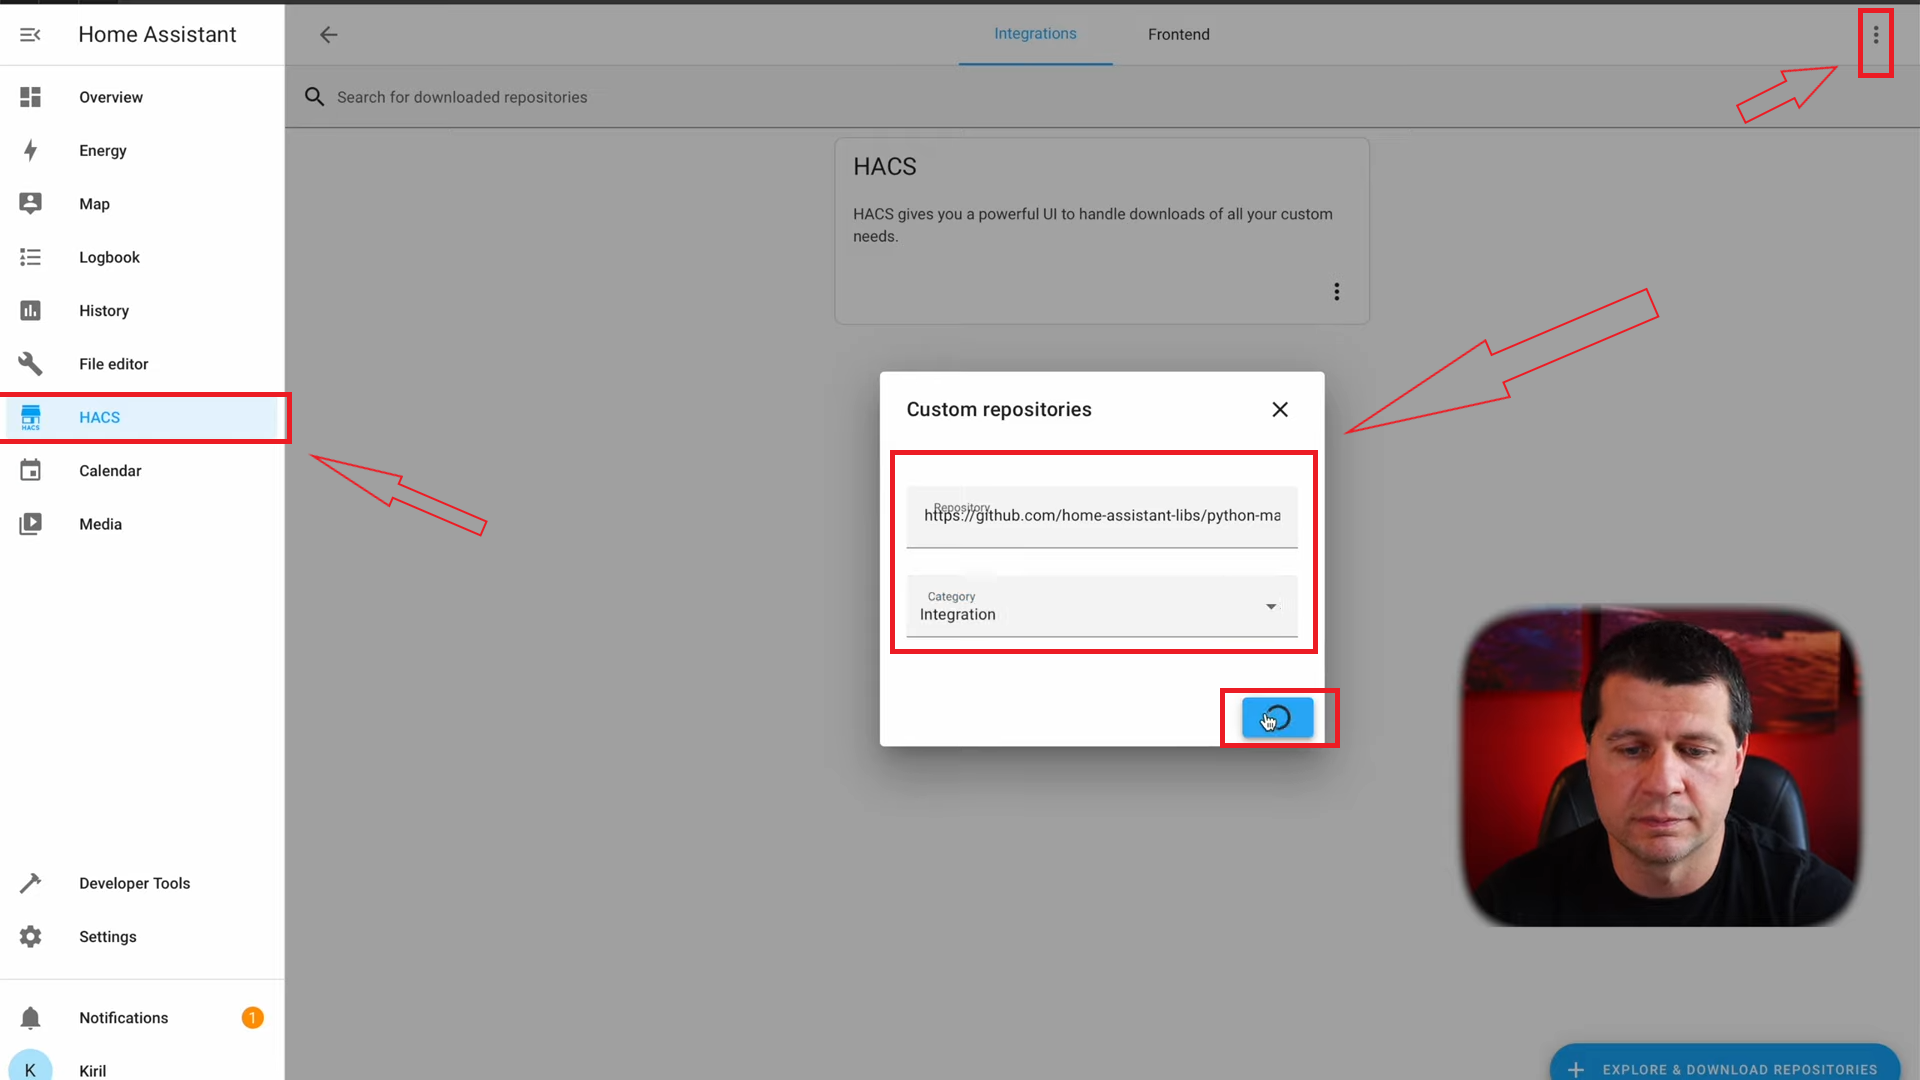
I’ll go to HACS > Integration section > three dots menu > custom repositories and I’ll paste the following URL in the repository field – https://github.com/home-assistant-libs/python-matter-server
As category I’ll choose integration and I’ll click on the Add button.
Click on Explore & Download Repositories, click on Matter (Experimental), and then on Download this repository with HACS button.
The Python server that interact with the Matter should be now ready to use. It is already in my HACS and I have a pending restart label, but I’ll not restart I’ll just hit refresh the browser. If that is not helping me – I’ll have to restart HA.
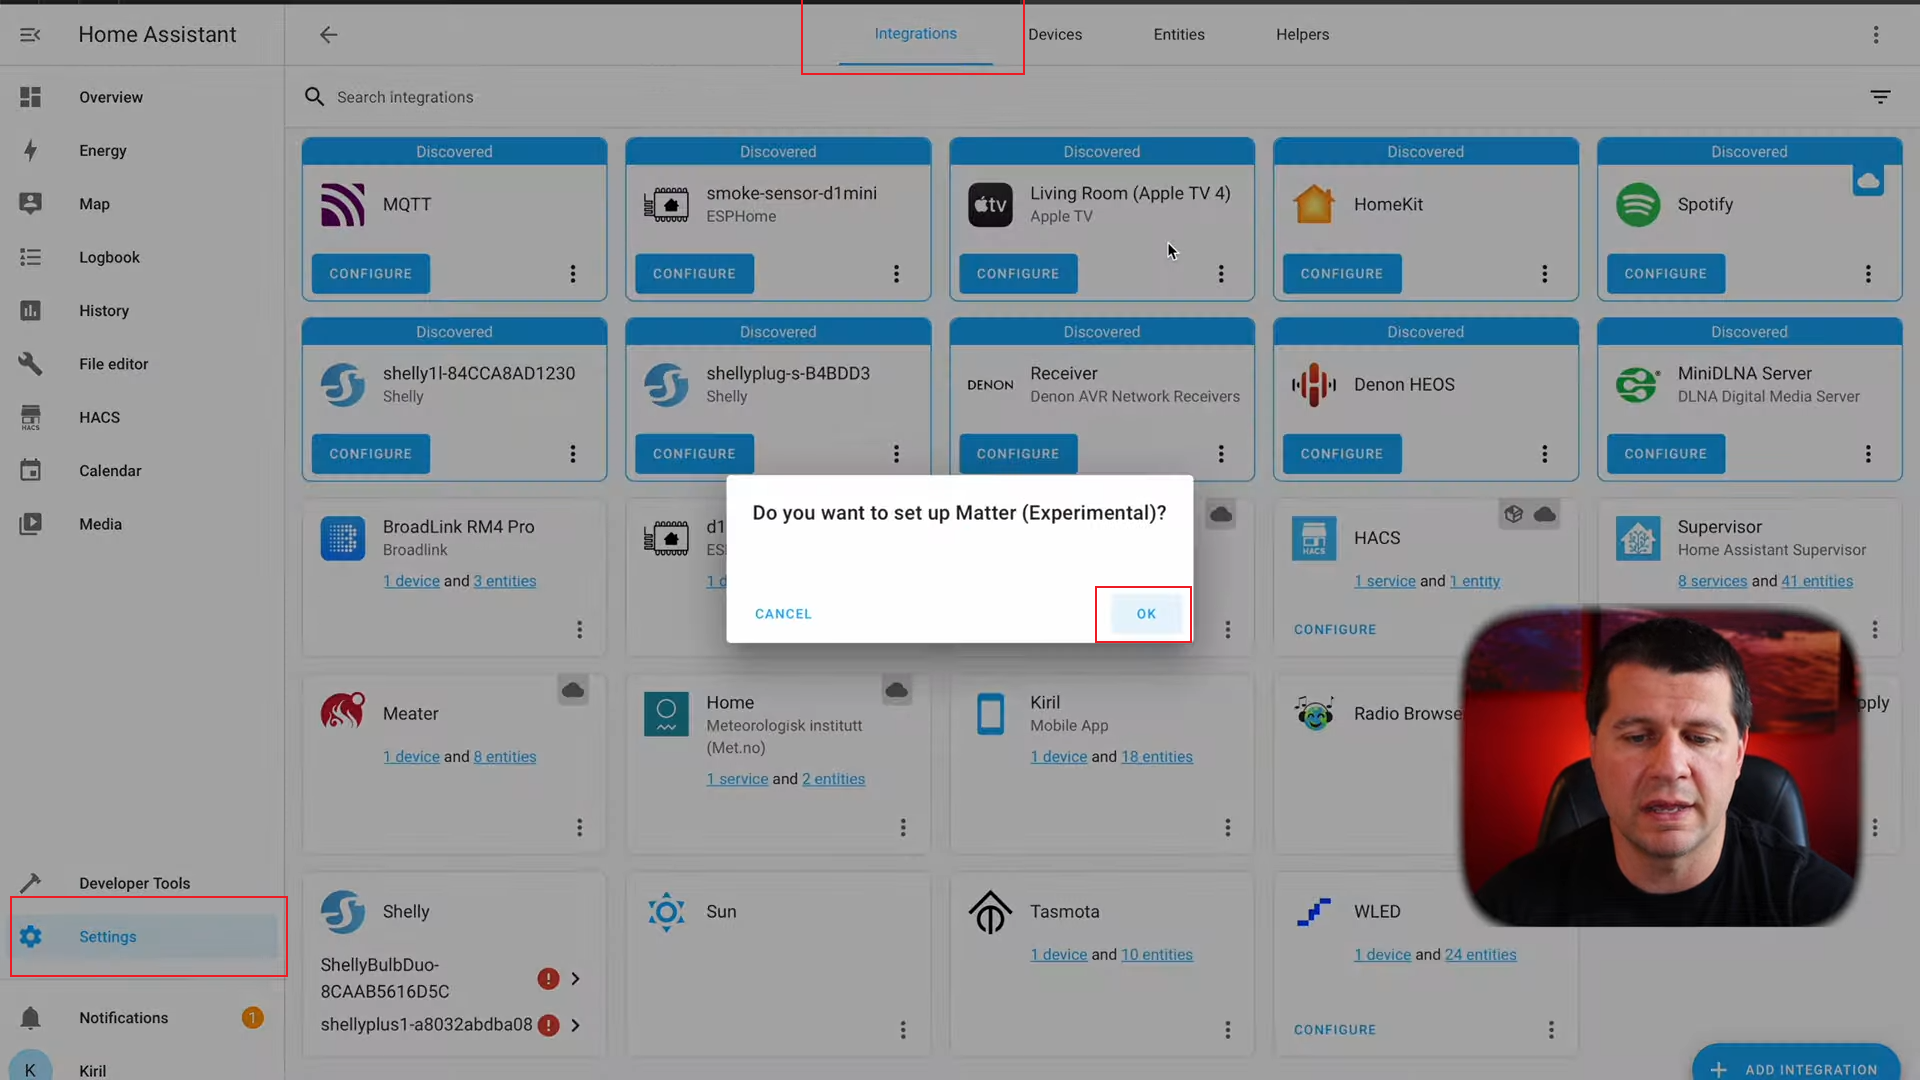
The next step is to add the Matter experimental integration in Home Assistant. I can use the following My Home Assistant link as it is faster. You will see a dialog with an URL, do not change anything and just click Submit and then Finish. My Matter experimental integration is added. So far, so good.
#Step 3 : Create Your Matter Light
We reach the step 3, which is to create a Matter light in Home Assistant. I have to connect my ESP32 device using a USB cable. Don’t forget to download the drivers for this ESP board.
- If your board is ESP32-C3-DevKitM-1 click on this link – https://www.silabs.com/products/development-tools/software/usb-to-uart-bridge-vcp-drivers
- if it is M5Stamp C3 click on this link – https://docs.m5stack.com/en/core/stamp_c3
You can download drivers for Windows or for Mac OS, but for Linux everything should work out of the box. The installation of these drivers for Windows and Mac is very trivial you just have to click “next” several times.
Next, I will open this link – https://nabucasa.github.io/matter-example-apps/ in Chrome or Edge browser, as these are the only supported browsers. Below you can see the page that Home Assistant crew provided for flashing the ESP32 board it is powered by ESP Web Tools. I have an article about ESP Web Tools as well If you wish to know more about it. It is very useful tool that makes the ESP32 & ESP8266 boards flashing very easy.
Anyways, I’ll click on the first bullet inside the Matter standard example apps page, because I’m having ESP32-C3-DevKitM-1 and I’ll click on Connect.
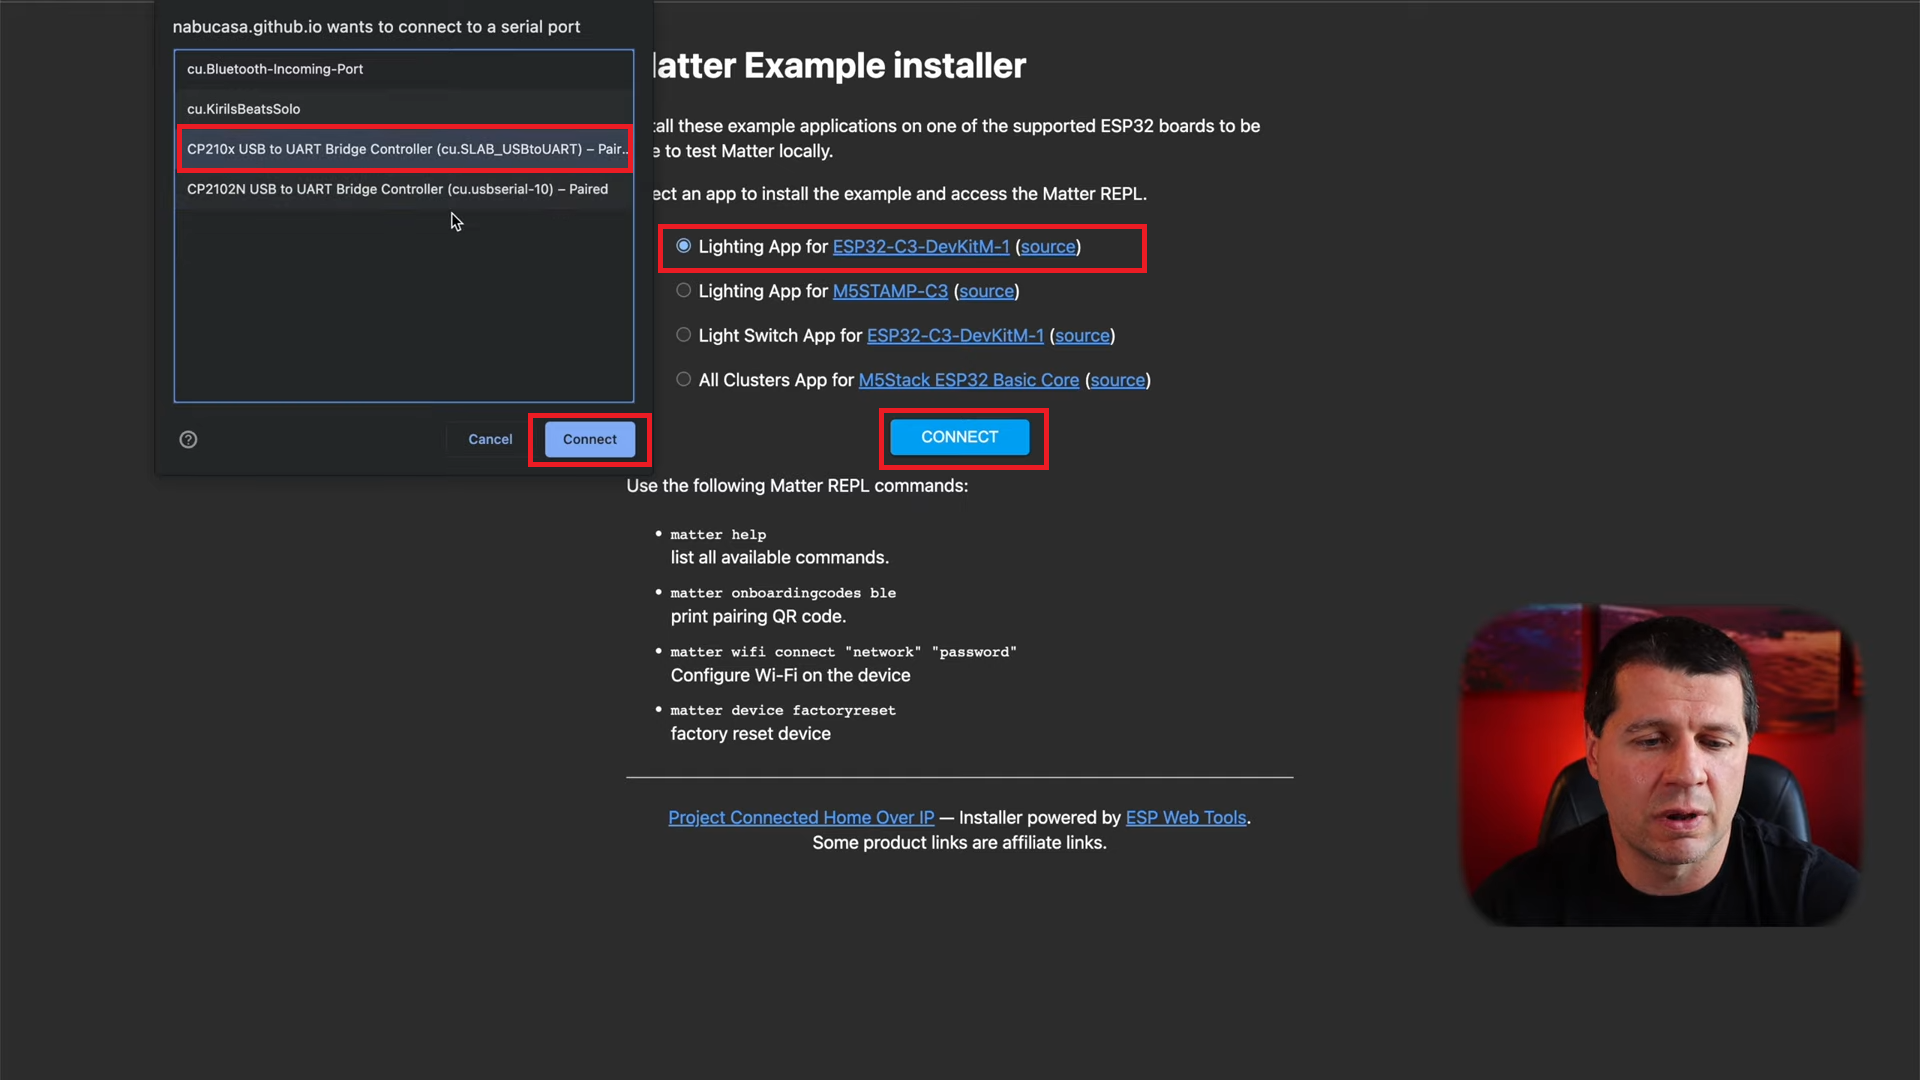
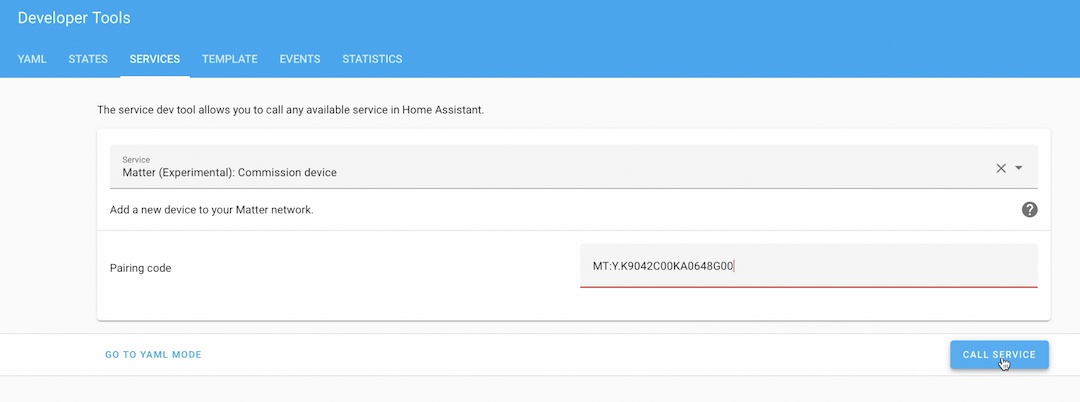
I have two devices displayed here, because I think I installed the drivers twice, once during this workshop, and once in the past. In your case you should have only one device, so choose that device and the flashing process will begin. After everything is ready, select Logs & Console and type the following command to get the pairing code:
matter onboardingcodes bleCopy the string after QR-Code: (starting with “MT:…”).
#Step 4 : Pair Your Matter Light
We reach step 4, where we have to pair the Matter device (simulating light) in Home Assistant.
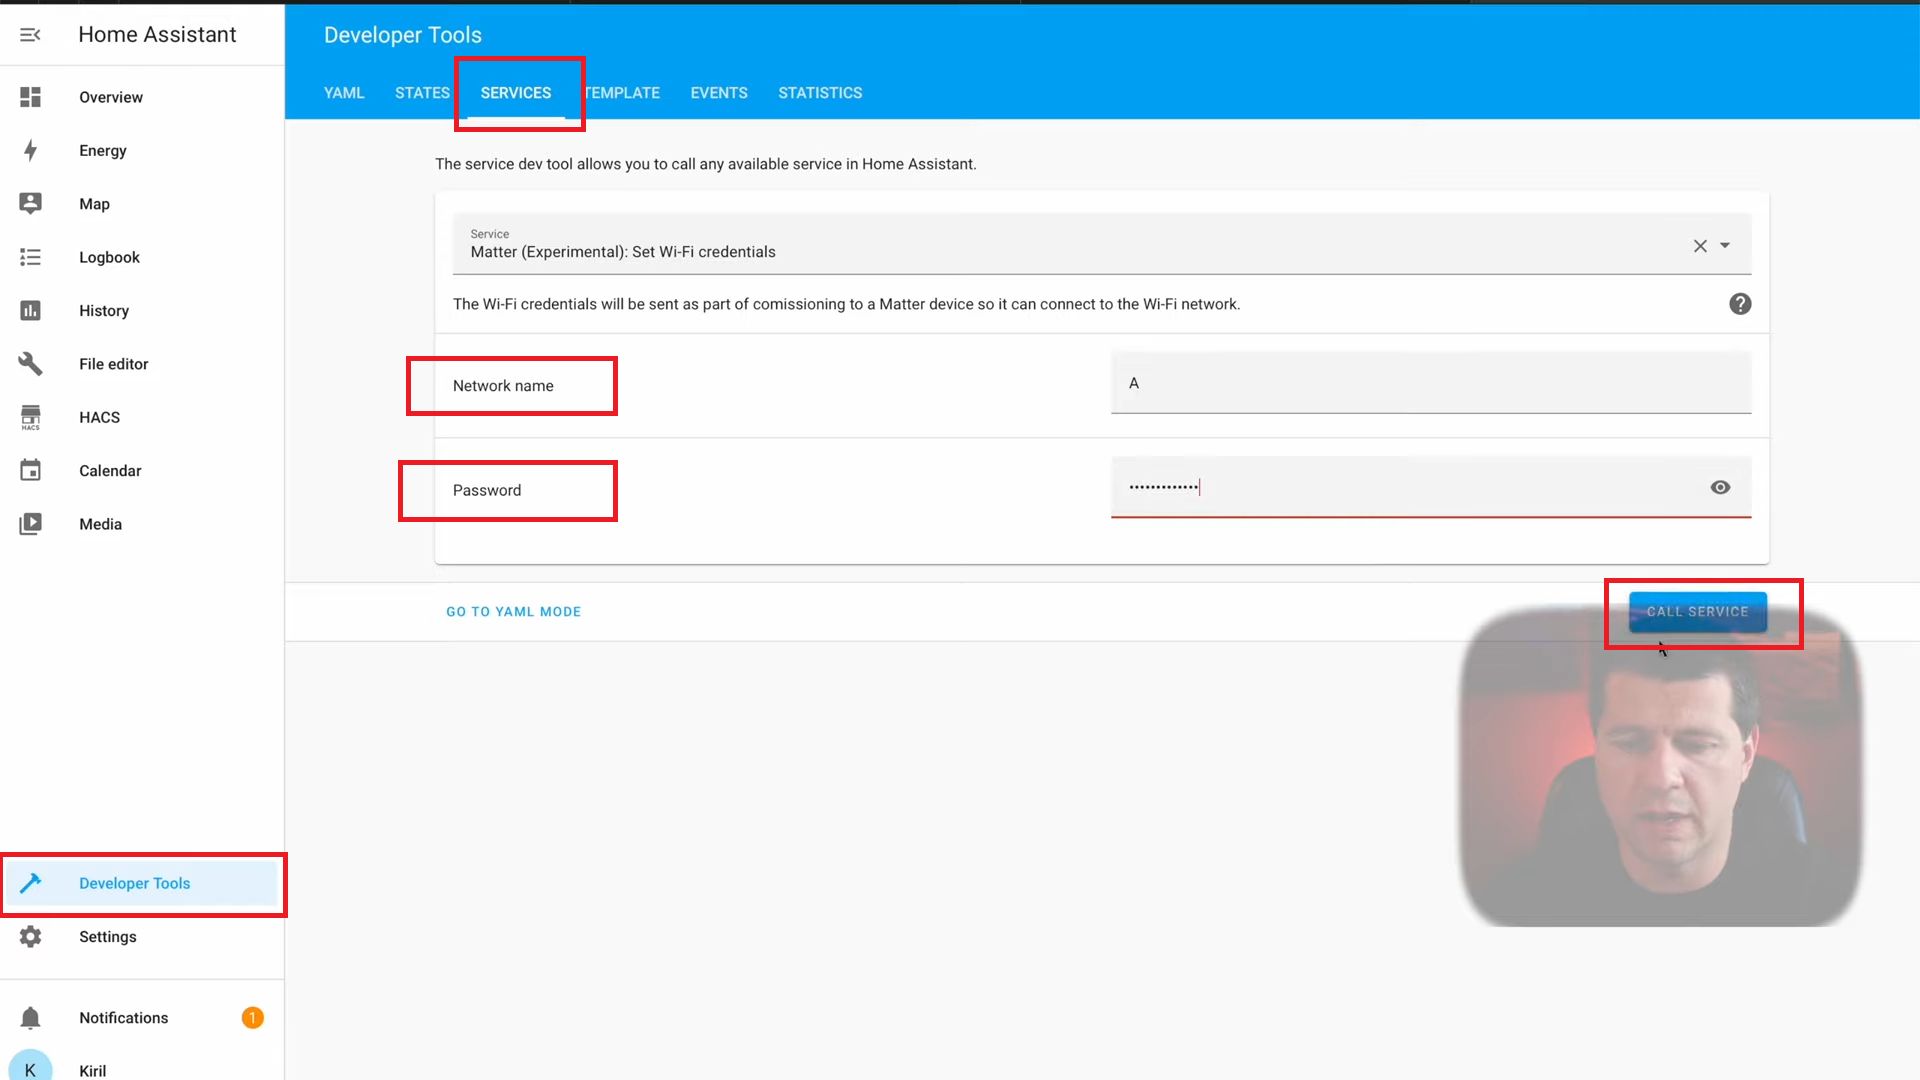
- For that go to: Developer Tools > Services or use this My Home Assistant link. Search for matter_experimental.set_wifi service and enter your WiFi credentials and then click on Call Service button.
- Next step is to call another service called matter_experimental.commission. Call the service with the QR code string that we get from the previous step. I’ll click on Call Service again and I think I’m ready.
Testing the Matter standard in Home Assistant
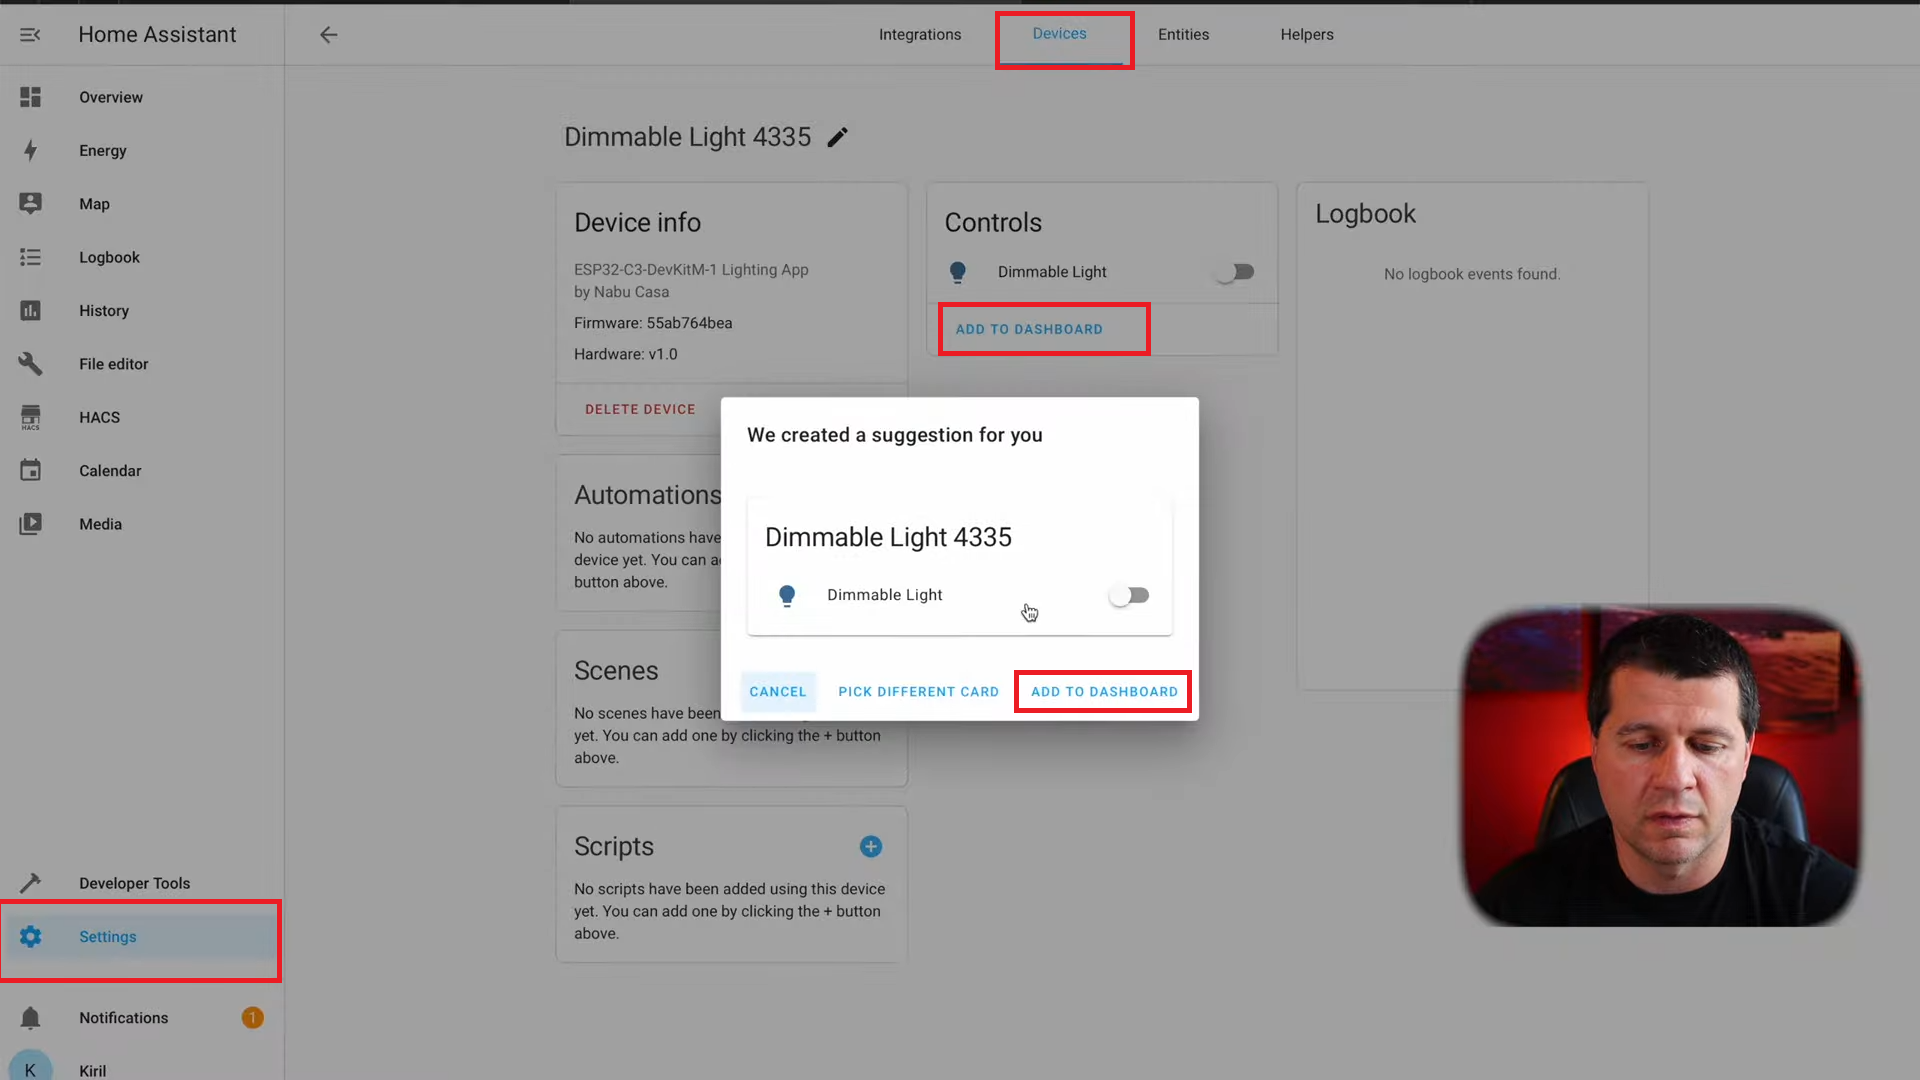
If I go to the Home Assistant integration section, under the Matter integration I’ll see one device and one entity called: Dimmable Light. I can add it to my Home Assistant Dashboard.
If I click on the Dimmable Light switch the LED on the ESP32-C3-DevKitM-1 will get turned on and off respectively. I can decrease the brightness of the LED and I can increase it.
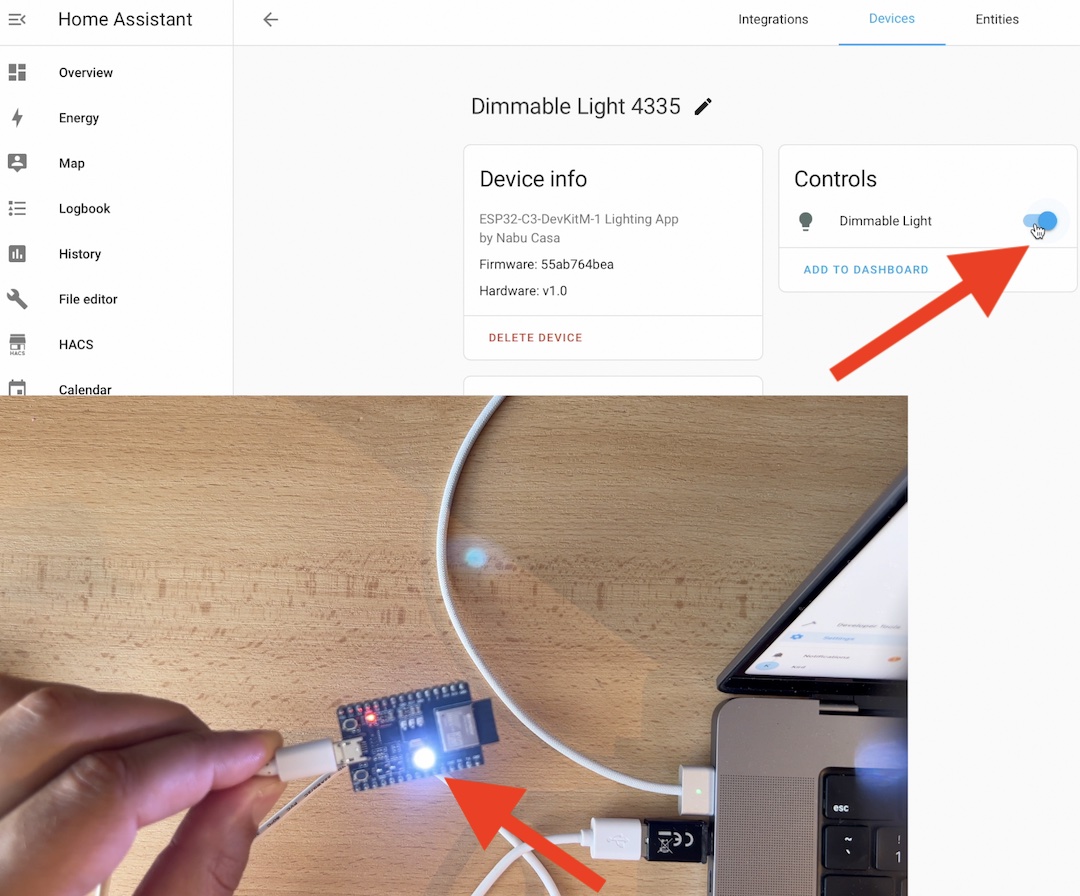
I can even press the Boot button located on the board and again the light will be turned On and Off and everything will be in sync with Home Assistant.
Of course, I can add automation scripts and scenes with this device inside Home Assistant, but this is not needed for now. The main idea here was to test the Matter Standard inside Home Assistant.
Outro
I really hope to see the Matter standard released for general public usage very soon, because it is very exciting and a lot of people are awaiting it like a hot bread 🍞.
If some of the terms and abbreviations that I use during this article are not so clear for you, check my free Smart Home glossary available on my other website https://automatelike.pro/glossary Go there enter your email and receive the Smart Home Glossary in your inbox absolutely for free.
I will see you next Wednesday when I release my new Smart Home related content. I’m Kiril and I’m done writing. Bye!
Whenn I add the https://github.com/home-assistant-libs/python-matter-server to HACS intergrations I got an error:
Repository structure for 1.0.5 is not compliant
https://i.ibb.co/bFBVk26/error.png