Today I will use an ESP32-CAM board that cost around $5 to make a wireless live streaming camera for Home Assistant. I will show every step that I did and I will share everything, so if you want, you can make one or dozen of such cameras for yourself.
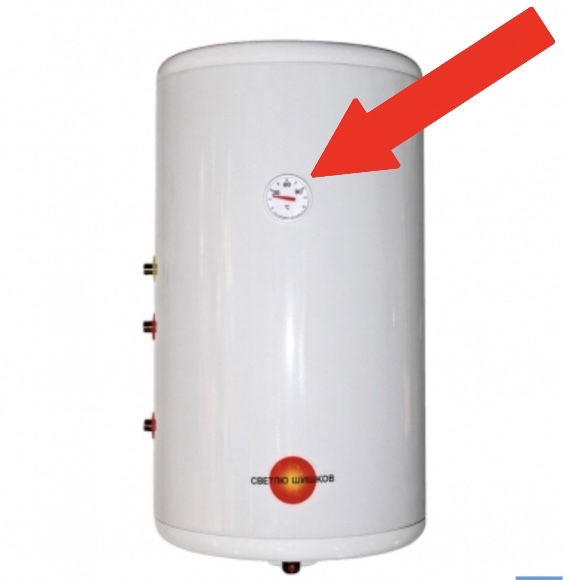
I’m personally doing this as I want to set up 1 or 2 of such cameras in my basement, so I can monitor my analog water heater thermostat and my pellet burner directly in my Home Assistant dashboard.
But the application of such tiny WIFI cameras are endless. Especially, when you add Home Assistant in the whole picture, which will allow making ton of useful automations, for example: video door bells, Image recognition, fish tank monitoring and many more.
Table of Contents
What can you expect from ESP32-CAM
I have to say that the image quality of the ESP32-CAM camera is not superb, it is far from the latest 8k security cameras out there, but it is decent enough, especially if you don’t want to read books using the camera and you don’t track fast objects.
If you are looking for great camera quality and good FPS, then you can skip this project and check for some of the shelf products like Reolink or Hikvision.
Smart Home Glossary
Before I continue to the needed things for this $5 live streaming camera for Home Assistant, I want to give you something digital for free.
I hope it will be helpful, as it is a Smart Home glossary in a form of a PDF document that I made for you. Inside that Glossary I put all of the Smart Home related words and acronyms that I can think of and their simple, but useful explanation.
Go to my other website and download it right now, free of any charge – https://automatelike.pro/glossary
Save that Glossary somewhere and when you hear/read a Smart Home word or acronym that is not so clear for you, check the meaning in the glossary.
Live Streaming Camera for Home Assistant – Hardware Requirements
Without further ado, let’s start with the requirements for today’s cheap live streaming camera for Home Assistant project.
ESP32-CAM
The first thing that is needed is the ESP32-CAM board and the tiny camera that is coming with it.
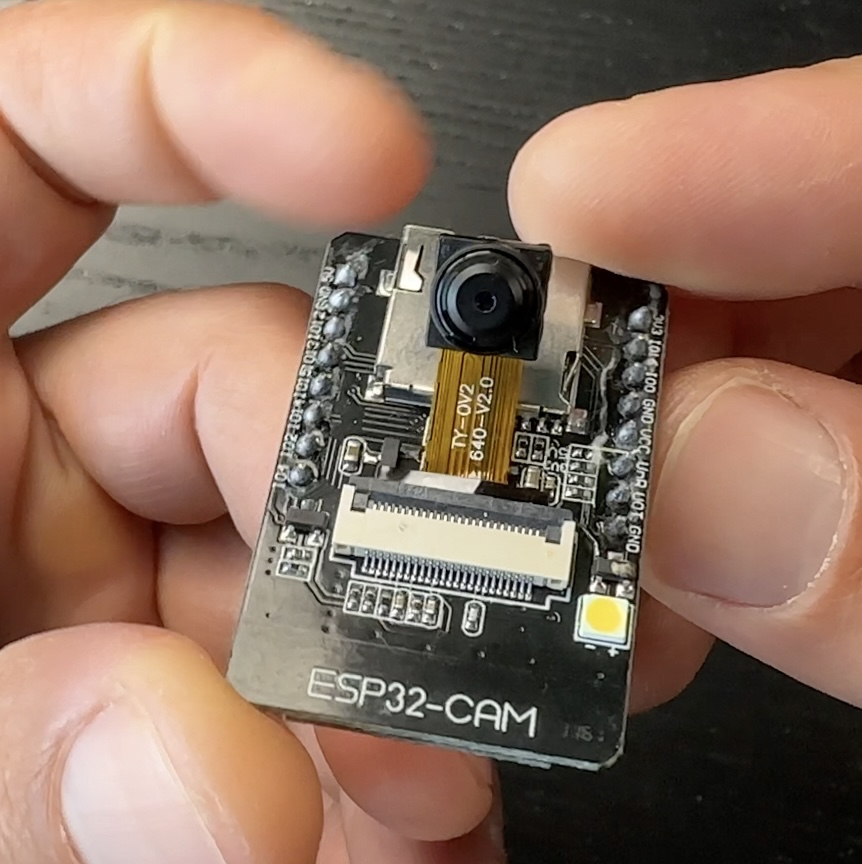
You can find ESP32-CAM in AliExpress website or in Amazon.
- ESP32-CAM (AliExpress) – https://s.click.aliexpress.com/e/_DB2tX2n
- 3PCS ESP32-CAM Camera + Jumper Wires (Amazon) – https://amzn.to/3Ck2Yrd
Quick Tip: I will put all of the needed parts for this project at the end of this section, so you can check their current prices and eventually to buy some.
FTDI Adapter
Next thing that is needed, is an FTDI adapter. I remember that this adapter was a bit scary to me at first, as it seems too complicated, but after the second time I use it, it all become fun.
The adapter is so useful and cheap that I think that every IoT DIY guy should have one.
The idea is the following:
The ESP32-CAM board have no USB port, as well as many other IoT boards. Instead these boards have pins, that means you can’t easily connect these boards to your computer to flash them. Here comes the FTDI adapter which have an USB to connect to your computer as well as some pins to connect to your boards. So it is kind of a good man in the middle.
- FTDI Adapter (AliExpress) – https://s.click.aliexpress.com/e/_DlKTNFN
- FTDI Adapter (Amazon) – https://amzn.to/3rIgVKJ
You only need this adapter during the flashing process after that you can put it in your drawer with your other IoT stuff until the next DIY project.
Jumper (Dupont) wires & USB Cables
One mini USB cable to connect the FTDI adapter to a computer is needed
- Mini USB Data Sync Cable for the FTDI adapter (AliExpress) – https://s.click.aliexpress.com/e/_Dldh4MT
- Mini USB Data Sync Cable for the FTDI adapter (Amazon) – https://amzn.to/3RIc0Eg
Next, some jumper wires are also needed to connect the FTDI adapter to the ESP32-CAM,
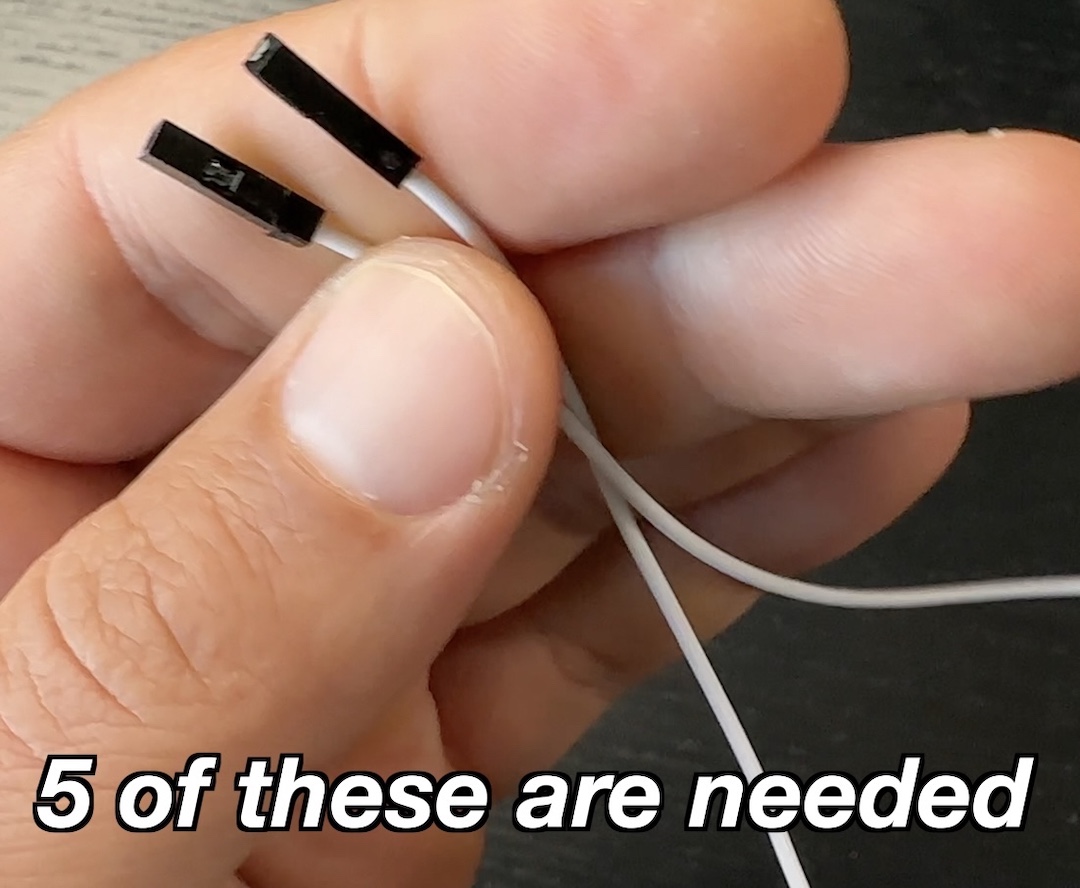
- Jumper Wires Female-to-Female (AliExpress) – https://s.click.aliexpress.com/e/_DEoCGxH
- Jumper Wires Female-to-Female (Amazon) – https://amzn.to/3ROczMI
Also a cable with USB adapter that will be used later to power the Camera.

- EU/US USB adapter + cable (AliExpress) – https://s.click.aliexpress.com/e/_DcI4Vf9
- EU USB adapter/charger (Amazon) – https://amzn.to/3CMdysL
- US USB adapter/charger (Amazon) – https://amzn.to/3SRDEjm
- Micro USB Cable that you can cut to power the camera (Amazon) – https://amzn.to/3rJ3aeM
- Micro USB Cable that you can cut to power the camera (AliExpress) – https://s.click.aliexpress.com/e/_DBkxndZ
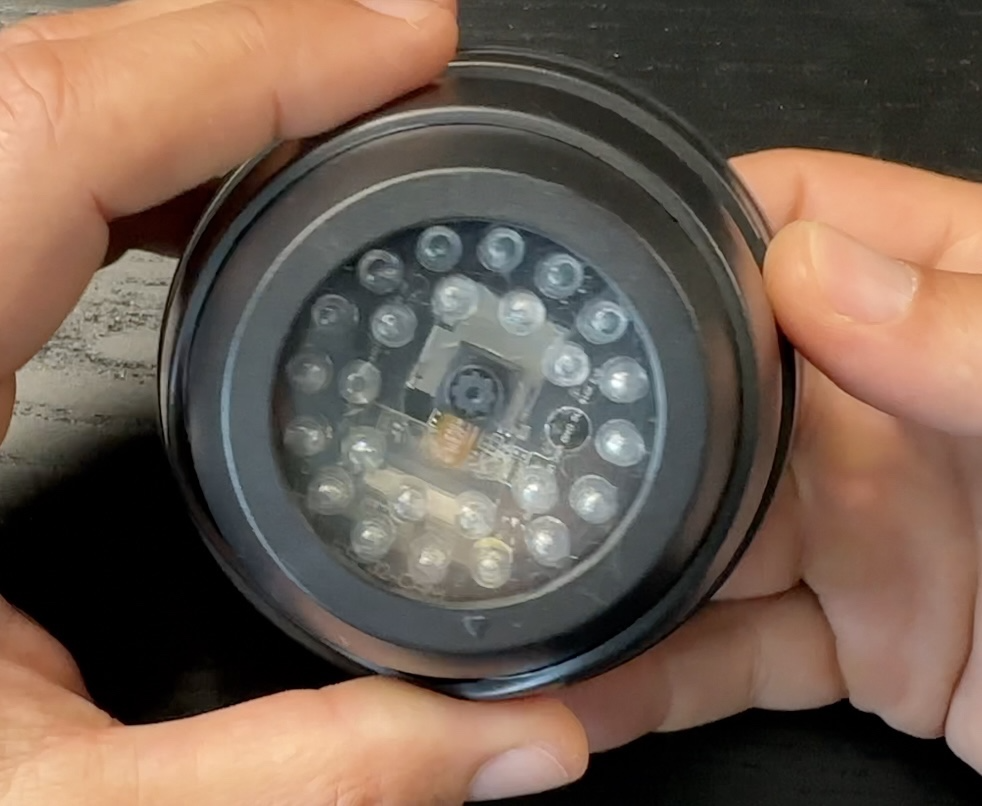
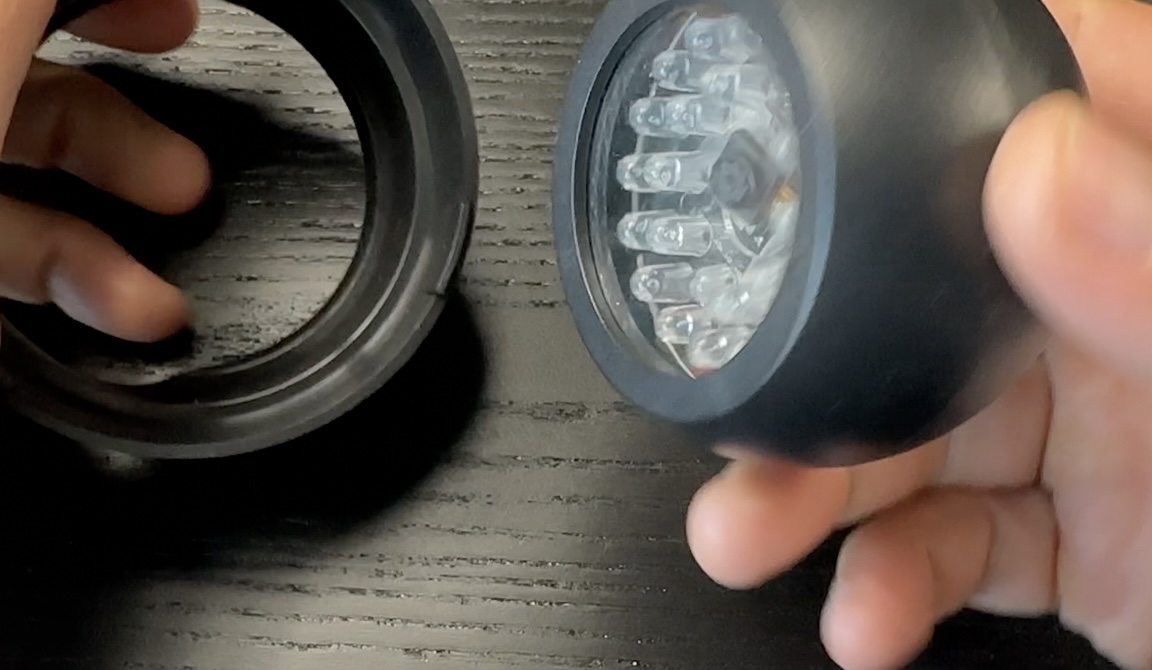
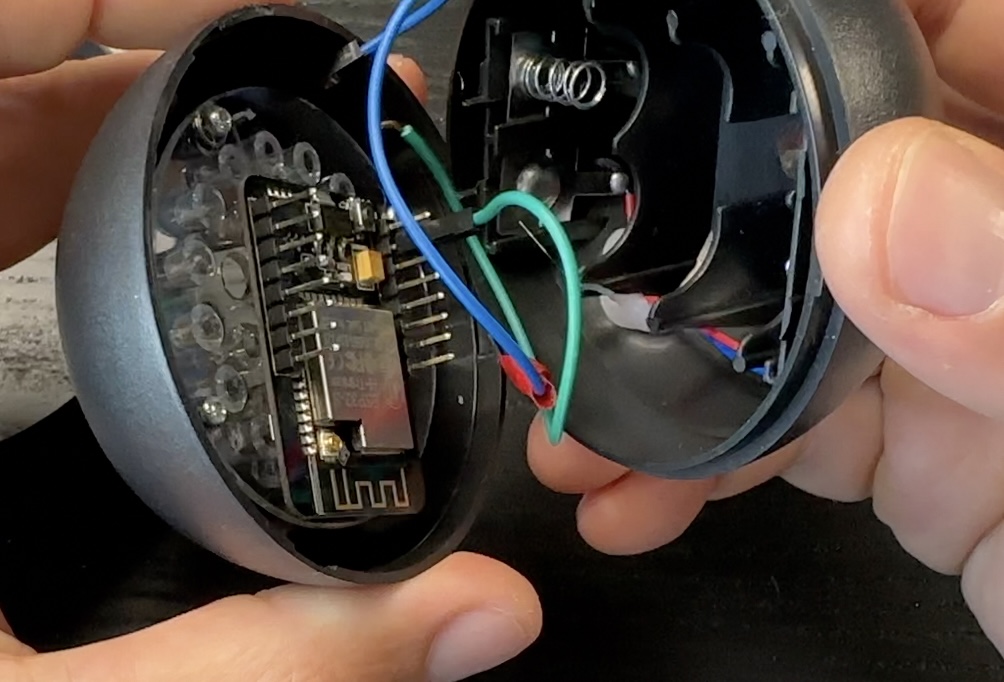
Dummy/Fake Camera Case
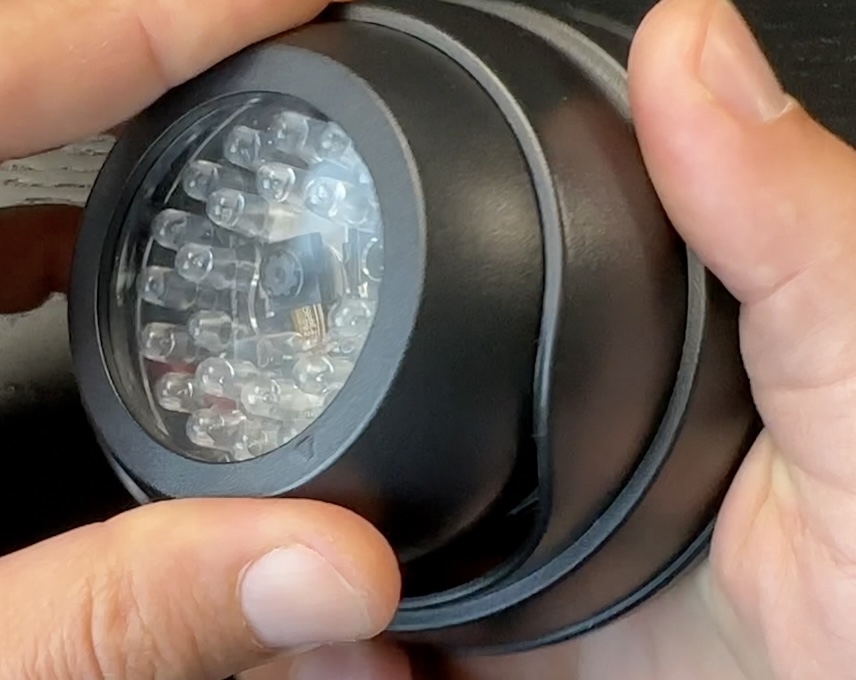
Optionally, to make this $5 live streaming camera for Home Assistant to look cool and finished you can buy a Dummy or Fake security camera case
- Dummy/Fake CCTV Camera Case (AliExpress) – https://s.click.aliexpress.com/e/_DDUSOiR
- Dummy/Fake CCTV Camera Case (Amazon) – https://amzn.to/3SQUdvT
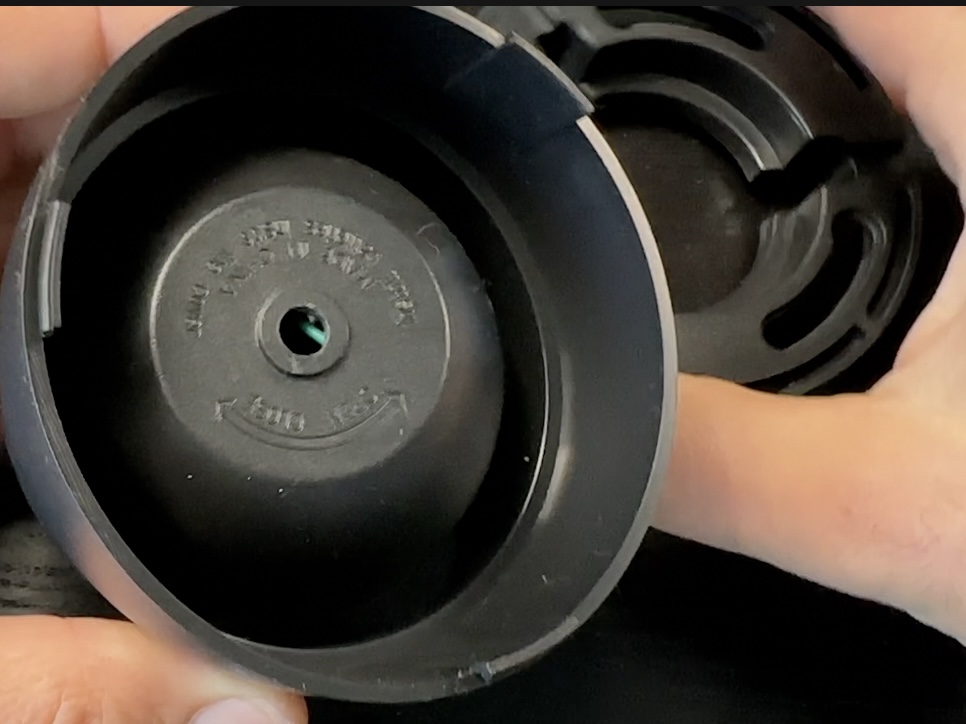
The other option, If you have a 3D printer is to print something from https://www.thingiverse.com website for example.
That was the needed hardware. Buying affiliate links for all of the needed parts from AliExpress or Amazon can be found below:
| ITEM | LINK |
| ESP32-CAM (AliExpress) | https://s.click.aliexpress.com/e/_DB2tX2n |
| 3PCS ESP32-CAM Camera + Jumper Wires (Amazon) | https://amzn.to/3Ck2Yrd |
| FTDI Adapter (AliExpress) | https://s.click.aliexpress.com/e/_DlKTNFN |
| FTDI Adapter (Amazon) | https://amzn.to/3rIgVKJ |
| Mini USB Data Sync Cable for the FTDI adapter (AliExpress) | https://s.click.aliexpress.com/e/_Dldh4MT |
| Mini USB Data Sync Cable for the FTDI adapter (Amazon) | https://amzn.to/3RIc0Eg |
| Jumper Wires Female-to-Female (AliExpress) | https://s.click.aliexpress.com/e/_DEoCGxH |
| Jumper Wires Female-to-Female (Amazon) | https://amzn.to/3ROczMI |
| Dummy/Fake CCTV Camera Case (AliExpress) | https://s.click.aliexpress.com/e/_DDUSOiR |
| Dummy/Fake CCTV Camera Case (Amazon) | https://amzn.to/3SQUdvT |
| EU/US USB adapter + cable (AliExpress) | https://s.click.aliexpress.com/e/_DcI4Vf9 |
| EU USB adapter/charger (Amazon) | https://amzn.to/3CMdysL |
| US USB adapter/charger (Amazon) – | https://amzn.to/3SRDEjm |
| Micro USB Cable that you can cut to power the camera (Amazon) | https://amzn.to/3rJ3aeM |
| Micro USB Cable that you can cut to power the camera (AliExpress) | https://s.click.aliexpress.com/e/_DBkxndZ |
Live Streaming Camera for Home Assistant – Software Requirements
Apart from the hardware stuff listed above, you will also need some software.
Namely:
- Home Assistant and
- ESPHome Dashboard (where ESPHome Dashboard is available as a Home Assistant add-on)
To help you further with this software part, I will give you two things:
- First, If you want to know more about Home Assistant and the different installation types or you still don’t have Home Assistant – go register for my free Webinar where I’m explaining everything in details – https://automatelike.pro/webinar
- Second, if you already have Home Assistant, but you don’t have ESPHome Dashboard – check this article of mine where I’m explaining the possible ways to get it – Complete ESPHome Installation Guide: 4 different ways to install ESPHome
Check these two things now and then come back right here. If you already have them, just continue reading, as now is the best time to connect the ESP32-CAM board to the FTDI adapter.
How to connect the ESP32-CAM to FTDI adapter?
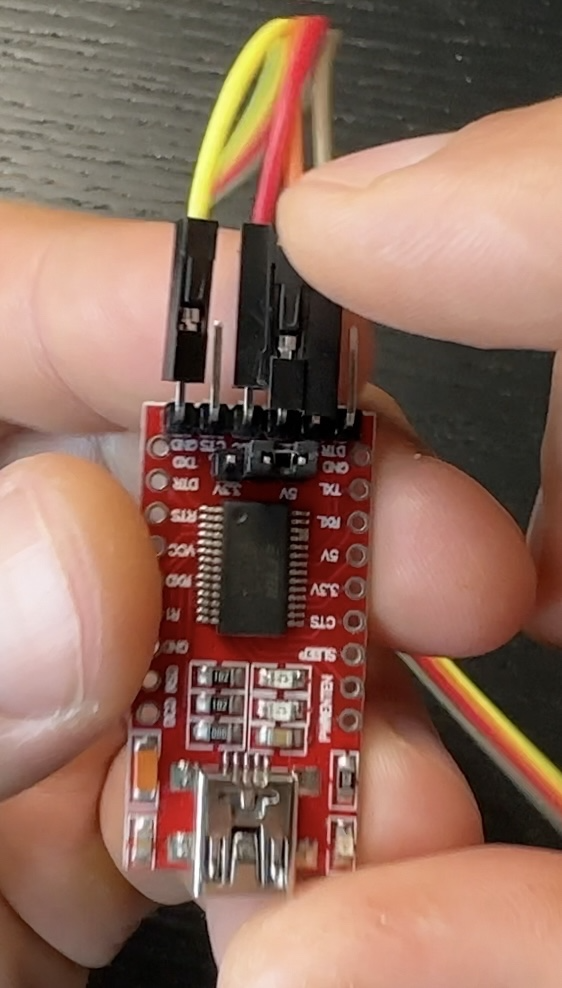
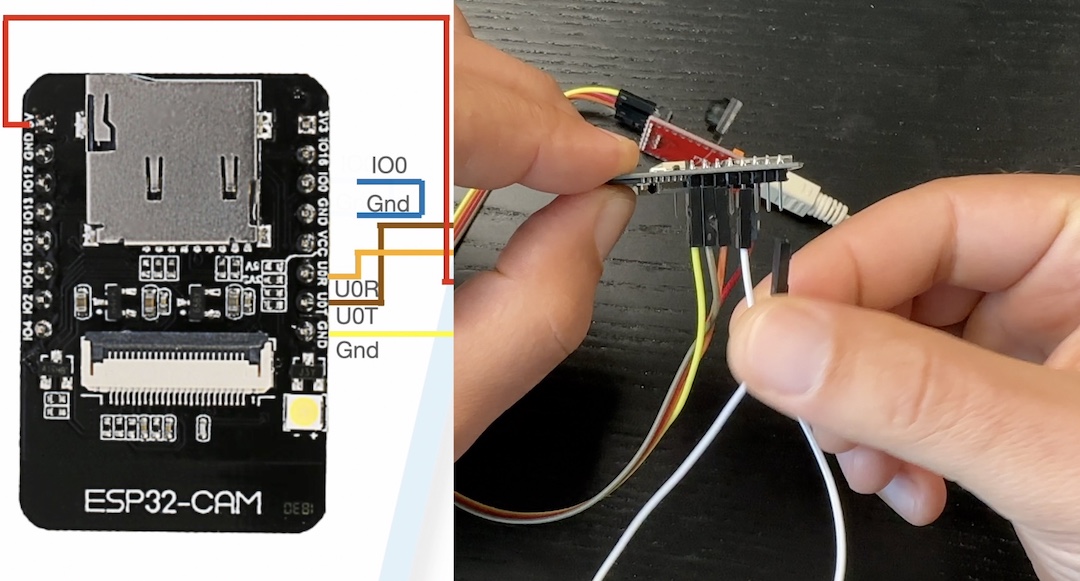
One important remark here, most FTDI adapters have a jumper that can switch between 3.3V and 5V. For this project the FTDI adapter should be set to 5V.
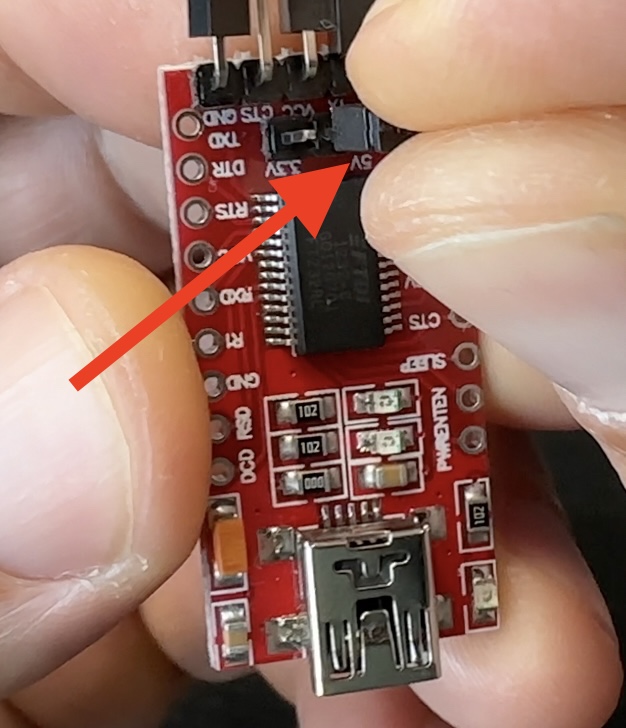
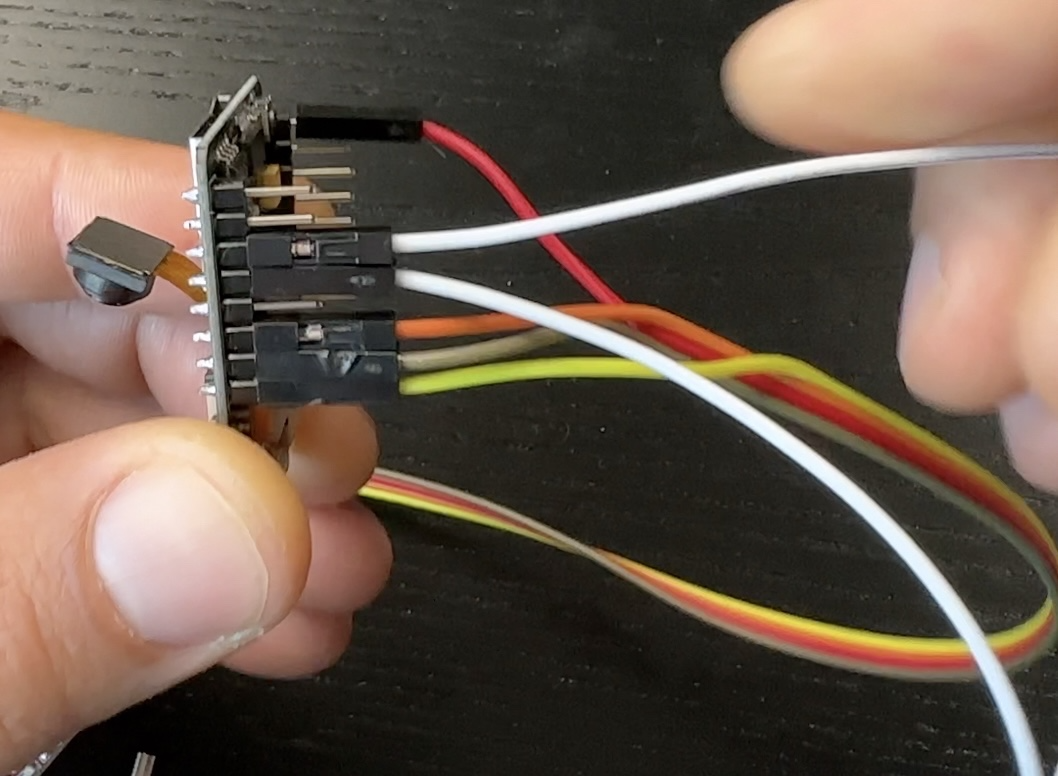
After I switched to 5V, I will use 5 female-to-female jumper wires and I will connect the GND pin of the FTDI adapter to any of the GND pin on the ESP32-CAM board, then I will connect the RX pin on the FTDI to the U0T pin of the ESP32-CAM, TX on the FTDI to the U0R and VCC or power on the FTDI to the 5V PIN on the ESP32-CAM.
To put the ESP32-CAM into programming or flashing mode, I have to connect any of the GND Pins on the ESP32-CAM board to the I00 pin again on the ESP32-CAM. This last connection is only needed during the flashing process and can be removed after that.
Here is a table if that is easier for you:
| FTDI ADAPTER | ESP32-CAM BOARD |
| GND | GND |
| RX | U0T |
| TX | U0R |
| VCC | 5V |
| GND to IO0 |
And here is a GIF diagram if that is easier for you:
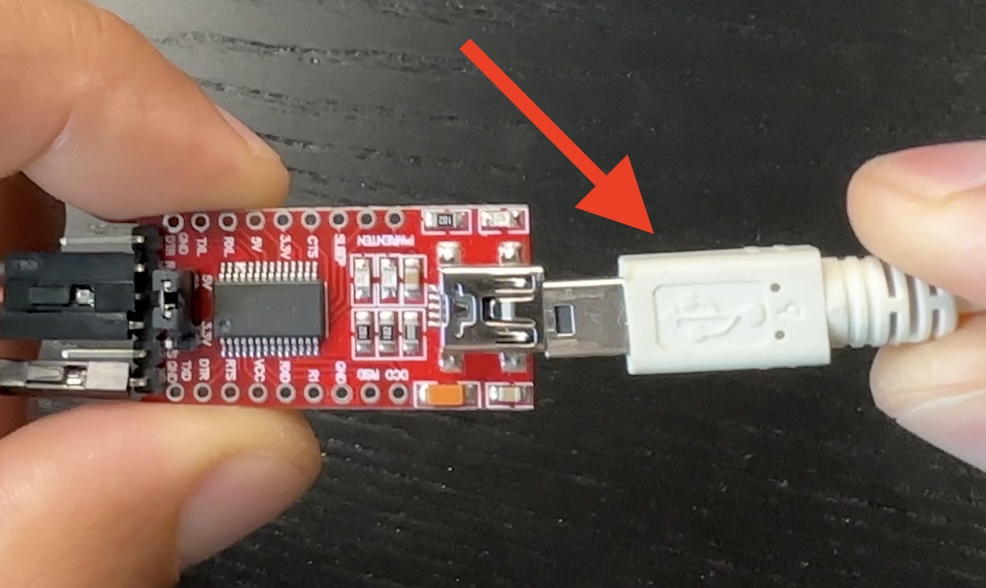
This is the end result of how I connect everything.
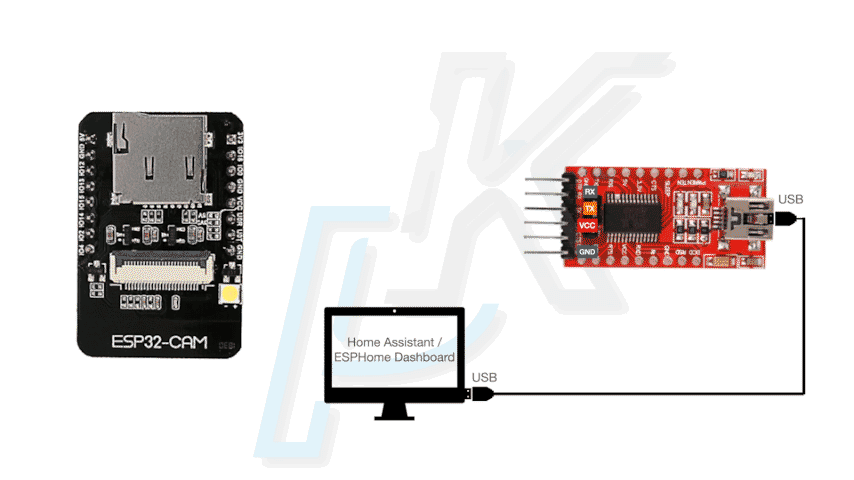
How to install ESPHome Firmware on the ESP32-CAM?
After I have all of the above, I can connect the FTDI adapter to the computer where Home Assistant & ESPHome Dashboard are installed, so I can flash the ESPhome firmware on the ESP32-CAM.
Here is how:
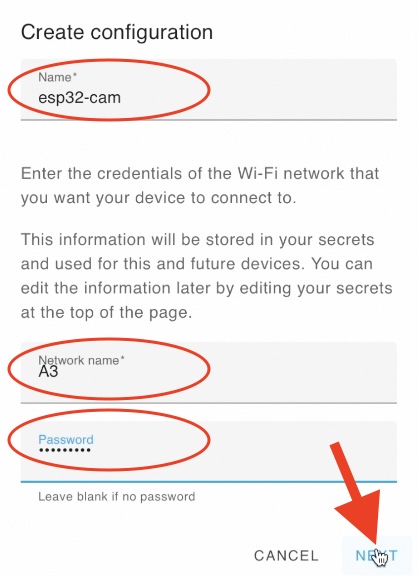
- I will open my ESPHome Dashboard and I will click on the + New Device button, then I will click on the Continue button
- I will enter the device name (my camera name will be: esp32-cam), as well as my WIFI name and password.
- On the next dialog as device type I will select ESP32 and I will click Next.
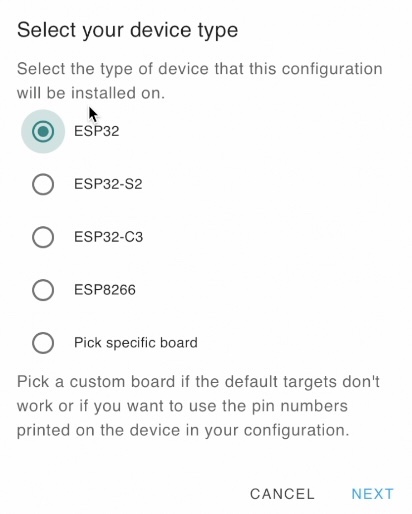
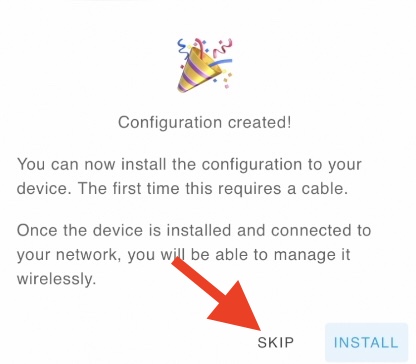
- The basic ESPHome configuration will be created and I can install it on the ESP32-CAM, but before that, I want to modify that configuration a bit, so I will click on the SKIP button.
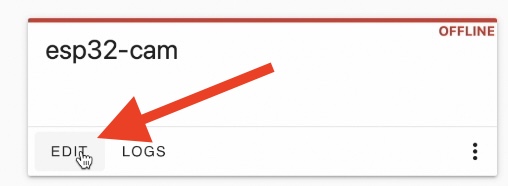
- I will click on the Edit button below the newly created ESPHome Device.
- On the next step, I will do something very hard, I will select all the YAML code and I will delete it. After that, I will paste the code below. The code is also available in GitHub – https://gist.github.com/peyanski/3c02a7276db7c9371b725713b1391a4c
esphome:
  name: esp32-cam
  platform: ESP32
  board: esp32dev

# Enable logging
logger:

# Enable Home Assistant API
api:
    reboot_timeout: 0s

ota:

web_server:
  port: 80

wifi:
  ssid: !secret wifi_ssid
  password: !secret wifi_password

  # Enable fallback hotspot (captive portal) in case wifi connection fails
  ap:
    ssid: "Esp32-Cam Fallback Hotspot"
    password: "C3FOhAPFtouw"

captive_portal:

# Example configuration entry
esp32_camera:
  external_clock:
    pin: GPIO0
    frequency: 20MHz
  i2c_pins:
    sda: GPIO26
    scl: GPIO27
  data_pins: [GPIO5, GPIO18, GPIO19, GPIO21, GPIO36, GPIO39, GPIO34, GPIO35]
  vsync_pin: GPIO25
  href_pin: GPIO23
  pixel_clock_pin: GPIO22
  power_down_pin: GPIO32

  # Image settings
  name: My ESP32-CAM

# Flashlight
output:
  - platform: gpio
    pin: GPIO4
    id: gpio_4

## GPIO_4 is the flash light pin
light:
  - platform: binary
    output: gpio_4
name: flashlight- Then I will click on the Save and then Install buttons.

- The only things that you may wish to change in the code above is the name: configurations, but that is optional and you can leave everything as it is.
- At this point I should connect the FTDI adapter (with connected ESP32-CAM on it) to the device where Home Assistant and ESPHome Dashboard are installed. And I will select the third option from the dialog (Plug into the computer running ESPHome Dashboard)
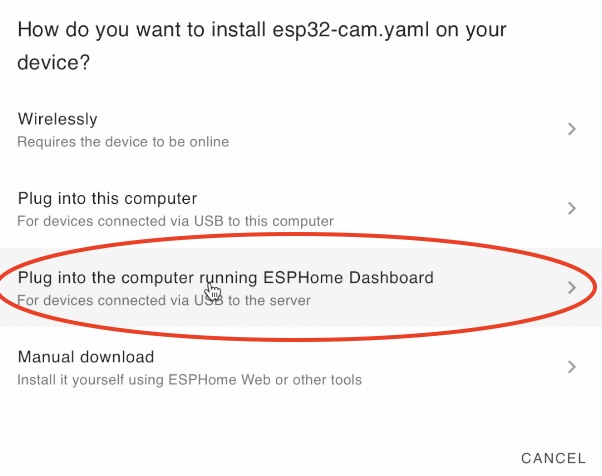
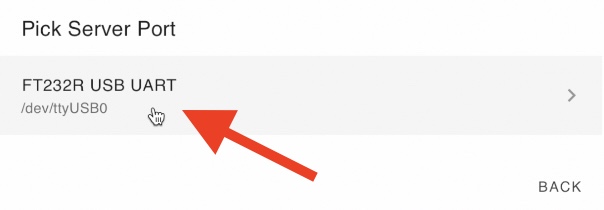
- I will pick the server port where FTDI adapter is connected and the ESPHome installation will begin
- After the installation is finished it is important the GND to IO0 connection on the ESP32-CAM board to be removed and then the almost ready live streaming camera for Home Assistant to be restarted.
- After the restart, I can check the logs for errors wirelessly, which is kind of cool

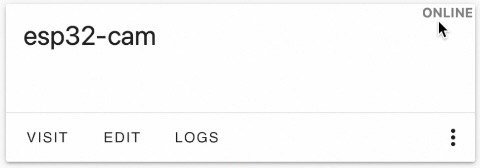
- If everything is fine, as end result, the ESP32-CAM device should become online after few seconds.
The above means that the device is ready to be added in Home Assistant and in the next section I’m going to do exactly that.
How to add the ESP32-CAM to Home Assistant?
Adding the $5 live streaming camera for Home Assistant in Home Assistant is super easy. Here are the steps that I executed:
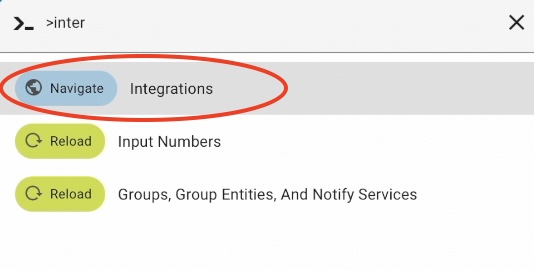
- Inside Home Assistant I pressed the “c” button to invoke the Home Assistant command search bar.
- Then I typed: integration and I selected Navigate Integrations
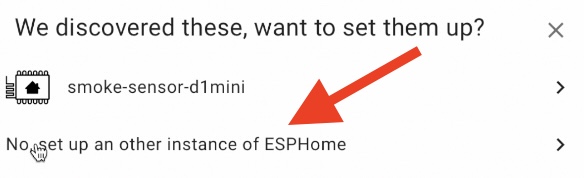
- There is a big chance the ESPHome based live streaming camera for Home Assistant to be auto discovered in the Integrations section, but this was not the case for me this time, so I clicked on the + Add Integrations and I searched for ESPHome, then I selected No, set up an other instance of ESPHome
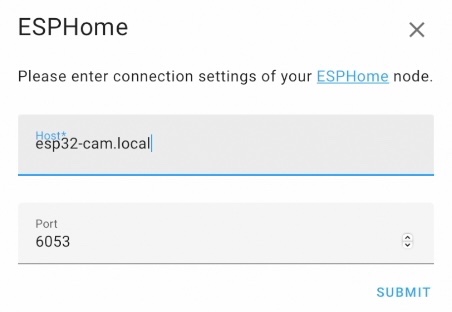
- As Host I typed esp32-cam.local, because this was the name of my ESPHome device. It is possible here the IP address to be used, which can be seen in the logs of the device or in the wireless router interface. I leaved the default port and I clicked on the Submit button.
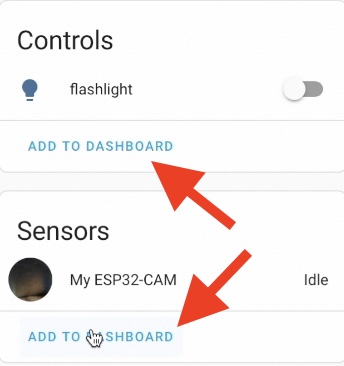
- And just like that the ESP32-CAM is added to my Home Assistant. When I open it from the Integrations list I can see a flashlight switch and the Camera sensor. If I click on that flashlight switch – the LED on the ESP32-CAM board will be turned on
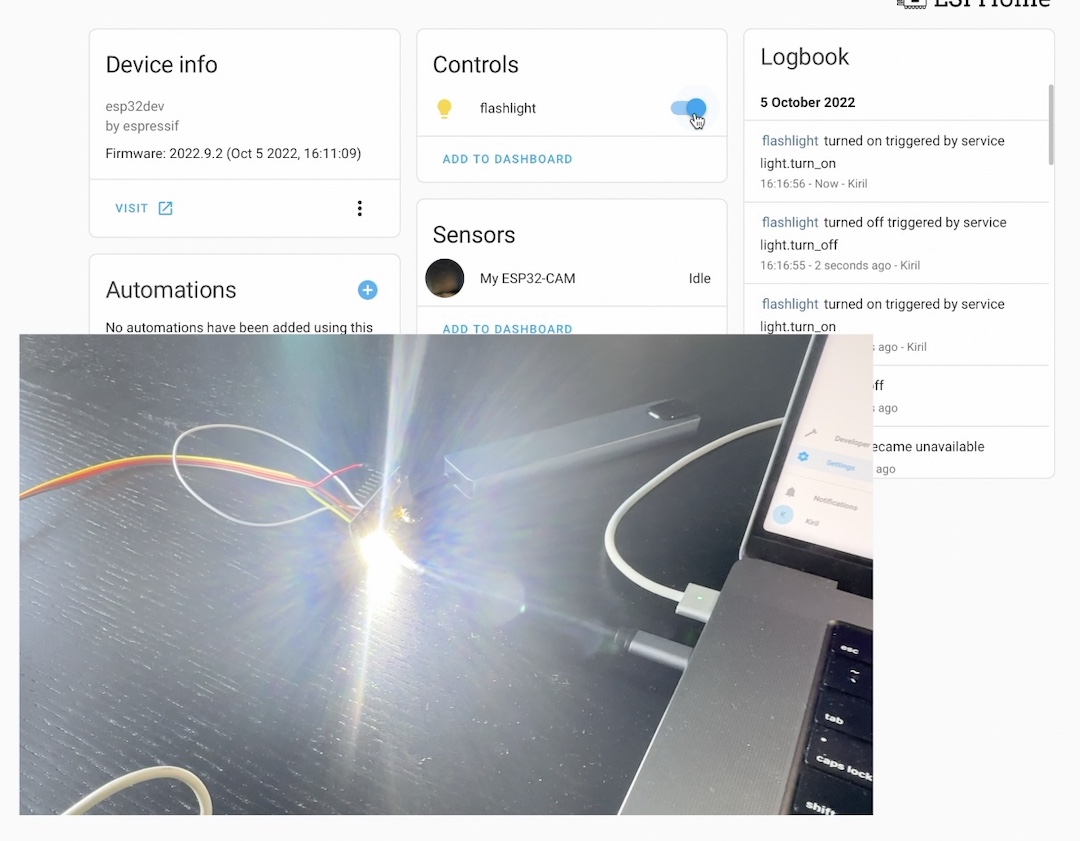
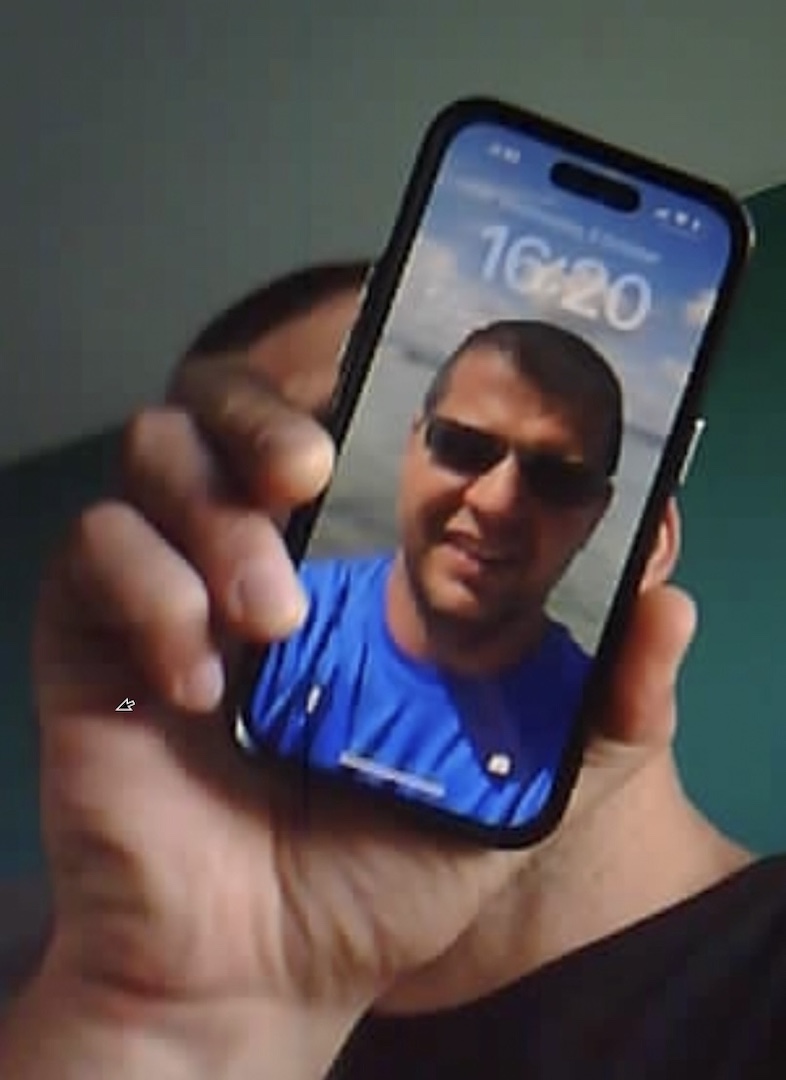
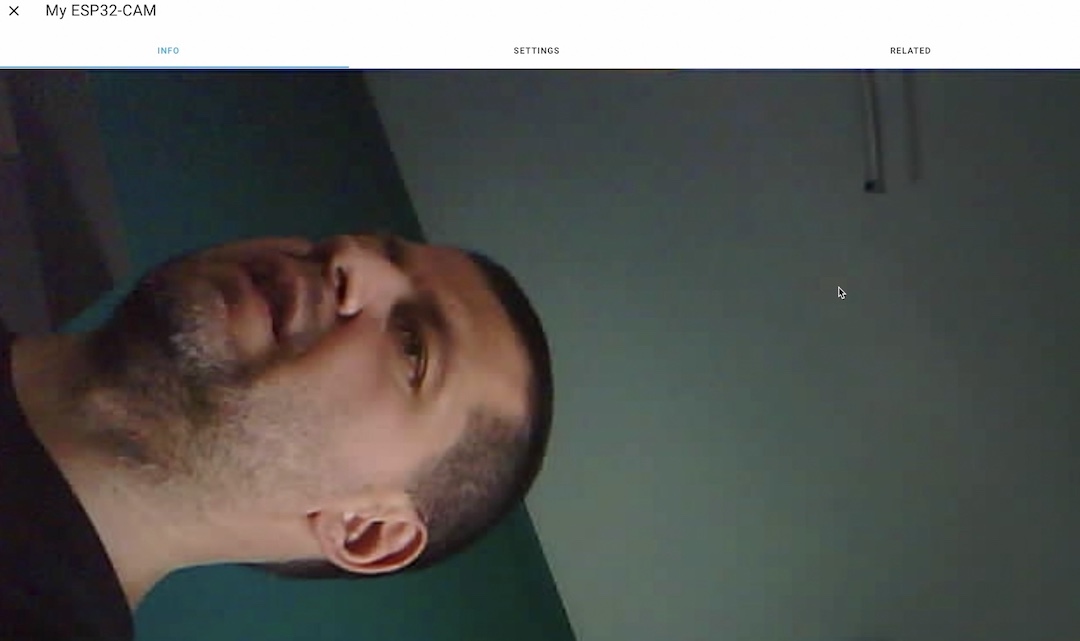
- And if I click on the My ESP32-CAM sensor I will open the camera stream.
- I can easily add the camera and the flashlight switch to my Home Assistant dashboard, by clicking on the ADD TO DASHBOARD button.
Final Steps
As I said in the beginning, the final step is to power the ESP32-cam and to leave it somewhere with a WIFI coverage. To power the ESP32-CAM I have two options:
- To buy a module or hat with USB – https://s.click.aliexpress.com/e/_DB2tX2n
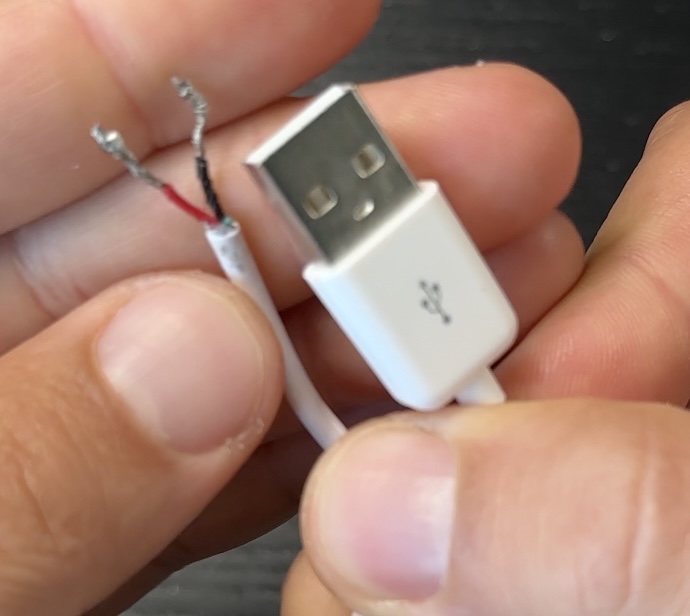
- Or I can cut a USB cable and I can connect the RED wire to the 5V pin of the ESP32-CAM and the black USB wire to the GND pin.
Also now is the best time for the fake security camera case where I can put my ready ESP32-CAM based live streaming camera for Home Assistant inside.

Challenge for You
I have a quick challenge for you – Are you going to try this $5 live streaming camera for Home Assistant and for what are you going to use it?
Share your answers in the comments section below.
Also if you manage to do it type #esp32camowned, so everybody will know that you made it and can congratulate you.
Thank you for reading, I’m Kiril and I’m done. Bye.
Great description but every time i try to install the esp32 camera board I get an error message stating
Platform Manager: Installing platformio/espressif32 @ 3.5.0
Error: Please upgrade to the PlatformIO Core 6
Do you know of any way to upgrade the PlatformIO .
I can set it up using esphome-web and this allows it to be made discoverable.
I can then adopt the camera which sets up an entity in ESPHome showing the camera online but when i come to install anything, even the default YAML set up in esphome-web the error message noted above comes up. I have two ESP32 cameras and they bothy do the same.
Can you think of any way to fix this.
#Esp32camowned
Very good instructions Kiril. Mine auto detected so all I had to do was go to the integration and add the flashlight and image to the dashboard. Super Easy!!
I will set it up outside at my bird feeder. I think I will add a motion sensor to alert me when there is something there.
Thanks Kiril
Great work Ralph! Thanks for the good words, thanks that you try the project and most of all thanks that you are sharing the results here. Enjoy!
Flashing fails!
========================= [SUCCESS] Took 50.43 seconds =========================
INFO Successfully compiled program.
esptool.py v4.5.1
Serial port /dev/ttyUSB0
Connecting………………………………..
ERROR Running command failed: Failed to connect to ESP32: No serial data received.
[snipped]
INFO Upload with baud rate 460800 failed. Trying again with baud rate 115200.
esptool.py v4.5.1
Serial port /dev/ttyUSB0
Connecting………………………………..
ERROR Running command failed: Failed to connect to ESP32: No serial data received.
Please help me.
#esp32camowned
With a bit of luck I got one working. But see my comment above from 06/06/2023.
I tried several times with two esp32-cam’s, with no luck!
ERROR Running command failed: Failed to connect to ESP32: No serial data received.
I do have another cam and three underway from Ali-express, so I’ll give it a try.
Wish me luck or give me advice!
Cheers
I got same error with ftdp adapter. I used esp32 cam adapter and connected to the server. It worked
How to get the ribbon showing “info settings related” that is visible in your picture under “And if I click on the My ESP32-CAM sensor I will open the camera stream.” I don’t get it on mine. When clicking on “settings”, can you alter the settings of the camera, e.g. resolution?
Never mind, the ribbon showing “info settings related” is from older versions of HA. Newer versions show a cogwheel (settings) and three vertical dots (device info / related). And no, settings is not about changing the settings of the camera but the settings of the card itself.