
In this article we will see how to easily start presence detection with Raspberry Pi, Home Assistant and and free software called Monitor. We will also use some help from Mosquitto MQTT Broker to enable MQTT communication between all involved components.
Accurate presence detection is crucial for any Smart Home. Base on it you can activate automations when someone enter or leave your home or even when change rooms.
So Raspberry Pi, Home Assistant, Monitor and little MQTT communication. Coming up…
Table of Contents
What if I don’t have Home Assistant?
If you don’t know anything about Home Assistant go check these articles and install Home Assistant.
- Home Assistant Container and Home Assistant Supervised – LINK
- Home Assistant on Windows using VirtualBox – LINK
What if I don’t have a Raspberry Pi?
If you don’t have a Raspberry Pi go grab one, almost any of the models will do. The one that I’m using for this project is the Raspberry Pi Zero which is just perfect for Bluetooth presence detection. Here are few pros:
- It is very tiny,
- It has very low power consumption (around 150mA),
- It have embedded WiFi and Bluetooth, so you can place it almost anywhere you wish,
- Last, but not least you can find it really cheap these days.
Bellow you can see the prices in Amazon:
- Raspberry Pi Zero W (Amazon Affiliate link) – https://amzn.to/2LjtYQU
- Raspberry Pi Zero W Official Starter Kit (Amazon Affiliate link) – https://amzn.to/3ndcX87
You will also need a SD card and standard mini USB cable with adapter. I will recommend to get a reliable SD card from known brand if you wish to minimise the occasional SD card corruption problems.
Bellow are few examples that I was used before or I’m still using.
- Kingston 16GB microSDHC Canvas Select Plus 100MB/s (Amazon Affiliate link) – https://amzn.to/397OgoW
- SanDisk 16GB Ultra microSDHC UHS-I Memory Card with Adapter (Amazon Affiliate link) – https://amzn.to/3hHg1IL
What you can expect?
We are going to start with the setup of a Raspberry Pi OS on our Raspberry PI Zero W from scratch on a fast pace, because it is pretty straightforward process and you are really smart guys.
Next will install and setup the Mosquitto MQTT Broker and Monitor script on our brand new Raspberry.
After that we will involve Home Assistant and we will create some MQTT sensors and presence detection automations.
The end goal is one very accurate and fast presence detection with Raspberry Pi, Home Assistant and Monitor where MQTT is used for communication and Bluetooth is used for passive device detection.
Don’t worry if you have any difficulties doing this, you can always ask in the comments bellow. I personally or some other wonderful guys from our community will try to help.
Now let’s start this.
Raspberry Pi OS on SD Card
Go to the download section of https://www.raspberrypi.org/software/ and get the Raspberry Pi Imager for your operating system.
Start it, insert a SD card in your computer SD card slot or SD card reader and choose Raspberry Pi OS (other) > Raspberry Pi OS Lite (32-bit)

Then select your SD card and click on Write button.
After the writing and verification processes finished – just unplug and plug again your SD card as we have to create two files there.
How to enable SSH access?
We will enable SSH to access our Raspberry Pi over the network without having to attach any display or peripherals to it. To enable the SSH just create an empty file inside the boot/root partition of the SD card called ssh. The file must be without any extension (like .txt or .md) or content.
If you are using macOS type the following in Terminal:
touch /Volumes/boot/sshFor Linux/Windows you can use any text editor or you can copy/paste and rename one of the existing text files inside the boot partition of the SD card.
How to enable the WiFi?
To setup the Wi-Fi of the Raspberry we have to create one more file called wpa_supplicant.conf file in boot/root directory, and to add Wi-Fi details inside. Below is an example of the wpa_supplicant.conf file content:
country=US
    ctrl_interface=DIR=/var/run/wpa_supplicant GROUP=netdev
    update_config=1

network={
    ssid="Your Network Name"
    psk="Your Network Password"
    key_mgmt=WPA-PSK
}
You may wish to change the ssid with your WiFi name and psk with your WiFi password and optionally the country abbreviation ;-).
When you are ready with creation of ssh and wpa_supplicant.conf files in your SD card, unplug it from your computer and plug it in the Raspberry Pi and power on the Pi.
Install Mosquitto on Raspberry Pi Zero W
Okay, we have our Raspberry Pi Zero W up and running and ready to work. We are not going to make the Raspberry waiting too much, because we will install Mosquitto.
Mosquitto is one of the most popular MQTT brokers available. It is needed for the Monitor script to communicate with the rest of the world and to announce who’s home and who’s not. Let’s install it.
Connect to the Raspberry Pi using SSH:
ssh pi@YOUR_RASPBERRY_IPThe above is valid for Linux/macOS. For Windows use the Putty SSH client. Default user is pi and default password is raspberry. To find the Raspberry IP check your router interface for the connected clients.
Update and upgrade your Raspberry OS by executing the following:
sudo apt-get update && sudo apt-get upgrade -y && sudo apt-get dist-upgrade -y && sudo reboot
The above commands will be executed one-by-one and finally you Raspberry will reboot. Log in again and install Mosquitto by executing this:
# get Mosquitto repo key
wget http://repo.mosquitto.org/debian/mosquitto-repo.gpg.key

#add the repo
sudo apt-key add mosquitto-repo.gpg.key

#download appropriate lists file
cd /etc/apt/sources.list.d/
sudo wget http://repo.mosquitto.org/debian/mosquitto-buster.list

#update caches and install
apt-cache search mosquitto
sudo apt-get update
sudo apt-get install -f libmosquitto-dev mosquitto mosquitto-clients libmosquitto1
Woohoo you now have the most popular MQTT Broker installed. Cheers 🥂
Install Monitor on Raspberry Pi Zero W
I think we have everything needed for the Monitor script installation. Let’s install that Monitor on the Raspberry Pi Zero W.
We need a git client to clone the Monitor repo, let’s start with that:
#install git client
cd ~
sudo apt-get install git
#clone the Monitor repo
git clone https://github.com/andrewjfreyer/monitor
#enter in `monitor` directory
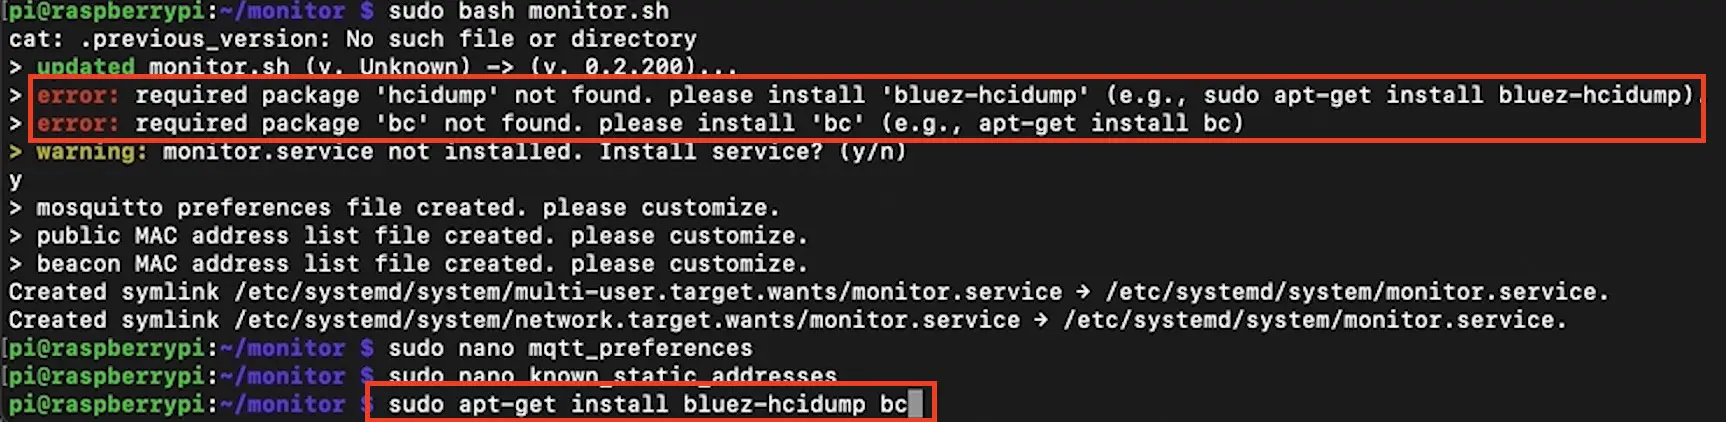
cd monitor/Start the Monitor script and watch for errors (missing packages):
sudo bash monitor.shIf you found any missing packages, install them using sudo apt-get install package_name. I had to install additionally only two packages (bluez-hcidumb and bc), but this may change over time (Hey there reader from the future, why don’t you subscribe for my newsletter?).
Edit MQTT preferences
In the mqtt_preferences file are stored all of the needed settings for the MQTT Broker and we can edit them with nano text editor
sudo nano mqtt_preferences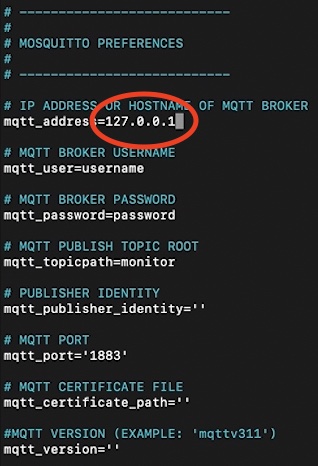
Change the mqtt_address from 0.0.0.0 to 127.0.0.1
This is needed for the Monitor script to connect to the MQTT Broker. All other settings may stay as they are, although is good idea to enable authentication and to create a dedicated user in Mosquitto to harden the security.
Add devices to track with Monitor
We can now add our devices that we want to monitor with Monitor (clever ah?). We just have to edit the known_static_addresses file in the Monitor configuration.
sudo nano known_static_addressesIn the file you have to add the Bluetooth MAC address of the device that you want to track and an alias e.g. 00:11:22:33:44:55 alias
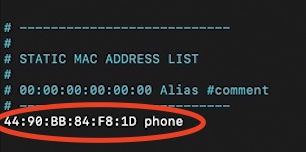
Don’t forget that you need the Bluetooth MAC address and not the WiFI MAC.
Start the Monitor script
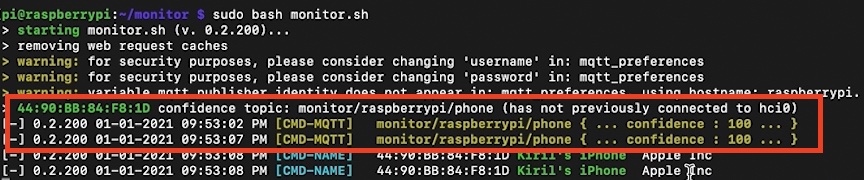
Start again the Monitor script with:
sudo bash monitor.shMy advice here is to try start and stop (Ctrl+C) the Monitor script until you see something similar: A MQTT topic, MAC addresses and confidence points:
Monitor on several Raspberries (Credits to Andrew)
You can use Monitor script on several Raspberry Pi devices to track your movement within your home more accurately. This is well explained by Andrew which is the author of the Monitor script on his GitHub page.
Hats down, Andrew you did a wonderful job with Monitor! Just keep up!
You can find the Monitor GitHub link on many places in this article, but here it is again 👉 LINK
Presence Detection with Raspberry Pi, Home Assistant and Monitor
It is time to join Home Assistant into our Raspberry Pi and Monitor Party!
We are going to add MQTT sensors in Home Assistant. The output from these sensors will give us an accurate numerical occupancy confidence data that we are going to use in Home Assistant automations.
Are you ready?
Home Assistant MQTT integration
You have to add the MQTT (remember the Mosquitto installed on the Raspberry?) Integration to Home Assistant.
Go to Home Assistant > Configuration > Integrations > Add Integration and search for MQTT.
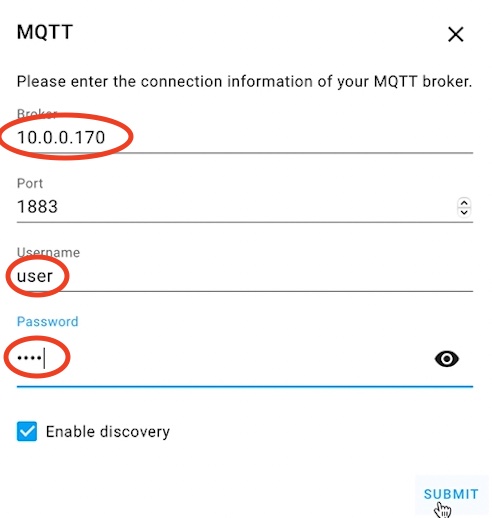
Add your Raspberry Pi – IP address, and any username and password.
Add MQTT sensors in Home Assistant
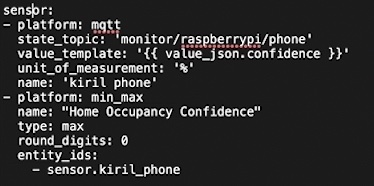
To add the MQTT sensors that are going to use the device tracking information from Monitor, we have to edit the Home Assistant configuration a bit. The changes should be under sensor: section in your configuration.yaml file. If you don’t have such section just create one.
Open the configuration.yaml file with text editor or any suitable Home Assistant add-on and add the following.
- platform: mqtt
  state_topic: 'monitor/YOUR_MQTT_TOPIC/YOUR_ALIAS'
  value_template: '{{ value_json.confidence }}'
  unit_of_measurement: '%'
  name: 'NAME_OF_THE_SENSOR'
Don’t forget to:
- Change the monitor/YOUR_MQTT_TOPIC/YOUR_ALIAS with yours (grab it from the Monitor screen).
- Change the NAME_OF_THE_SENSOR with anything you want.
- Create similar sensor for every device that you want to track.
After that we can create one more sensor which is useful if you track many devices and you want to quickly understand if any of these device is currently detected (is anybody home?)
- platform: min_max
  name: "Home Occupancy Confidence"
  type: max
  round_digits: 0
  entity_ids:
    - sensor.YOUR_SENSOR_NAME_1
    - sensor.YOUR_SENSOR_NAME_2
At the end you should have something like that in your configuration.yaml file.
Next, we will need an input boolean or helper. To create one you can add some YAML code in configuration.yaml as I will show here or you can use the Home Assistant GUI as I’m showing in my video.
Open the configuration.yaml and paste the following:
# Example configuration.yaml entry
input_boolean:
  occupancy:
    name: Occupancy
    icon: mdi:beach
Save the configuration.yaml file, check your configuration and restart Home Assistant.
After Home Assistant reboot, you can expose the new sensors on your Home Assistant Lovelace. That is very easy to do and if you have difficulties doing it just watch my video and don’t forget to leave a like there 👍
Home Assistant Automation using the MQTT sensors
We have our sensors in Home Assistant that are using MQTT platform to receive data from our Raspberry Pi with Monitor installed. We can use these sensors however we want, let’s see one very simple automation.
And very similar to the input boolean/helper creating I will say: To create the automation, you can add some YAML code in automations.yaml as I will show here or you can use the Home Assistant GUI as I’m showing in my video.
Open the automations.yaml and paste the following:
- alias: Occupancy On
  trigger:
    - platform: numeric_state
      entity_id: sensor.home_occupancy_confidence
      above: 10
  action:
    - service: input_boolean.turn_on
      data:
        entity_id: input_boolean.occupancy

- alias: Occupancy Off
  trigger:
    - platform: numeric_state
      entity_id: sensor.home_occupancy_confidence
      below: 10
  action:
    - service: input_boolean.turn_off
      data:
        entity_id: input_boolean.occupancy
Save the file and reload your automations.
Test the Home Assistant automations for Presence detection
To test if everything is working you can simulate that your tracked by Monitor devices are not in Home by turn them off or by activating the flight mode. As result you should see the following:
- The Monitor script will decrease the presence detection confidence from 100 to 0 in about a minute or so,
- Your MQTT sensors in Home Assistant will start displaying 0%,
- Your input boolean / helper will be turned off.
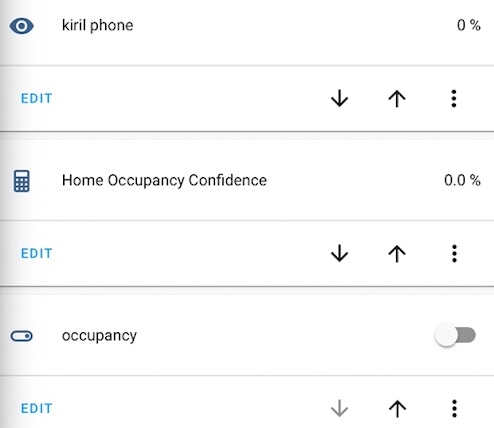
MQTT sensor, Home Occupancy Confidence sensor and occupancy helper are detecting that the tracked device is not at Home.
And vice versa if you turn on or deactivate flight mode your tracked device(s) – the sensors above will show 100% and the occupancy helper will also turn on.
Support my Work!
I really hope that you find this information useful and you now know more about how to use Presence detection with Raspberry Pi Zero W, Home Assistant and Monitor script.
If you want to secure this blog existence you can become one of my supporters. You can see exactly how in this section of my site.
I can’t thank enough to all wonderful guys that are supporting my work already – you are amazing!
Any other sort of engagement on this site and my YouTube channel does really help out a lot with the Google & YouTube algorithms, so make sure you hit the subscribe, as well as the Like and Bell buttons.
If you are just entering the Smart Home world you could also buy my digital product called: Smart Home – Getting Started Actionable Guide 👉 LINK
Also feel free to add me on Twitter by searching for @KPeyanski. You can find me on my Discord server as well.
Stay safe and don’t forget – Home Smart, But Not Hard!
Thanks for this – i followed and all worked fine on the Pi W – can see BT devcies connecting
I am already using MQTT Broker in HA; how to get it to work in this case?
I tried changing the details in mqtt_preferences to match my HA
But Pi W reports
[CMD-MQTT] warning: mqtt broker refused connection – check username, password, and host address
and in HA I get
1610794544: New connection from on port 1883.
1610794544: Socket error on client , disconnecting.
Any thoughts?
It seems to me that your username and/or password that you entered in mqtt_preferences are not correct. Just change them to match the ones your are using in your already working broker in HA and try again.
Thank you for all your videos. I enjoy them and find them very helpful.
Question for you, though. How does Monitor compare to Room Assistant? Can you have both? I’m comparing these two with “better presence” (helto4real).
Hi Dan, you can’t have them both working at the same time it’s overkill, but you can install them both and activate either one or another to see which one is better. I think there is no clear winner for the moment and you better check them by yourself to see what you like best.
Thanks for the guide. I got confused with the security part of mosquitto and needed to add the listen 1883 and allow_anonymous true to the config file it seemed? It looked like a new update https://mosquitto.org/blog/2020/12/version-2-0-0-released/ but maybe you know that. anyway buying your PDF seemed like the easiest way to support you and i’m excited to see what else you have to say. Thanks again for posting this !!
(for the record it’s all working)
I’m very glad that you liked the Raspberry Pi, Home Assistant & Monitor article and that it all worked at the end. I Really hope that you will like the Guide as well. Thanks for the support!
Hi all, no doubt some of you following this are struggling with the authentication in HA saying ‘failed to connect’.
The reason is (as pointed out above by Sven) is that mosquitto 2 doesn’t allow anonymous connections by default.
The solution is to edit the mosquitto conf:
sudo nano /etc/config/mosquitto.conf
and add:
listener 1883
allow_anonymous true
to the end of the file.
Then reboot your Pi, and you should then be able to connect HA successfully.
Thanks Ben King for the tips.
I’ve too have been struggling with the ‘failed to connect’ error with MQTT in HA.
When I try your command “sudo nano /etc/config/mosquitto.conf” I get an error that the directory /etc/config does not exist.
Do you mean to edit the “mqtt_preferences” file?
I’m using a RPi3a instead of a Zero W if it matters.
Ok, I found the Mosquitto.conf file.
sudo nano /etc/mosquitto/mosquitto.conf
I am trying to set up my raspberry pi following your example. When I enter the command :
git clone git://github.com/andrewjfreyer/monitor
I get the following error:
Cloning into ‘monitor’…
fatal: remote error:
The unauthenticated git protocol on port 9418 is no longer supported.
Please see https://github.blog/2021-09-01-improving-git-protocol-security-github/ for more information.
I understand that this has something to do with new security features, but I don’t understand enough of what’s going on to know how to proceed.
Can you help?
Hi. Thank you for sharing. My phone is oneplus 5t. How do you adress random macs modern phones generate ? my bluetooth mac keeps changing. TIA