In the latest Home Assistant release – Media browser was renamed to just Media, but that is not the only new thing in the new Home Assistant Media section. It is just the opposite, the Media is now full of features like: casting from the web browser, integration support of Plex, VLC, Libre Elec, Apple TV, Spotify and more.
In this article I’m going to demonstrate you all of these Home Assistant media integrations, but first I will show you the integrated browser player and how to upload media files, so the Home Assistant Media player can see them and play them.
Table of Contents
How to upload files to Home Assistant Media using File Editor?
The first method for transferring files that I want to show you is using File Editor Home Assistant Add-on. To install the File Editor. I will open my Home Assistant and I’ll go to:
- Configuration > Add-ons, Backups & Supervisor > Add-on Store and I will search for file editor.
Alternatively, the My Home Assistant link below can be used and it will lead you to the same place described above.

- Then, I will click on the Install button and I will wait for the File Editor Add-on installation to finish.
After the File Editor is installed:
- I’ll first go to Configuration tab. The key moment here is to disable the Enforce Basepath option! The enforce_basepath should be set to false.
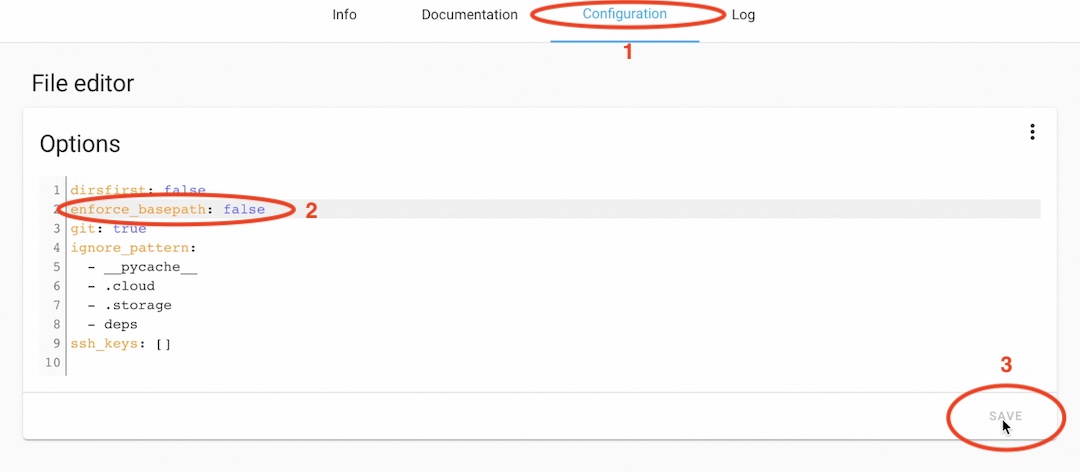
Setting this option to false will allow me to freely browse any folders inside my Home Assistant.
- I’ll go back to Info tab and I will hit Start button, then I’ll click on the OPEN WEB UI button to open the File Editor.
- After that, I will click on the folder icon, by default the opened folder is /config, but I want the to change it to media folder.
- Inside the media folder I can upload media files, but it is recommended to try this with not very big songs & movies.
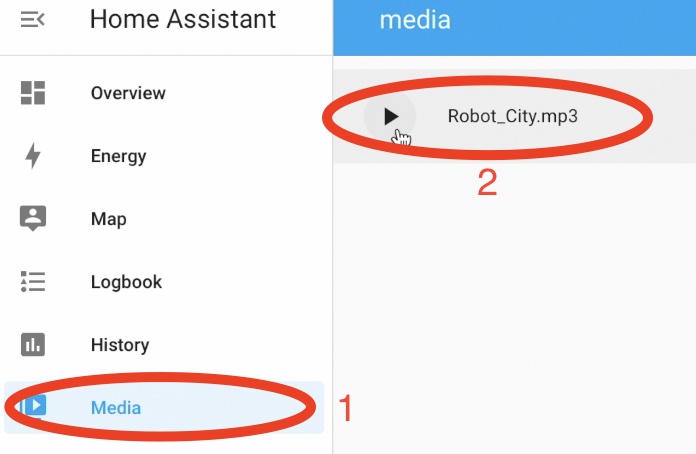
- When the upload is successful and the media file is in my media folder. I can go to the Home Assistant Media section and there I can see my file and I can play it.
How to upload files to Home Assistant Media using Samba Add-on?
File Editor add-on is good to upload single not very big file, but if you wish to upload many songs or movies, big folders and so on – it is better to use the Home Assistant Samba Add-on. This is how you can do that.
I will open my Home Assistant and I’ll go again to:
- Configuration > Add-ons, Backups & Supervisor > Add-on Store and I will search for samba and I will install it.
Alternatively, you can click on this My Home Assistant link below and it will lead you to the same place described above.

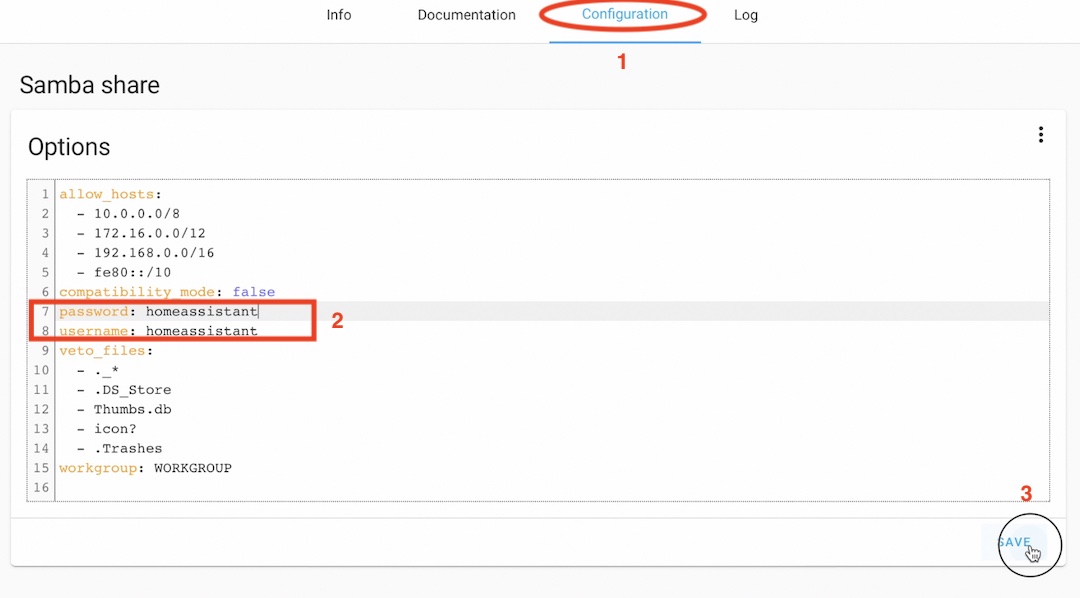
- Then I will go to Configuration tab of the Samba add-on and I will set a password for the default homeassistant username and I will make my password homeassistant as well and I will save the configuration. It is highly recommended to choose stronger Samba password here if you want to use this not only for tests.
- Then, I will go back to Info tab and I will click on the Start button to actually start the Samba Add-on.
- When the Samba share is started, I can try to connect to the exposed network shares using any standard file browser like the Finder for macOS or Windows Explorer for Windows.
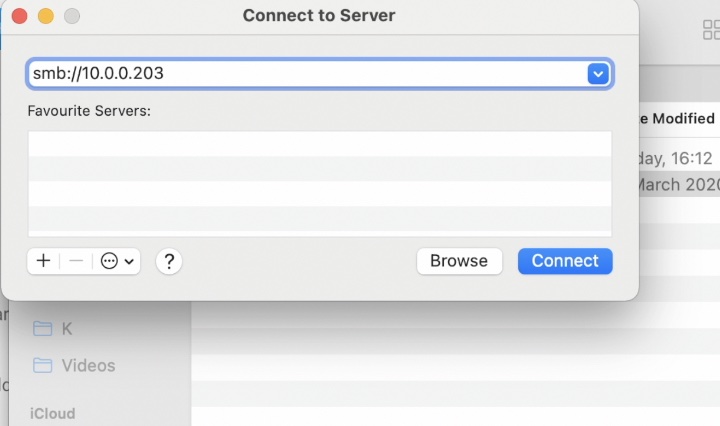
TIP!: As Samba Server IP, just type the IP of your Home Assistant device.
- As username & password I will type: homeassistant, because I set these credentials in the Samba Add-on configuration.
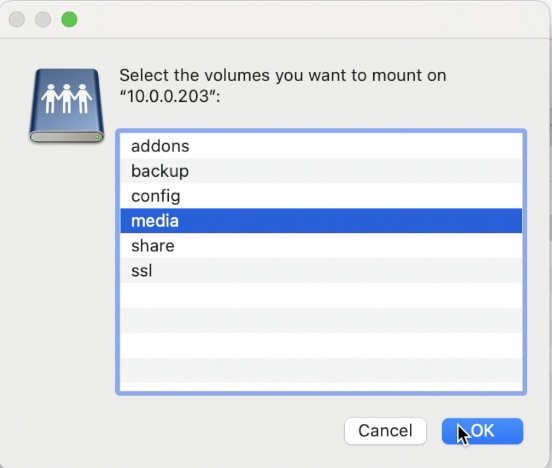
- When I’m trying to connect to the Samba using macOS Finder it asks me to select the volumes that I want to mount. And I want the media volume.
- After I successfully connect to the media share, I can copy & paste there (just like any other normal folder) multiple songs & movies as well as whole folders and it happens way faster compared to the File Editor method described previously.
How to add VLC in Home Assistant Media section?
Home Assistant VLC Add-on allows you to use your local device as media player if you attach some USB speakers on it. That works perfect if you have your Home Assistant installed on a Raspberry Pi, Odroid or you’re using Home Assistant Blue or Yellow. Let’s see what we will have in Home Assistant Media section after VLC Add-on installation and configuration.
- To install VLC Home Assistant add-on click on the My Home Assistant link below or go to: Configuration > Add-ons, Backups & Supervisor > Add-on store and search for vlc.
- Install the VLC add-on and just start it as no additional configuration is needed.
- Then head on to Configuration > Devices & Services > Add integration and search for VLC. You may skip the add integration part as there is a big chance that the VLC integration will be already auto discovered by Home Assistant, if that is the case look for a VLC card and if you find it just click on the Configure button.
- A dialog asking you “Do you want to connect to add-on VLC?” will appear! Click Submit and then Finish buttons!
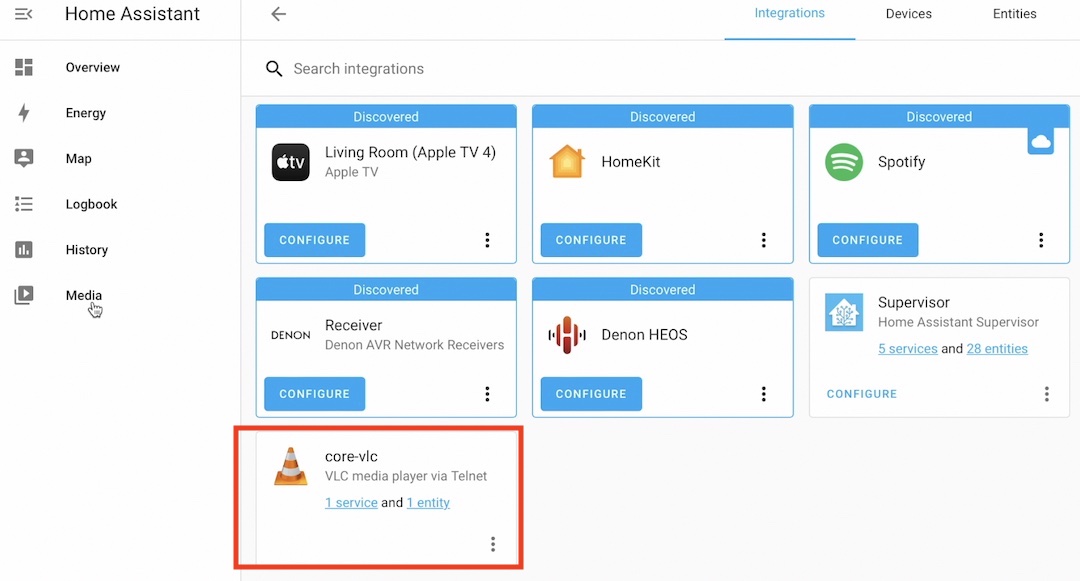
- If you go to the Home Assistant media section now and if you click on the Browser button in the lower right corner you will see a VLC-TELNET option.
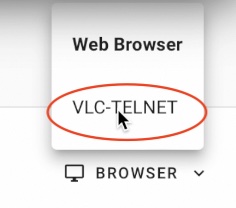
When you select that VLC-TELNET option and you start playing some songs for example, the sound will go through your device where Home Assistant is installed if you attached some USB speakers on it. That will make your device a real local smart media player.
How to add Plex Media Server in Home Assistant Media section?
If you have Plex Media Server installed you can add it to Home Assistant. Plex Media Server is also available as Home Assistant Add-on in the Home Assistant Add-on store and I have a dedicated article about that (Plex Media Server from Home Assistant).
No matter where exactly Plex Media Server is installed you can add it in your Home Assistant and if you do that it will be also visible in the Home Assistant media section. Let’s see this.
As quick summary:
- I installed the Plex Media Server add-on which is installed as usual from the Home Assistant Add-on Store the same can happen by clicking the My Home Assistant Link below.
- Then I configured it using the Configuration tab (I got the claim code from Plex website and I enabled webtools option)
- Finally, from the Info tab I started the Plex Media Server add-on. These steps are well described in my Home Assistant Plex Media Server article 👉 LINK
- Then I went to: Configuration > Devices & Services > Add Integration and I searched for plex. You can click on the My Home Assistant link below if you want to do the same:

- I had two options to obtain a new token from Plex.tv or to configure Plex server manually. I choose to the first option (to get the token from Plex.tv).
- I signed in my Plex account and when everything is finished my Home Assistant and my Plex Media Server were integrated.
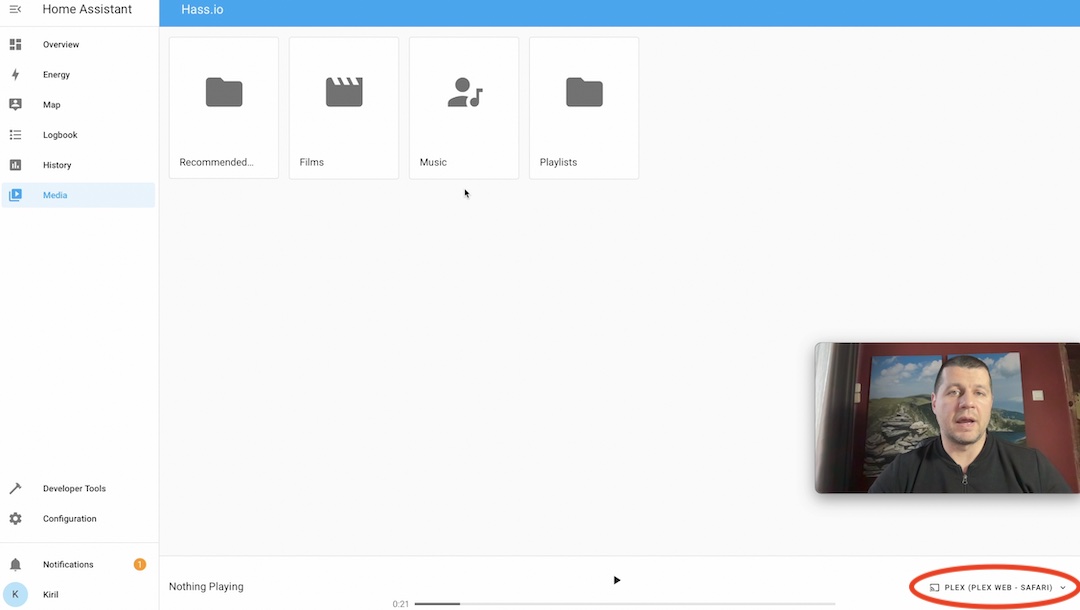
- After that, I went to Home Assistant Media Section and in the lower right corner I saw Plex (plex web – safari) as possible to select option.
- When I select that Plex option I saw my Plex Media Server Library which I can browse and play.
How to add KODI (LibreELEC) in Home Assistant Media section?
The Kodi or LibreELEC integration is also visible in Home Assistant Media section. Check this article of mine if you wish to see all of the details about Kodi & LibreELEC and Home Assistant (Home Assistant Kodi Integration).
Follow these steps to add Kodi in Home Assistant media.
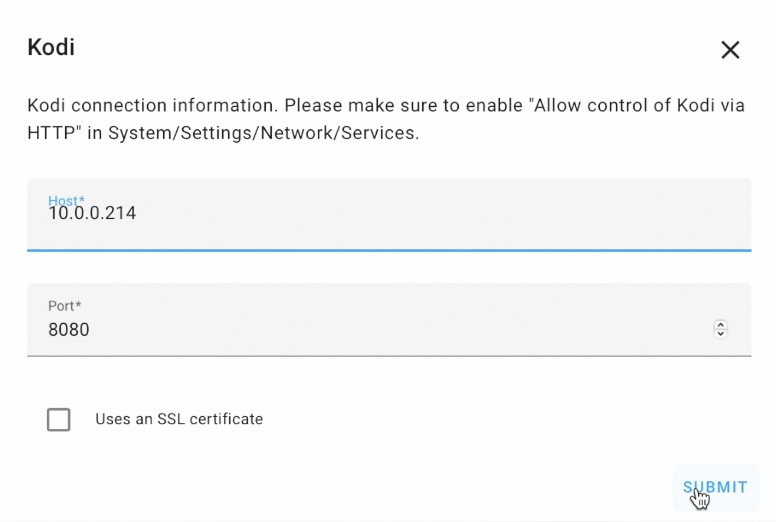
- Go to Configuration > Devices & Services > Add Integration and search for Kodi. Alternatively, click on the My Home Assistant link below.
- Click on the Kodi integration and type your Kodi IP, then click Submit & Finish buttons.
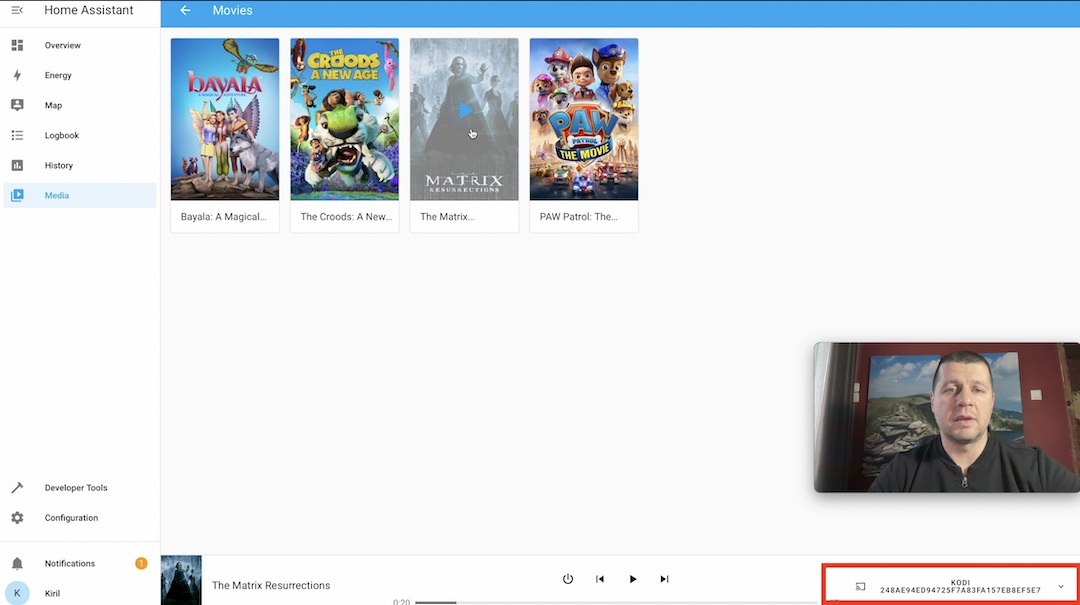
- Go to Home Assistant Media section and select Kodi integration from the lower right corner.
- You have to see your Kodi library inside Home Assistant Media. Of course you will be able to control it.
How to add Apple TV in Home Assistant Media section?
Apple TV is usually auto discovered by Home Assistant and can be easily added as integration. if you do that, Apple TV will be also visible in the Home Assistant Media section automatically. Let’s see that in action.
- As usual, go to Configuration > Devices & Services > Add Integration and search for Apple TV (Before you click Add Integration, check if Apple TV is auto discovered and just click Configure button if it is)
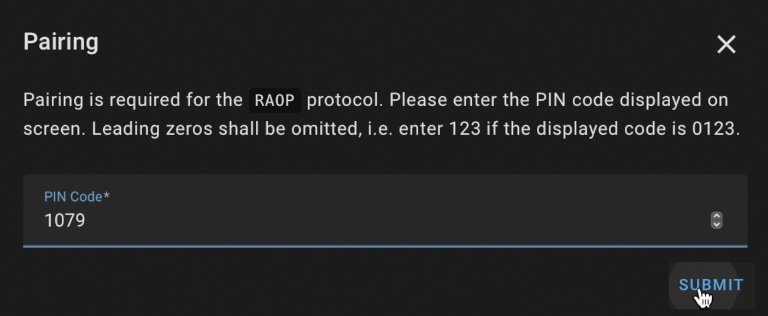
- To complete the process you have to enter the PIN code that is displayed on your Apple TV in the Home Assistant dialog.
- When Home Assistant and Apple TV integration is finished, go to Home Assistant Media section and you will see your device there as selectable option from the lower right button.
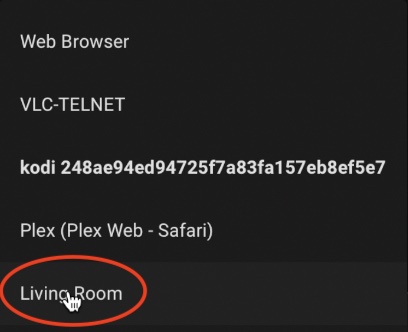
- When you select your device (in my case it is named Living Room) you will see a list of your installed applications in your Apple TV. You can try to start them right from the Home Assistant.
- If for example you play Some YouTube video clips on your Apple TV, this will be also visible and controllable from Home Assistant Media.
Trying to add Spotify in Home Assistant Media section
I have to admit that I failed to add Spotify in Home Assistant Media for some reason. I successfully added the Spotify integration, but still Spotify is not visible in my Media section of Home Assistant. I will show you what I did and if you know what’s the reason – let me know in the comments.
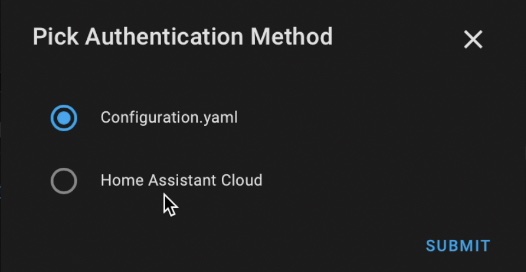
There are two possible methods to add Spotify in Home Assistant:
- Using the Configuration.yaml.
- Using the Home Assistant Cloud.
However, If I try the Home Assistant Cloud method (I even tried with activated Nabu Casa) I ended up with a spinning circle and dialog saying “Loading next step for Spotify” for several minutes and then an Aborted error.
It clearly seems that this method is not working for me for some reason. But you can try it as well, maybe it will work for you, I don’t know.
Then, I tried the other method, the manual one with the configuration.yaml
- I went to https://developer.spotify.com and I logged in with my Spotify account from the Dashboard section.
- I created an app.
- I set the Redirect URI for the app to be: http://<my_home_assistant_url>:<port>/auth/external/callback
- I pasted the following YAML inside my
configuration.yamlfile and I restarted the Home Assistant
Here is my configuration.yaml.
spotify:
  client_id: 18d416324d4c43f19b493877
  client_secret: !secret spotify_client_secret # the client secret is stored in secrets.yaml file
By the way, I have a very detailed Home Assistant Spotify article that can guide you through the above steps. If you are interested check it right here 👉 LINK
After all of the steps above, I managed to add the Spotify Integration in my Home Assistant and everything seems to work as expected, but still the Spotify integration is missing in my Home Assistant media section for some reason. I tried multiple restarts, integration reloads and so on, but with no luck.
How to bookmark media integrations?
If you like to bookmark some stuff in your browser, then this next section is just for you. Every integration that we added so far in Home Assistant Media Section have different URL. You can use that to go to specific Media integration fast and easy. Just open the integration and bookmark the URL in your browser.

Outro
If you want to secure this website existence – check the support methods listed in my support section 👉 LINK
I’m Kiril and I’m done writing. Bye!
Great tutorial, as always!
Now, for a challenge: how can I create a hard- or soft-link in the Media directory that points at my personal music collection on my NAS? I have >150GB of mp3 files, so it’s not feasible to move them to my RPi.
This request shows up in forums e.g.:
https://community.home-assistant.io/t/mount-remote-smb-share-on-hassio/116734/16 https://community.home-assistant.io/t/point-media-dirs-at-nas-share/227698
but no one seems to have figured this out.
Thanks again for all your blog posts..
Se ainda não conseguiu fazer a sua integração do Spotify no HA, siga o passo a passo do seguinte link: https://community.home-assistant.io/t/spotify-configuration-error-invalid-client-failed-to-get-client/144322/19 (YESSSSS I found it…).
Como normalmente já existe alguma outra configuração no arquivo que deverá ser excluído, principalmente credenciais do Google, eu optei por editar o arquivo “application_credentials” e remover somente as linhas do Spotify, e assim funcionou do mesmo jeito e consegui instalar a integração.
Texto em português, desculpe.