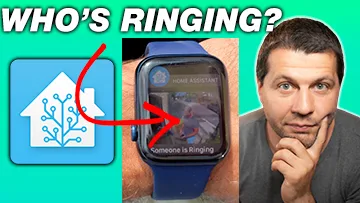
What is who is ringing Home Automation? I always wanted to have one simple, but very useful Home Automation, namely when someone rings at my front door I want to receive a picture on my phone or on my smart watch showing me who is ringing.
If you want to have the same useful feature I will show you what I did with all of the details and the needed components, so you can do that as well.
Without further ado, I will start with what I used for this who is ringing home automation.
Table of Contents
Component 1 #Smart Home Hub
The first thing that is needed is a Smart Home Hub. This will be the brain of our operation. The hub can be free or paid, it could be a software hub installed on an always-on computer or dedicated hardware that comes preinstalled and ready to be used.
I can two hands recommend Home Assistant as your main Smart Home hub, because simply there is nothing even close that is available right now. Home Assistant is free and you can install it on many different devices using any of the 4 officials and supported available installation methods.
If you want to know more Home Assistant and what are the possible ways to have it check my Home Assistant webinar where you will understand everything about the different installation types of Home Assistant. I cover there all four official methods + 1 secret, not so official, but a stupid easy way to get Home Assistant up & running in less than 5 minutes. If you are eager to learn more register on my website https://automatelike.pro/webinar it is free.
As summary, I will use Home Assistant as my home automation hub and I recommend using the same.
Component 2 #Camera
The next component that is needed is a camera that will capture the image of the subject that is ringing on the door. And I’m saying subject here on purpose because not only persons can push buttons that are hanging on the front doors. Some nasty cats can do that as well, especially in the middle of the night. And don’t ask me from where I know that.
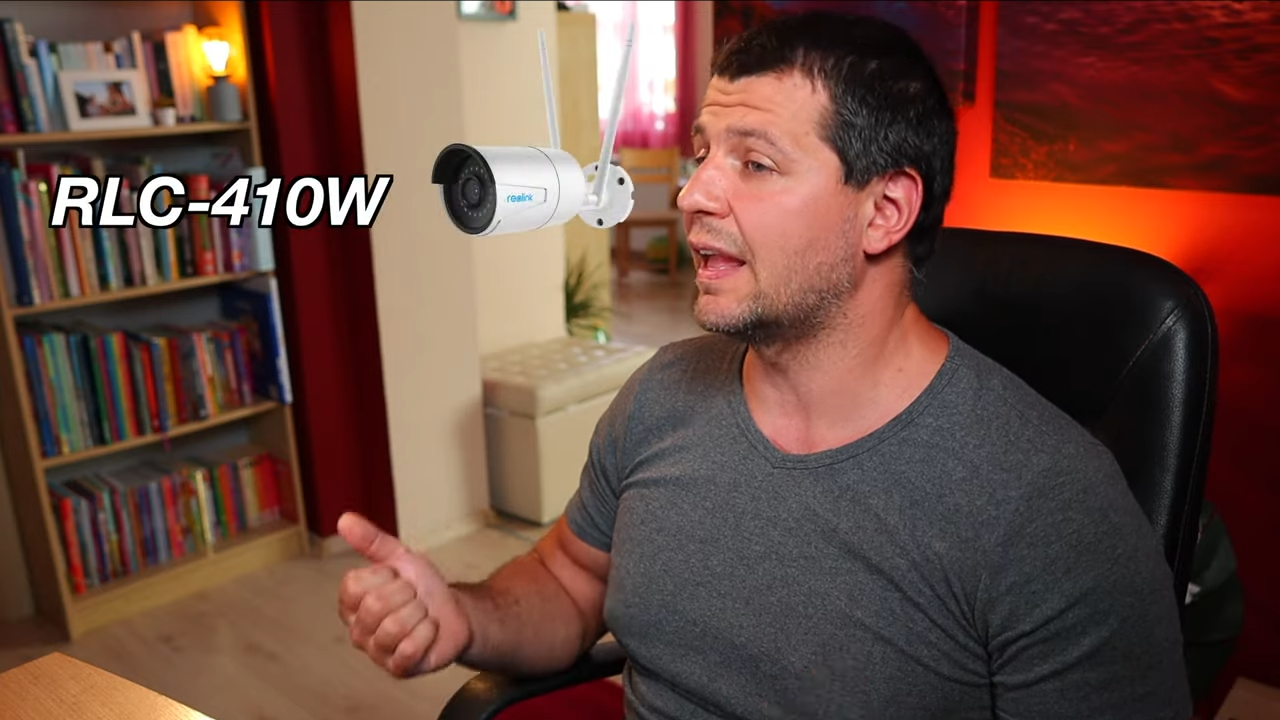
Never mind, any camera that supports RTSP protocol should be fine here. RTSP protocol is a worldwide standard for streaming video. Unfortunately, not all cameras support RTSP protocol, especially the very cheap ones. So grab yourself a good camera from a respected brand like Reolink, Hikvision, Axis, ANNKE, and so on, but double-check that the model you are getting is supporting RTSP.
I’m using Reolink NVR and a mixture of several different Reolink camera models like RLC-520, RLC-810A & Reolink 410W. If you are interested in the exact parameters of these cameras & the NVR you can check my affiliate links below.
- Reolink RLC-520 – https://amzn.to/3QPmIcR
- Reolink RLC-810A – https://amzn.to/3xTekAt
- Reolink RLC-410W – https://amzn.to/3buX9xE
- Reolink NVR – https://amzn.to/3OnxLZh
- Reolink NVR + 4K Cameras Bundle x4 – https://amzn.to/3bvLZIW
- Reolink Flash Deals – http://shrsl.com/301ih
Again as summary, you can have a NVR that will record the camera stream 24/7 or you can only have one camera connected over WiFi or via LAN cable that doesn’t record anything and you are good to go. Just remember RTSP protocol is a must.
Component 3 #Button and Siren
The next thing that is needed is one button and optionally a siren. Preferably, the button should be for outdoor use and kind of smart to the degree that you can add it to your Home Assistant. Options here a lot. For example, you can use a:
- Standard RF-433Mhz button and a siren and to integrate them in your Home Assistant using a:
- RF Bridge like the Sonoff RF Bridge – https://itead.cc/product/sonoff-rf-bridge-433/ref/29/
- Broadlink RM4 Pro – https://amzn.to/3nck17y
- You can use any other WiFi, ZigBee, Z-Wave, or Bluetooth buttons as long as you can add them in Home Assistant you are good to go.
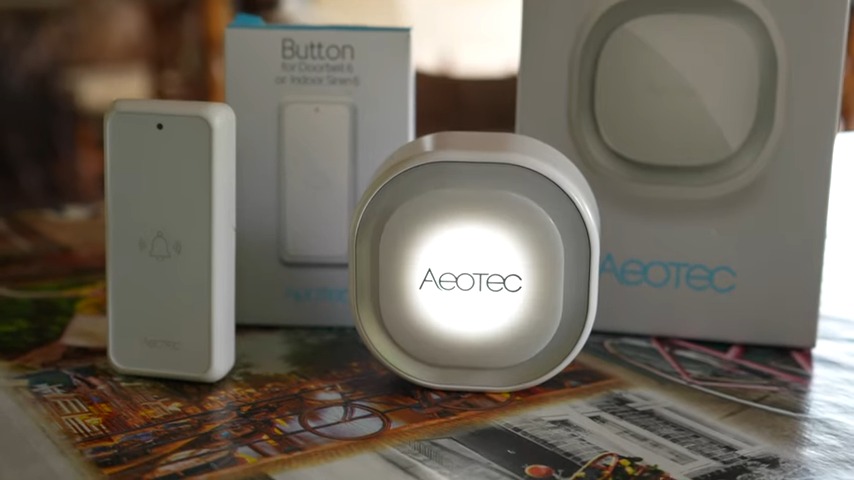
I will use a Z-Wave Aeotec Siren + Button + Aeotec Z-Stick combo.
- Aeotec Z-Stick 7 – https://amzn.to/3xoIUCT
- Aeotec Siren 6, Z-Wave Plus S2 Enabled – https://amzn.to/3xipHmc
- Aeotec Siren 6 + Button – https://amzn.to/3bng9xP
Of course, you can use anything you have. It will be best if you share in the comments section what camera & what buttons are you using or you are going to use.
Making the who is ringing home automation!
Now that we have a Home Assistant, an RTSP-enabled Camera, and a button it is time to bundle everything into one simple, but useful Home Automation. Let’s first add the camera in Home Assistant and then we will continue with the rest of the steps.
Step 1: Add Camera to Home Assistant
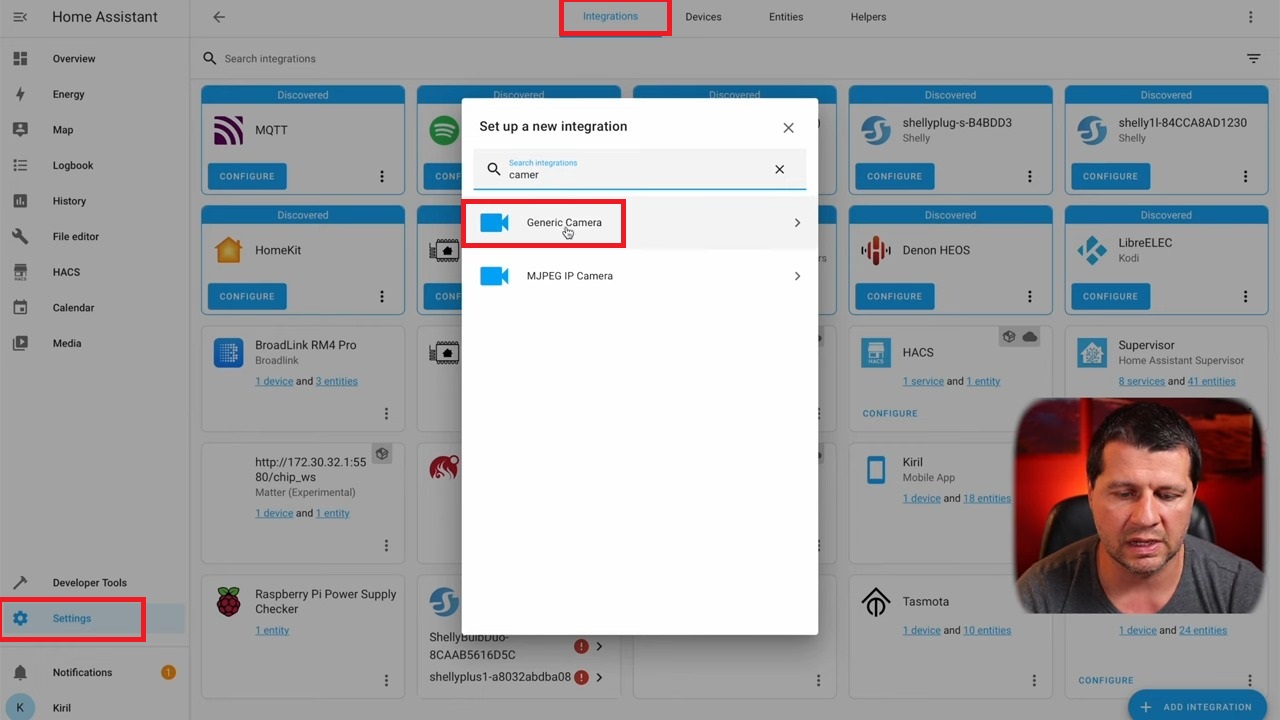
I’ll open my test Home Assistant installation and I’ll press the “c” button and I’ll start typing integrations and I’ll select navigate to integrations, add integration and I’ll search for camera. I’ll select the generic camera here and in this dialog.
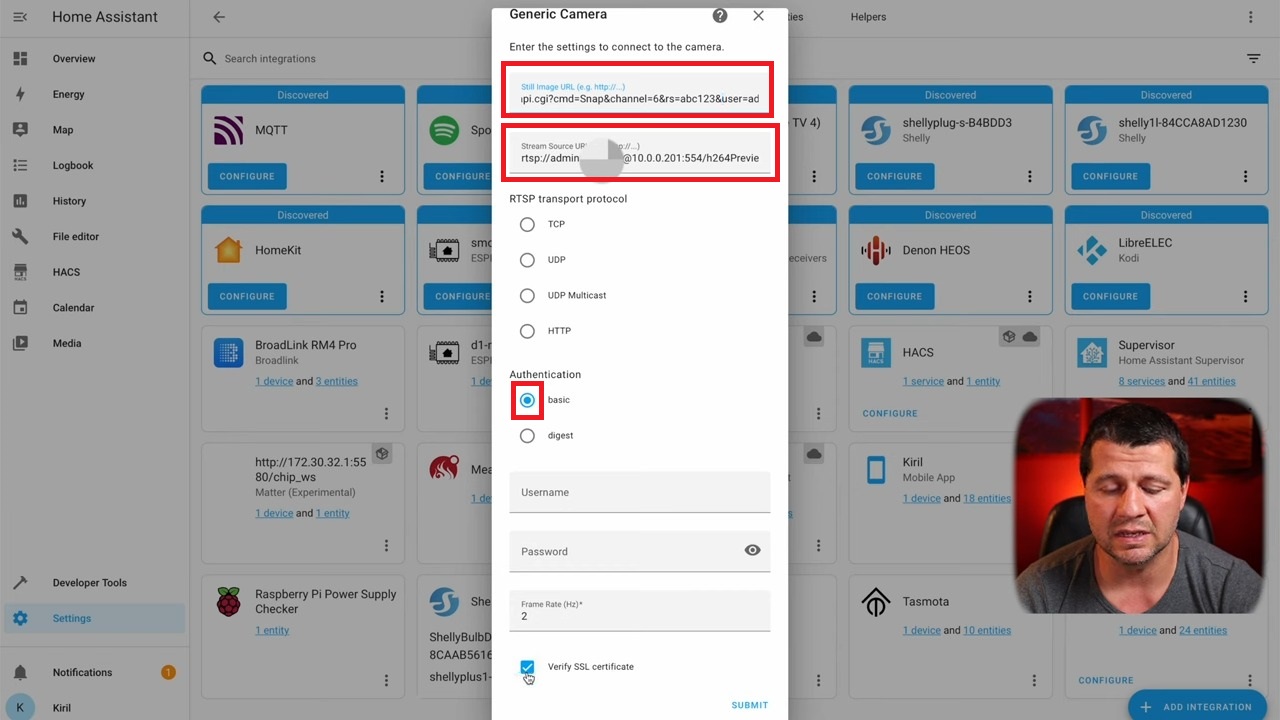
I’ll enter my camera settings which are different for the different camera brands, some cameras have still image URLs. This is usually an HTTP address and I’ll paste mine in the adding Generic Camera dialog. This Still Image field is optional, you can add it or you can skip it.
You have three options in the Generic Camera dialog:
- To add only the still image URL of your camera,
- To add only the RTSP link of your camera,
- or to add them both.
And I’ll add both because I already know the links and I want to demonstrate them to you.
- This is my Reolink still image link – http://YOUR_IP/cgi-bin/api.cgi?cmd=Snap&channel=6&rs=abc123&user=YOUR_PASS&password=YOUR_USER
- This is my Reolink RTSP link – rtsp://YOUR_USER:YOUR_PASS@YOUR_IP:554/h264Preview_07_sub
Again the above links are for the Reolink camera connected to Reolink NVR. The RTSP Link is camera-specific, check your camera manual to see what it is for your camera or ask your camera vendor support. Also the RTSP link is for NVR channel 7. That means this is the seventh camera connected to my NVR. This is also visible in the still image URL, but the channel there is 6, which equals again the 7th camera because they start from 0.
Next settings in the Generic Camera dialog are:
- The RTSP transport protocol – I’ll leave this empty, because it will auto-detect which one to use. Usually, it is TCP or UDP.
- Authentication will be basic.
- Username and Password are only valid for the still image URL, but I already embed them in my URL, so this is also not needed.
- Verify SSL certificate – I’m not using SSL, so I’ll uncheck this.
- Frame rate is two frames per second by default. I’m okay with that I’ll click Submit.
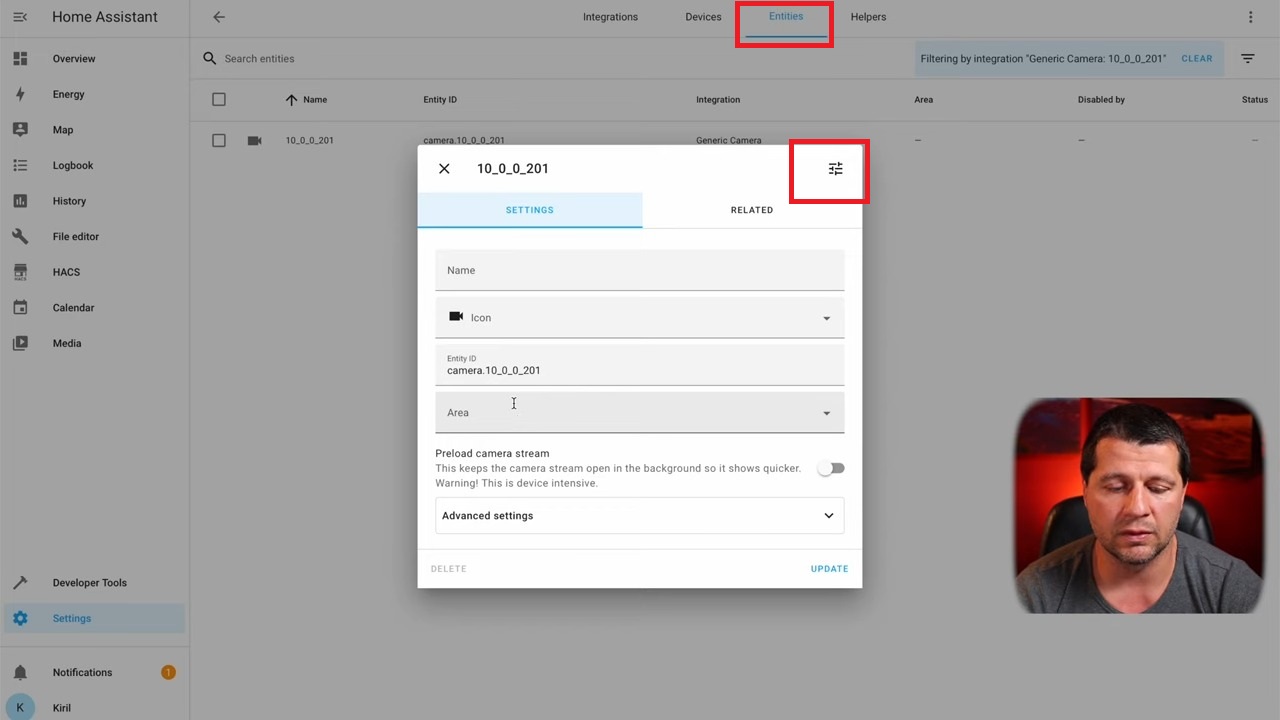
With this I should have created configuration for my camera in my Home Assistant. If I click on the device setting I should be able to see the camera stream inside Home Assistant.
Optionally, if I click on the camera entry in Home Assistant I can change the name, the icon, and the entity ID and I can add it to an area, but you can leave everything by default if you don’t want to do that.
Step 2: Add Button and Siren
The next step would be to add the button and optionally a siren inside Home Assistant. As I said before the possible options for a smart button that works with Home Assistant are a lot and you can use anything that fits your needs and budget. The idea here is to catch the event of the button pressing and to use that as a trigger of the Home Assistant automation, so we can immediately send a picture from the camera when there is such an event.
I already added my Aeotec smart button & siren in Home Assistant and I explained how I did it in this article of mine 👇
But again you can use whatever button you wish here including a helper or a dummy button.
Step 3: Creating the Who’s Ringing Automation in Home Assistant
I’ll go to my Home Assistant automation section. To go there I’ll press the “c” button and I’ll start typing automation and I’ll select Navigate Automations. I’ll create a new automation selecting the empty automation option.

Inside Home Assistant Automation editor I will do the following steps:
- I will name my automation and the name of the automation will be: send a picture when someone is ringing, but you can choose anything you want here as a name.
- I’ll go to the trigger section. Here we have to catch the button press event. In my case the trigger type will be a device, the device name is indoor siren 6. When a specific ringtone is activated in this Indoor Siren 6 (the remote button is pressed) I will catch that and I will activate my automation. Most probably your trigger will be different, for example: The trigger type will be a State, the entity will be your button and when your button becomes on (that means someone is pressing it) you can activate the actions in your automation. Usually, this is the case, but my case is a little bit different, because I’m using the Aeotec Siren 6 + Aeotec button.
Next, I’ll go to the action section in the automation editor. This part should be absolutely the same as yours.
- I will use the call service action, the service will be a camera.snapshot.
- I’ll choose the entity and the entity will be my generic camera.
- And I want to have a file name. This file name will be stored in the /config/www folder and the name will be frontdoor_camera_snapshot.jpg.
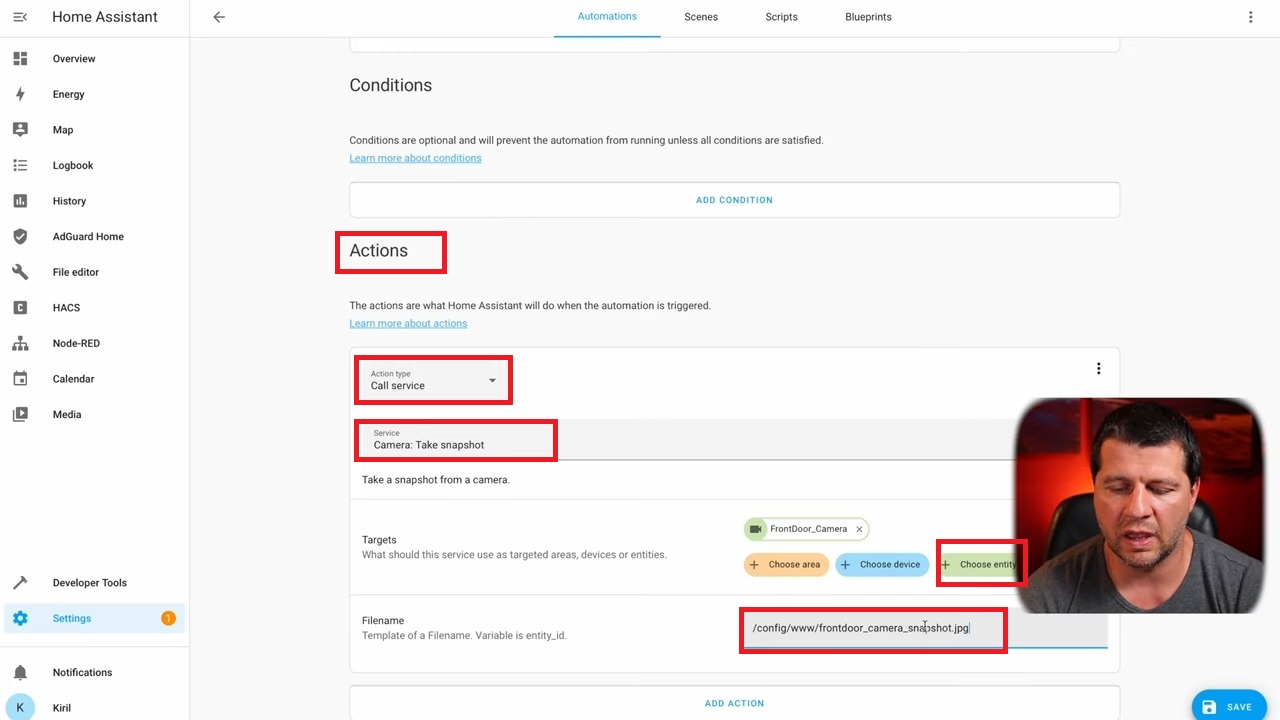
Quick Tip: Folders here are very important. If you mess up the full path, the automation will not work as expected. If you already have a www folder inside your Home Assistant just use it. Otherwise, you have to create that www folder inside your config folder and restart your Home Assistant. After that, you can upload any files inside that folder and you can access them without any authentication so you can use that for your notifications services.
Back to the who is ringing home automation in Home Assistant. I will add another action.
- Again the action will be call service, but this time I want a notification service.
Quick Tip: With Home Assistant you also have a lot of notification options. I will use the Home Assistant companion app to push the Picture from the camera and a message to my phone and watch. If you don’t like that for some reason you can use many other options like Telegram, Mail, Twitter, Viber, and so on.
- The message of this notification service will be: someone is ringing at the door and I’ll enable the data field inside the notification action. I’ll type image: and then I’ll enter the following path: /local/ and then the file name.
image: /local/frontdoor_camera_snapshot.jpg- I’ll also add a URL with the same path and filename.
url: /local/frontdoor_camera_snapshot.jpg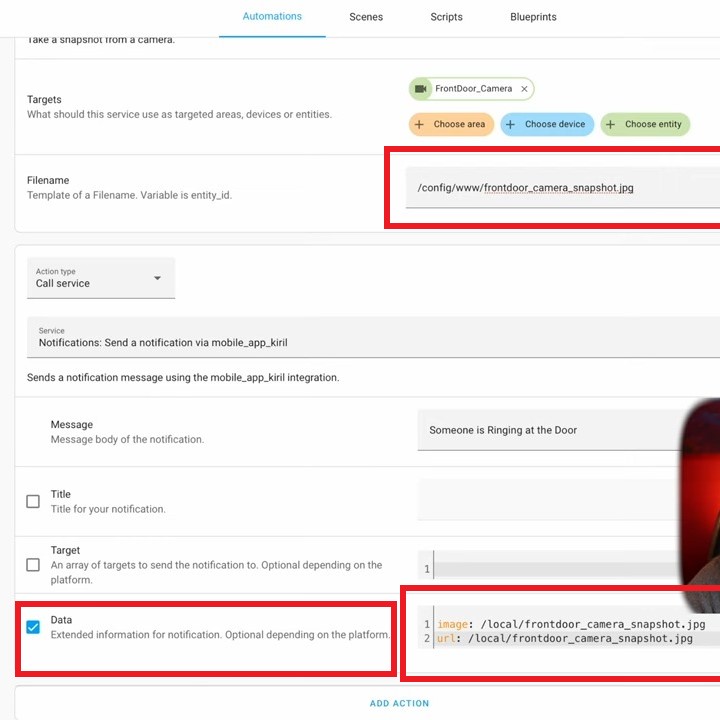
That way I’ll receive a message saying “Someone is Ringing at the Door”, I’ll also receive the image that I snapshotted in the previous action, and if I click on this notification. The Home Assistant companion app will open this URL in a bigger screen. Otherwise, the notification will be cleared.
Below you can find the full YAML code of the Who is Ringing Home Automation.
alias: Send a Picture when someone is Ringing
description: ''
trigger:
  - type: sound
    platform: device
    device_id: 79a91911e6e548f547ad17df9beaf308 # change that with yours
    entity_id: binary_sensor.indoor_siren_6_siren_siren_active_3 # change that with yours
    domain: binary_sensor
condition: []
action:
  - service: camera.snapshot
    data:
      filename: /config/www/frontdoor_camera_snapshot.jpg
    target:
      entity_id: camera.front_door
  - service: notify.mobile_app_kiril # change that with yours
    data:
      message: Someone is Ringing at the Door
      data:
        image: /local/frontdoor_camera_snapshot.jpg
        url: /local/frontdoor_camera_snapshot.jpg
mode: single
To have your Home Assistant Companion app configured you will need secure access to your Home Assistant installation from the Internet and you can get that either by paying for the Cloud Nabu Casa service or by following any of these tutorials where I’m showing how to securely expose your Home Assistant to the outside world.
- Free Cloudflare Tunnel To Home Assistant: Full Tutorial!
- Home Assistant Remote Access using NGINX Reverse Proxy & DuckDNS
- Home Assistant Remote Access with DuckDNS and Let’s Encrypt
- How to install Home Assistant Container + Remote Access using Twingate
Step 4: Testing the Who is ringing Home Automation
I’ll save my Who is ringing Home Automation in Home Assistant and I will execute the following step to test it:
- I’ll first create a snapshot, by selecting the run action from the three dots menu in the upper right corner next to the camera.snapshot action in the Home Assistant automation.
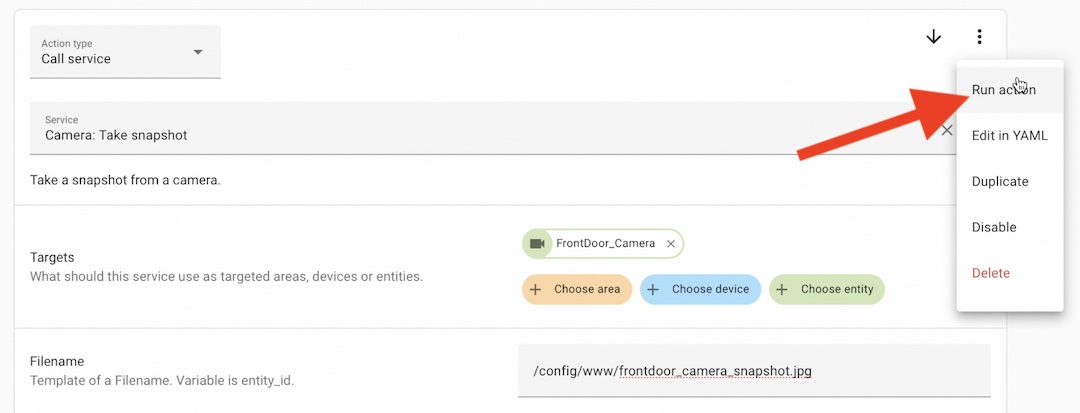
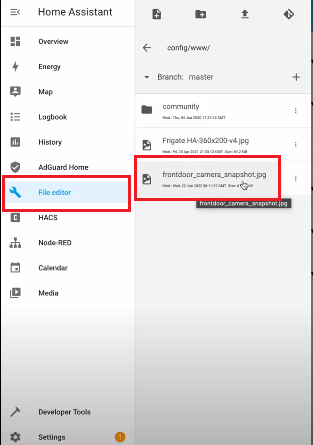
As a result inside the www folder I should have a frontdoor_camera_snapshot.jpg file.
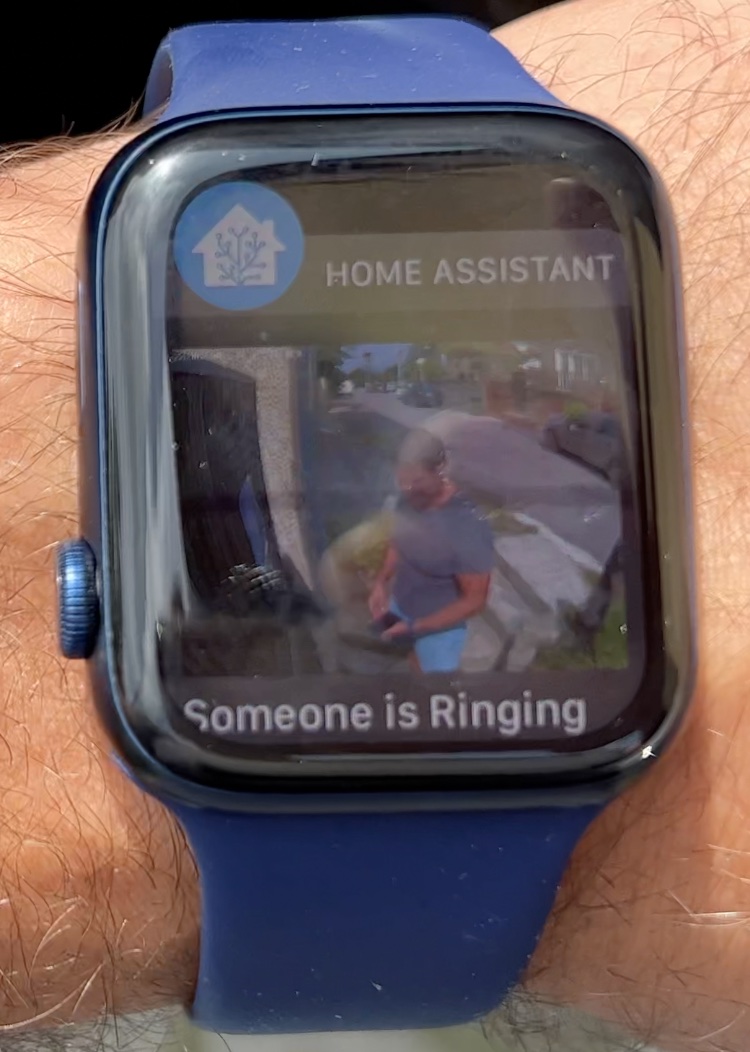
- If I run the next action in the Who is ringing home automation, that would be the notification service. I should receive a message on my phone and on my smart watch. If I hold on to the notification on my phone I would see the camera image and if I click on it I’ll see it on a full screen.
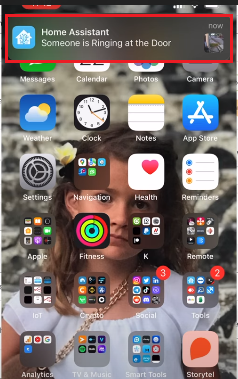
The test was performed on an iOS device and Apple Watch, but the experience should be the same with Android. To perform a real life test of the who is ringing home automation. I just have to push one button. This button is the remote bell button that should activate the above automation and I should receive a picture and text as notification.
Of course, this is not to an only possible way to make such who is ringing home automation. I’m pretty curious do you already have such in your smart home and if yes, can you please share how you manage to do it in the comments section below?
Subscribe for my newsletter to receive more articles like this straight in your inbox.
I’m Kiril and I’m done writing. Bye!
Hi Kiril,
I’m trying to setup notifications using notify.events service to send to Viber. I get the notification, but it doesn’t send the photo. Do you have any idea?
Make sure that you are using the correct syntax as described in the documentation. Also more importantly, create a www folder inside your config folder and restart your Home Assistant. Place your image(s) inside /config/www and refer to the image as /local/Your_Image.jpg. Exactly as described in this article.
Thanks for your reply Kiril
That is exactly what I did. I have snapshot.jpg in the /config/www and then in the “Call Service” data field I have:
image: /local/snapshot.jpg
url: /local/snapshot.jpg
It just sends the text message, not the jpeg file.
I was able to set it up through Node-red
Thanks for a great guide. Having problem that the android is showing the first picture taken. Seems like the cache is not cleared. Someone commented on the youtube clip that they used this code to create a pciture file: snapshot_{{ as_timestamp(now()) | timestamp_custom(‘%Y%m%d_%H%M’) }}.jpg
How do you use this in the notification field?
The notification works fine but the url just opens the companion app in the home page, not in the image!!!