You may want to have Home Assistant remote access from everywhere, but you don’t want to setup complicated VPNs or to pay for the cloud service? If yes, then this article is just for you.
Table of Contents
What will you see in this article?
Exposing a local server or service to the outside world has always been tricky.
Exposing Home Assistant is not hard, but you have to do it the right way with SSL encryption and IP ban enabled for multiple failed logins. Otherwise you put your whole house or at least all of your sensors, switches and integrations that you have in Home Assistant at risk.
This tutorial will take you through some port forwarding, setup a dynamic DNS for your IP and allow trusted encrypted connections – using DuckDNS and Let’s Encrypt for free!
And if you wouldn’t mind just hitting that little “subscribe” button for my Newsletter. That will greatly help me and by the way it is also free.
Now let’s start this article.
Home Assistant Port Forwarding
First step of the enabling Home Assistant remote access is to set up a port forwarding rule in your router. Just search for: ”[your router] port forward” in YouTube or in Google.
Here is how you can do it in UniFi controller.
Go to Settings > Routing & Firewall > Port Forwarding in your UniFi Controller interface and click on Create New Port Forward Rule button.

This is what you aim! Just replace the Forward IP – 10.0.0.2 with your Home Assistant local address and you are good to go.
If you have different router the experience and visualisation may differ, but the principle is the same. You just have to open port 443 in your router and forward it to your local Home Assistant IP on port 8123.
You also have to assign a static IP address for the server where your Home Assistant is installed. If you don’t know how to do that just ask in the comments section below or search in Google.
Creating a DuckDNS sub domain
Now you have to create a DuckDNS sub domain. This will be the address that you will enter in the browser the Home Assistant remote access.
Just go to DuckDNS.org and login with either of the available options (Persona, Twitter, GitHub, Reddit, Google) and then create a new sub domain. In a similar way as in the picture below.

Then copy the DuckDNS token above your newly created sub-domain and head over to your Home Assistant with a smile.
Adding DuckDNS add-on in Home Assistant
Open your Home Assistant and press, the “c” button to invoke the search bar, type add-on and choose Navigate Add-On store.
Or just click the My Home Assistant Link below:

Search for DuckDNS add-on and install it.
Go to the configuration tab of DuckDNS add-on and:
- Change the accept_terms to true. By changing it, you agree to use Let’s Encrypt auto renewal SSL certificate feature. And that is really good.
- Add your DuckDNS token next to the token: keyword.
- Add your DuckDNS subdomain (get it from the duckdns.org website) under domains:
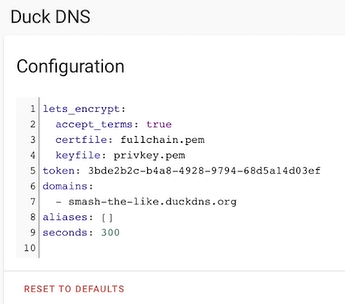
Save the changes and start the add-on. You should see no errors in the logs and if that is the case you are just perfect.
Set Home Assistant internal and external URLs
Now is the right time to set up your internal and external URLs for our Home Assistant remote access.
You have to edit your Home Assistant configurations
Editing configuration.yaml file
Open the configuration.yaml file with your favourite editor and paste inside the following lines under your homeassistant: section:
# configuration.yaml entry
homeassistant:
  external_url: https://YOUR_SUBDOMAIN_HERE.duckdns.org
  internal_url: http://YOUR_INTERNAL_HA_IP_HERE:8123
Don’t forget to replace YOUR_SUBDOMAIN_HERE & YOUR_INTERNAL_HA_IP_HERE with yours.
You can save the file, but don’t close it yet! We will need it a bit more in the next section.
Home Assistant http section
To enable a secure Home Assistant Remote Access we have to tell the Home Assistant where to find the SSL certificate and key from Let’s Encrypt.
It is not hard just paste the following lines in your configuration.yaml file:
# configuration.yaml entry
http:
  ssl_certificate: /ssl/fullchain.pem
  ssl_key: /ssl/privkey.pem
  ip_ban_enabled: true
  login_attempts_threshold: 5
Double check that you don’t have http: section already in your file. If so, copy only the last 4 lines from the above in your configuration.yaml file
The last two lines from above YAML are helping to harden the security. If you enable IP Ban option with threshold 5 as in the example, and if someone tries to login 5 times with a wrong password in your Home Assistant – it will be banned automatically.
After the first ban, an ip_bans.yaml file will be created in the root configuration folder. It will have the banned IP address and time in UTC when it was banned. So you can rest assured that you have a secure Home Assistant remote access.
Save the changes, check your configuration and restart your Home Assistant server.
After the restart you can check if your Home Assistant remote is working and you can access it remotely for the first time.
Just open the https://YOUR_SUBDOMAIN_HERE.duckdns.org in a new browser or tab.
Congratulations! You deserve it! Really!
But, don’t stop reading now. You have just few more step to make this whole setup even more secure!
What if Home Assistant Remote Access is not working or you loose your local access?
After the above implementation you may face difficulties accessing your local or remote Home Assistant address. First of all, don’t panic! Second, double check these things:
- Make sure that you type https:// and not http:// before your local & external address of your Home Assistant,
- Make sure that you are not banned by the ip_ban_enabled option. That means your IP is not in the ip_bans.yaml file. If it is there just delete it and/or disable the ip ban option by set ip_ban_enabled: false in configuration.yaml file
- Clear your browser cache or open an private/incognito window and try again. You can also try with different browser.
- Don’t expect to have Trusted SSL certificate when access your local address. That is not possible! That means – you will receive warnings from your browser when you access the https version of your local Home Assistant. Depending of the browser that you are using you may add your local Home Assistant https address as exclusion once and you will not receive any warnings after that.
- The Trusted SSL certificate by remote authority like Let’s Encrypt is only possible with your external IP (duckDNS subdomain or other domain).
- Correct port forwarding in your router is crucial for this Home Assistant remote access to work – Double, not Triple check it and test it.
- If you didn’t install and start the DuckDNS add-on. You will receive errors that ssl files and folders are missing when trying to check your Home Assistant configuration or during the Home Assistant start.
Two other ways for Home Assistant remote access
There are also few other ways for Home Assistant remote access.
- Home Assistant Remote Access using NGINX Reverse Proxy & DuckDNS
- Free Cloudflare Tunnel To Home Assistant: Full Tutorial!
- You can use a VPN. I will recommend to invest some of your time into configuring and setup a VPN to securely access everything in your home and to leave your ports closed. These are my VPN tutorials that you could use.
- You can also use the Home Assistant Cloud service called Nabu Casa. This a secure and easy way, but it will cost you 6 dollars monthly to have it. You can try the service for free for 30 days.
Quick question for You
Nobody answers my questions in the articles for unknown reason to me.
Would you like to brake that rule?
If yes, then let me know in the comments which Home Assistant Remote Access is better for you?
- Using a VPN,
- Using the Cloud Service,
- Using this method that I’m showing.
Regardless of what you choose just be sure that you smashed the subscribe button for my Newsletter.
One more thing…
And before we harden the Home Assistant remote access, there is one more thing that I want to share with you.
Yes, exactly you who read this article till this very moment!
I have a Home Assistant Webinar on which I’m talking about 4 different official ways to install Home Assistant + 1 secret stupid easy way. This webinar is completely free of charge and you can watch it instantly by register on this link 👉 https://automatelike.pro/webinar
I hope you will like it as much as I do. Now let’s continue!
Harden the Home Assistant Remote Access Security more
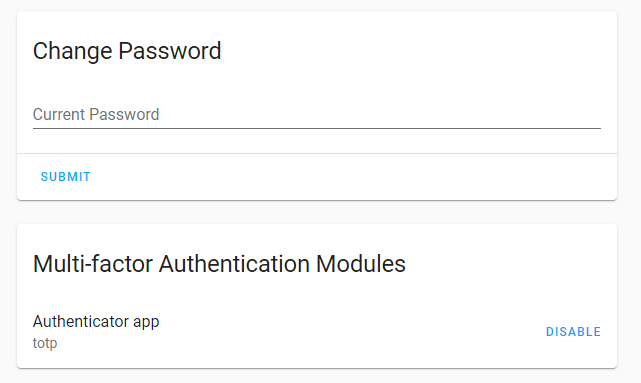
Log in your Home Assistant and click on your username in the lower left corner of the screen.
Then do the following:
- Change your password with a password that contains: letters in upper and lower case, digits and special characters. It will be best if you use this password only for your Home Assistant and nowhere else.
- Enable Multi-factor Authentication Modules – I’m using Google Authenticator for that.
- Download it for free from you your mobile phone store.
- Open it and scan the code that Home Assistant will display with the authenticator app.
- Then the authenticator will display a code that you will have to enter in Home Assistant.
- From now on every-time you want to log in Home Assistant from new device, you will have to enter your username, password and a generated code in the Google authenticator that is changed every 30 secs.
Activating ip_ban_option and Multi-factor Authentication Modules is a must if you enable your Home Assistant Remote Access in the way that i’m showing with the port forwarding and SSL. So don’t skip this!
Support my work
If you like the Home Assistant Remote Access with DuckDNS and Let’s Encript Article and you want more content like this you may want to become one of my supporters. Check exactly how on my support page!
Any other sort of engagement on this site and my YouTube channel does really help out a lot with the Google & YouTube algorithms, so make sure you hit the subscribe, as well as the Like and Bell buttons.
Also feel free to add me on Twitter by searching for @KPeyanski. You can find me on my Discord server as well.
I really hope that you find this information useful and you now know how to setup Home Assistant remote access with DuckDNS and Let’s Encrypt and of course some port forwarding
Stay safe and don’t forget – Home Smart, But Not Hard!
Thank you for reading, I will see you in the next article.
Thanks for this tutorial, kiril!
I am new with HA (just started yesterday) and I am not able to get remote access.
I have been following it step by step, and I have found these issues:
– About port forwarding, what is the need to use 443? This one is blocked by my ISP provider to provide remote assistance so no possibility to open it.
– Other issue is the yaml code with these errors:
Invalid config for [http]: not a file for dictionary value @ data[‘http’][‘ssl_certificate’]. Got ‘/ssl/fullchain.pem’ not a file for dictionary value @ data[‘http’][‘ssl_key’]. Got ‘/ssl/privkey.pem’. (See /config/configuration.yaml, line 15).
Invalid config for [http]: extra keys not allowed @ data[‘http’][‘external_url’]. Got ‘https://MYNAME.duckdns.org’ extra keys not allowed @ data[‘http’][‘internal_url’]. Got ‘http://INTERNALIP:8123’ not a file for dictionary value @ data[‘http’][‘ssl_certificate’]. Got ‘/ssl/fullchain.pem’ not a file for dictionary value @ data[‘http’][‘ssl_key’]. Got ‘/ssl/privkey.pem’. (See /config/configuration.yaml, line 15)
Thanks for your help!
Hi David, 443 is the default HTTPS port that is used for SSL communication everywhere. Regarding the yaml errors, check that you don’t have http section already added in configuration.yaml. Also make sure that you have installed the DuckDNS add-on and that you agree to Let’s encrypt T&C in the duckdns configuration
Hi Kiril,
I am getting the same error, tried searching it up many say that I have to move the cert folder to the same one as configuration.yaml, but not sure how to do it and dont think it will work anyway.
Btw great tutorial.
Thanks
Hey Rohan, can you please share your configuration here? Both configuration.yaml and DuckDNS. You can mask the real domain and IP
Hi Kiril,
Great blog post and video!
I am facing some issues and I am not sure why. I have followed your tutorial step by step but I still can’t access my homeassistant from the Duck DNS url.
The only thing I can think of is my router. I have an Archer C50 and I don’t know if I have set up port forwarding correctly. Here is a screenshot https://ibb.co/sKXWB55
The other files and setting are according to your instructions.
My configuration.yaml file https://ibb.co/Hg4YLgL
and my DuckDNS config https://ibb.co/mFpFFS3
Any ideas?
Hello Manou, I looked at your configs and everything seems fine to me at first sight. Can you share your duckdns (from HA add-on) and home assistant logs as well?
I did the same port forwarding in UNIFI but somehow I can’t reach Home Assistant from the DynDNS …
The Home Assistant is on a IoT VLAN, do you need to open any port in the firewall first? ( I assume now as we forwarding this ports…)
https://ibb.co/qRfqZ39
In the screenshot I have forwarding port to 443 instead of 8123 but same issue anyway. (The DynsDNS revers to the correct IP address)
Hey Kevin, why don’t you try with DuckDNS instead as stated in the article. Just a try to see if it will work OK, and only after that to try DynDNS
Perhaps a bit of a long shot. I followed your instructions and I got my HA accessible externally using DuckDNS but now I can only access HA using the duckdns domain. It seems that it has disabled access from your internal network. If I try to use the internal IP (like https://192.168.1.xxx:8123) or the local hostname.localdomain (ex: https://myhassio.local:8123), it doesn’t work. Note that I have both “internal_url” and “external_url” defined in configuration.yaml – do I need to do any additional config?
Try open your local HA using a different browser just for the test. I’m using Safari browser and I cannot login to my local HA (only remote duckdns address is working) from some time. But if I try to open my local HA with Chrome it works perfectly.
I have exactly the same problem. HA is not reachable after this configuration from internal network. Only via duckdns! I tried many browsers.
Are you trying https://your_local_ip ? Please don’t expect to have valid SSL certificate for your local IP. The valid SSL certificate is only valid when accessing your HA via DuckDNS.
Same situation happened to me except I thought I corrupted the files and went through a fresh install before I found out remote access was the only way to access HA after getting through the whole tutorial. Having both local and remote access would be great.
I have both local and remote access working at the same time using the exact same method described in the article/video. Please do not expect that your local access will be with thrusted SSL certificate from and authority – that is not possible. Your local access will use SSL encryption, but there will be warnings from your browser that SSL Certificate is not thrusted.
Just used your instructions for Home Assistant remote access using the first method with Duck DNS. Worked great, just one recommendation. As a nube to HA with a brand new installation, I found that once the configuration.yaml file is edited and HA restarted, you can only access it remotely through Duck DNS, even if you are on the same network behind all firewalls. I didn’t catch that the first time I tried it and thought I fried my microSD card because my open browser window with local access wouldn’t reconnect after restarting HA, so I went through a fresh install all over again. Same issue happened when I restarted so I thought I’d check if remote access was working and TA-DA, it was. Wasted several hours starting from scratch. It would help if there were a note letting people understand they should close the local access browser window they were working from and open a new one using Duck DNS. Alternately, is there a way to allow both remote and local access? That would be great if possible.
Thanks for your suggestion. I will try to make this part in the article more clearer as it appear that a lot of ppl are getting confused.
I added one new section. Hope is clear now! – https://peyanski.com/home-assistant-remote-access/#What_if_Home_Assistant_Remote_Access_is_not_working_or_you_loose_your_local_access
Kiril,
This is a great video. I am struggling to maintain both remote and local access to my home assistant. I followed your instruction to maintain the external_url and internal_url in the configuration.yaml. First, once I setup an external url with https://, there is no way I can access the local ip address via http:// (hope someone can fix this problem). Second, even I can access my home assistant via https://local-ip:8123, it still requires an internet connection in order to verify the certificate! The real issue with DuckDNS add-on is that you have to have an internet connection to access your home assistant. Since a url is the only way to get into hass.io. If no url works, then I lost my home assistant as well. I feel this remote home assistant solution is hardly a practical solution.
Hey Cheng, it is practical I’m using it on daily basis for months or even years. Local https is not requiring internet connection and please check this section of the article – https://peyanski.com/home-assistant-remote-access/#What_if_Home_Assistant_Remote_Access_is_not_working_or_you_loose_your_local_access
Hi Kiril,
Great article, really helpful! I followed the steps but can’t get remote access to work. I can access the duckdns domain when connected via my local WiFi but not externally. What am I missing here?
When loading on my phone it tries to connect but comes up with the ‘unable to connect to home assistant’.
Thanks for your help in advance
Jeremy
That is very strange 🙂 Can you try to clear your cache on your phone or install new browser on it and try again? What happens if you try to open your duckdns from other computer outside your wifi?
I hit a roadblock with my Linksys Velop router. I set up port forwarding just fine, but once I turned on forwarding for port 443, I could no longer access the configuration for the router, since it uses only a web-based UI over port 443. So I had to reset the router to factory defaults to clear the port forwarding.
I’ll have to find a different way to access HA remotely, but now I can’t quite figure out how to undo the change I’d made to HA. Specifically, I don’t know what the default internal and external URLs should be, and I can’t find them documented anywhere.
Any help would be appreciated.
for my RV i use dataplicity to remote access HA.
I#m using VPN now. 🙂 Again a very useful and straightforward tutorial! Thank you!
Hi Christoph, thanks for your comment. Have in mind that that I used this exact setup for years without any issues, and now I switched to NGINX reverse proxy method that I described here – https://peyanski.com/home-assistant-remote-access-using-nginx
No need to change it if it is working, but I’m saying this just for information.
Up and running remotely with your help, thanks for taking the time to write it. To answer you question I’ll use your method to access rather than the VPN I also have up and running simply for the sake of convenience
.
Great guide. I am reinstalling after 1+ year with Tailscale. It’s a great platform for adding / removing devices. Simply add client and authenticate through Google or others and your device is on network Issue though that the VPN client for IOS is a battery hog, seems to go to sleep on occaisions, and must be started manually after each reboot. If you are often adding / removing clients its worth it but not when I have a stable number of devices
Hi KIril, great guide!! Just in a few minutes having access from outside using https and from inside using http. Your explanation is very clear.
Though I have secure access from the outside just using duckdns and let’s encrypt, I’m still thinking about paying for the cloud access just to help things going with HA. So answering your question about which is my preferred method … still thinking … sure it’s not VPN method because it’s not as functional to me.
Thanks
Hi! I love your videos. I’ve learnt a lot from them. They’re awesome.
I’ve moved from Duckdns to Nabu Casa but it has arisen a problem with the “Remote Home Assistant” integration since it does not recognize the port forwarding to the standard 8123.
IS there anyway to solve it? Thanks in advance!
Hi, I’m brand new to this. Thanks for the tutorial. One issue I have is that I get an error when I edit the YAML configuration.
The file looks as below and the errors are at the end.
Any help with what I am doing wrong would be much appreciated.
Thanks,
John.
# Loads default set of integrations. Do not remove.
default_config:
# Load frontend themes from the themes folder
frontend:
themes: !include_dir_merge_named themes
automation: !include automations.yaml
script: !include scripts.yaml
scene: !include scenes.yaml
http:
ssl_certificate: /ssl/fullchain.pem
ssl_key: /ssl/privkey.pem
ip_ban_enabled: true
login_attempts_threshold: 5
homeassistant:
external_url: https://h88esmail.duckdns.org
internal_url: http://192.168.0.36:8123
Configuration errors
Invalid config for ‘http’ at configuration.yaml, line 13: not a file for dictionary value ‘http->ssl_certificate’, got ‘/ssl/fullchain.pem’
Invalid config for ‘http’ at configuration.yaml, line 14: not a file for dictionary value ‘http->ssl_key’, got ‘/ssl/privkey.pem’
Does the Smartthings access work if I use the “Cloudflare Tunnel To Home Assistant: Full Tutorial!” instead? I’m behind a CGNAT with no IP4 or 6 address, so would appreciate any help!
Hi Kiril,
Does Duckdns in HA work if i dont have public IP adress? My routers wan IP is 192.168.1.3.
Posting here hoping it may help others……
I figured out my reason for not working locally.
After reading all the comments on here, trying to figure out why I could ONLY remotely connect and having no joy, I decided to try myself.
I found my issue was that port 8123 was only listening on ssl and therefore when trying a curl on http://localhost:8123 from the home assistant box, I was getting an empty response.
I then changed my configuration to have both the internal and external addresses within the HA configuration.yaml to https, instead of the posted local http.
Now I can access externally over https with the duckdns and lets encrypt, but locally on https with the IP address, but with the EXPECTED complaint of incorrect certificate address (Bad_Cert_domain).
Once proceeding past the local cert domain page, both local and remote access are working fine.
Hope this helps someone. )))