
The Home Assistant Android Companion App was recently updated and it now supports some very interesting features in form of sensors and different notifications. Let’s see how we can use these android sensors in automations and how to enable home assistant android notifications.
Table of Contents
What will you learn from this article?
I have an article for Home Assistant IOS notifications, as well as Home Assistant MacOS notifications and I have a whole YouTube playlist full with all sorts of Home Assistant notification videos that you can check right here.
But Today I will show you how to setup Home Assistant Android companion app.
- Requirements:
- You will need a device with Android 5.0 or greater and recent Home Assistant version (0.104 or higher).
- You will also need 5 seconds or less to smash the subscribe button for my Newsletter. After that you will receive articles like this on a weekly basis.
First thing that you need to do
First thing that you need to check and if it’s missing you have to add it in your Home Assistant configuration. You have to open configuration.yaml file in your favourite text editor and paste the line from below inside it. Also double check that this text is not already there and if it is just skip this step.
default_config:Save the configuration.yaml file and restart your Home Assistant.
From where I can use Home Assistant Android App?
If you want to use Home Assistant Companion App for Android from anywhere, you have two options:
- To use a VPN – my WireGuard VPN tutorial, my ZeroTier VPN tutorial
- To enable Home Assistant Remote Access – my Home Assistant Remote Access tutorial
If you want to use the Home Assistant Android App only when you are at home. You just have to put the device with the Android app and the server where Home Assistant is installed in the same local network.
Either way open Google Play Store and download the Home Assistant Android Companion App.
First Start Home Assistant for Android
Start Home Assistant application on your Android device and give it some permissions. Actually all of the permissions.

The key moment here is to enter the Home Assistant address. As I said above this can be either your local IP where your Home Assistant installation is or a public domain or IP with SSL enabled (that is using HTTPS) that redirects to your Home Assistant.
Device Tracker from Home Assistant Android App
One of the most useful features in my opinion is the device tracker. When you open the Home Assistant companion app for Android for the first time the device_tracker entity will be automatically created.
I will quickly demonstrate you how you can use this device tracker to create an automation that will start the lights automatically when you enter in your home after sunset.
You have two options for that:
- You can use the Home Assistant graphical editor to create this automation as I’m showing in my video.
- Or you can edit your automations.yaml file.
I will show you the second option as the first is already covered in the video. Let’s do this:
Open your automations.yaml file and paste the following YAML code inside:
# automations.yaml entry
- id: '1606113858373'
  alias: After sunset
  description: ''
  trigger:
  - platform: state
    entity_id: device_tracker.YOUR_DEVICE
    to: home
  condition:
  - condition: sun
    after: sunset
  action:
  - service: light.turn_on
    data: {}
    entity_id: light.YOUR_LIGHTS_ENTITY
  mode: single
You may wish to change the YOUR_DEVICE with your device name and YOUR_LIGHTS_ENTITY with your lights entity 👍
Save the automations.yaml file and reload your automations from:
Home Assistant > Configuration > Server Control > Reload Automations or Restart Server
To test if everything is working use Developer Tools from Home Assistant to put your device in different zone (e.g. work) and return it back to home zone. And if the Sun condition is also met (it is after sunset) – your lights will be automatically turned on.
If you have difficulties doing this check my video for detailed instructions.
Note about Zones in Home Assistant
Of course you have to have a home zone defined in your Home Assistant to test the above automation. This is something that probably you already did during the initial setup of your Home Assistant. If you didn’t then go to:
Home Assistant > Configuration > Zones > Add Zone
And add your home zone on the map.
What other sensors the Companion App for Android is adding?
There are a lot of sensors that the Companion App for Android will add to your Home Assistant and this is the full list in the official Home Assistant documentation. Just make sure that you scroll down until you find the Android ones.
You can use them all.
Let me know in the comments below which one of the sensors is most useful for you?
If you have Android 11
For the devices with Android 11 or higher (hey there a man from the future 👋 ) – the Home Assistant Android app will automatically integrate with the Android 11 power menu controls.
Currently if you have devices in your Home Assistant from one of the following domains:
automationOn/OffclimateTemperature slidercoverOpen/ClosefanOn/Off, speed sliderlightOn/Off, Brightness control sliderlockLock/UnlocksceneTurn on scenescriptTurn on scriptswitchOn/Offinput_booleanOn/Offinput_numberNumber control slider
you should see something similar in your Android 11 device.
Home Assistant Android Widgets
Let’s talk about Android widgets. You can create widgets on your device home screen so you can call any Home Assistant service or to display an entity from the comfort of your Android device.
You just have to hold your finger on empty space on your Android device home screen and then to select widgets. After that you have to search for the Home Assistant section and to add the widget that you wish to use.

That is very handy if you wish to have fast shortcuts on your Android device from where you can control your Home Assistant and Smart Home.
Home Assistant Android notifications
It is time to see Home Assistant Android notifications in action. I will show you three types of notifications, because I find them most interesting and useful. And the Home Assistant Android notification that I choose are these:
- The normal very standard Android notifications,
- Android Text-To-Speech (TTS) notifications,
- Android Actionable Notifications.
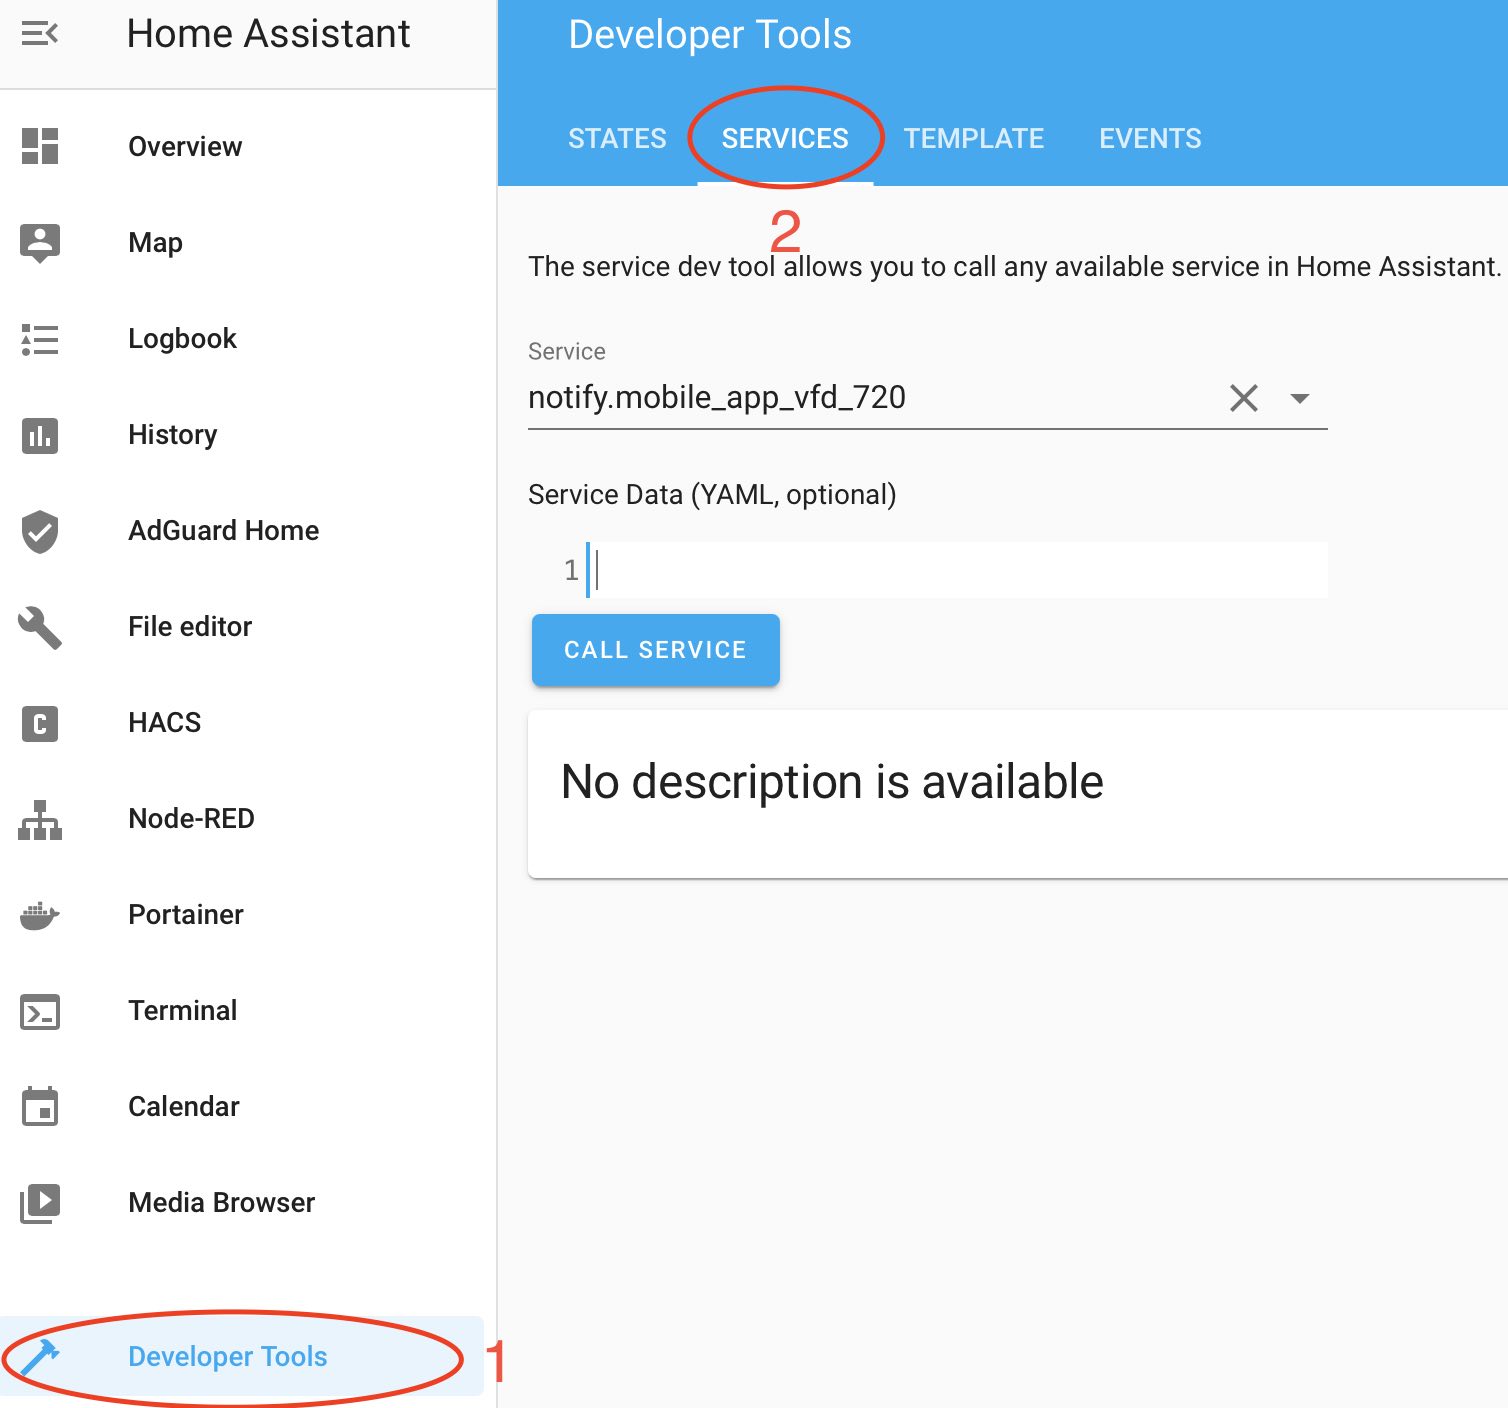
To test all of these notifications you have to open:
Home Assistant > Developer tools > Services
and as Service, from the dropdown menu choose the notify.mobile_app_MY_DEVICE_NAME
Of course you can wrap all of these tests in Home Assistant automations & scripts if you wish and I will show you exactly how later in the article. But for now let’s have some fun with the Home Assistant Android notifications.
The standard Android notifications
To test the standard Android notifications I will paste these two lines inside the Service Data in Developer Tools:
title: smash
message: the like
Then I just have to press the CALL SERVICE button.

And to check my Android device for the notification.
Android Text-To-Speech notifications
The standard notifications in Home Assistant Companion App for Android are working just fine and they can be very helpful. Let’s see how we can use Text-To-Speech or TTS notifications in Android invoked from the Home Assistant.
First, double check that you have Google Text-To-Speech app installed and that is updated to the latest version.
Then go to your Android Settings > System > Languages & input > Text-to-speech output.
You should see something similar on your screen. Of course you can choose any other supported by Android TTS language.
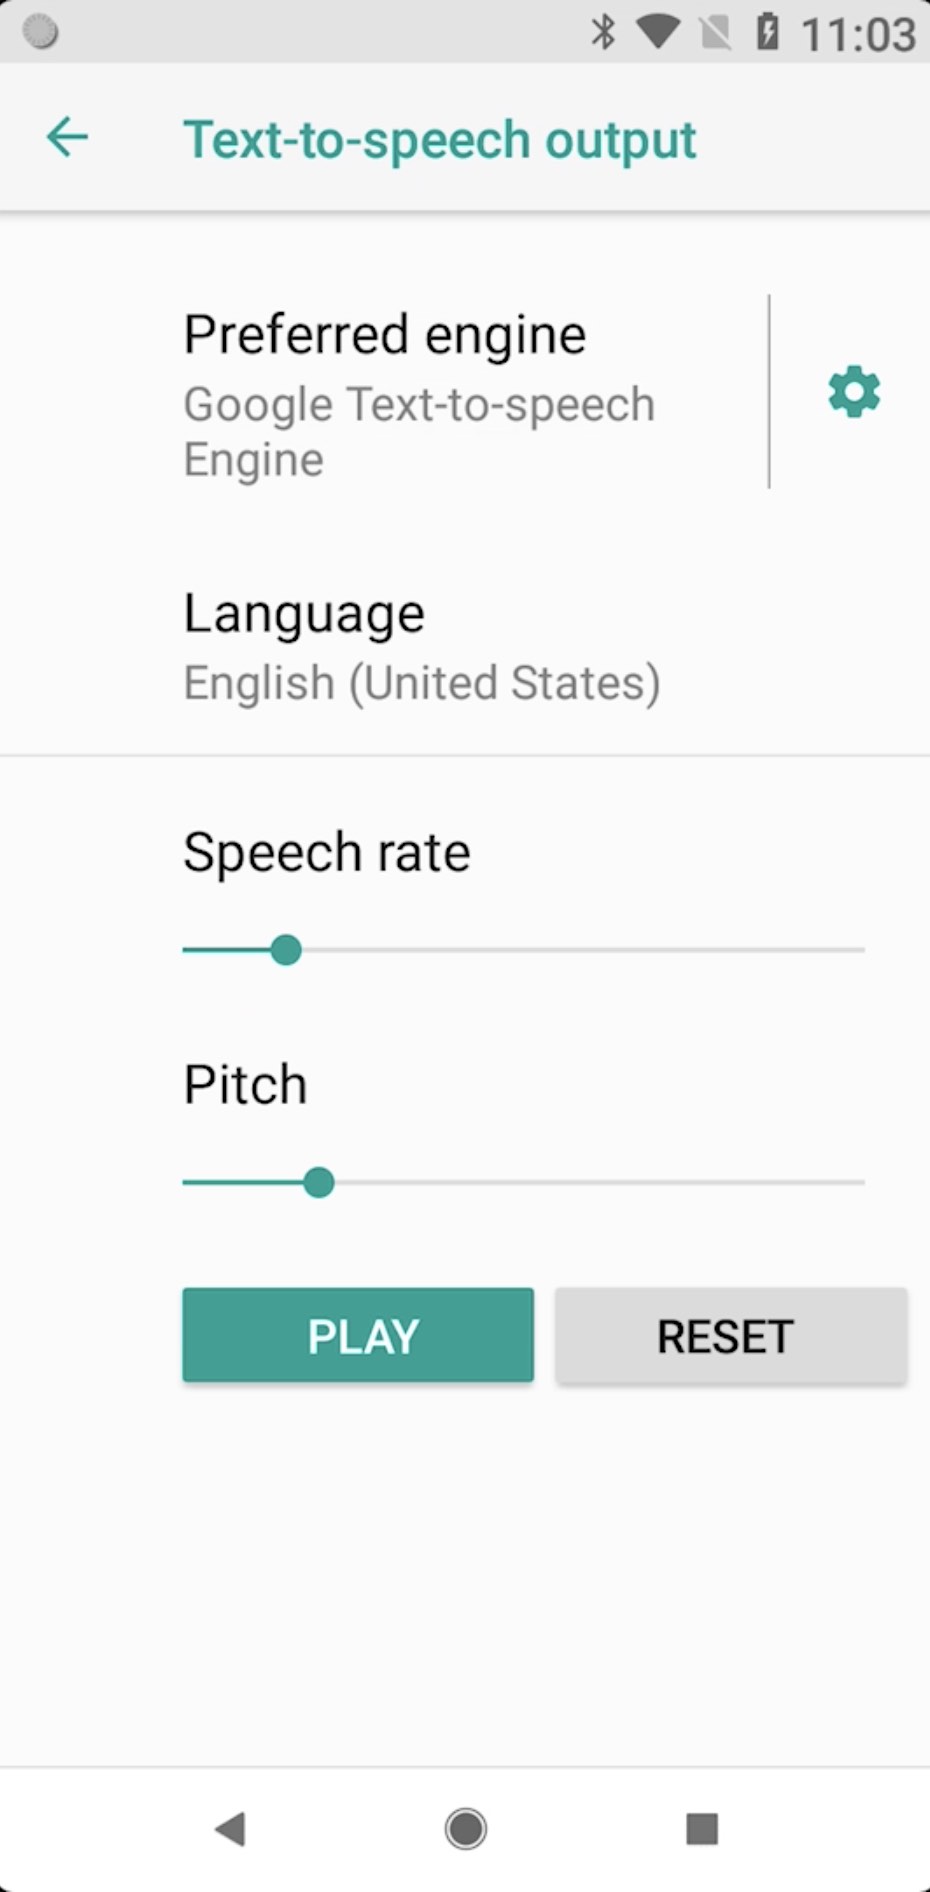
Press Play to test that TTS is working fine.
After everything above is verified. You want to go to Home Assistant > Developer tools > Services as described above. Choose notify.mobile_app_YOUR_DEVICE_NAME as Service
And you can paste the following lines in the Service Data.
message: TTS
title: smash the Subscribe for my Newsletter
To activate the TTS in Android from Home Assistant – the “message: TTS” should be always there and the actual text that you want to hear should be placed as title. Below is the screen that is showing what needs to be done.
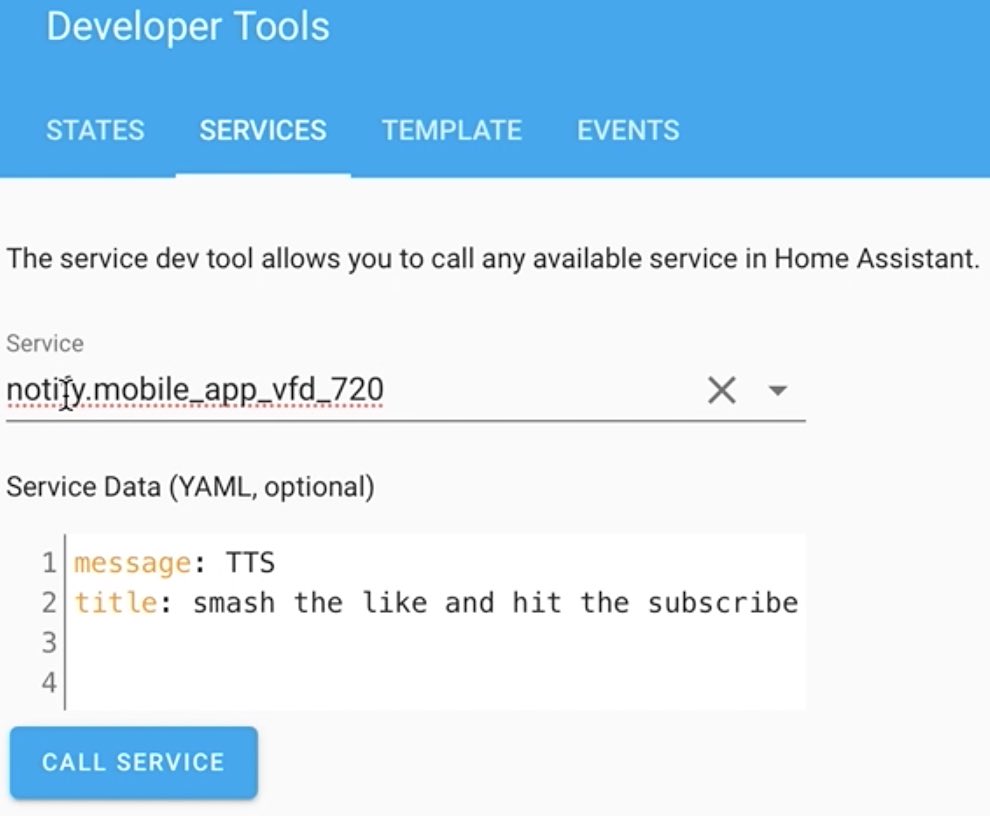
When you are ready just click on CALL SERVICE button and you should hear the text in the title: from your Android device with Text-To-Speech.
Android Actionable Notifications
To test the Android Actionable notifications we are going to use the same setup as desired above.
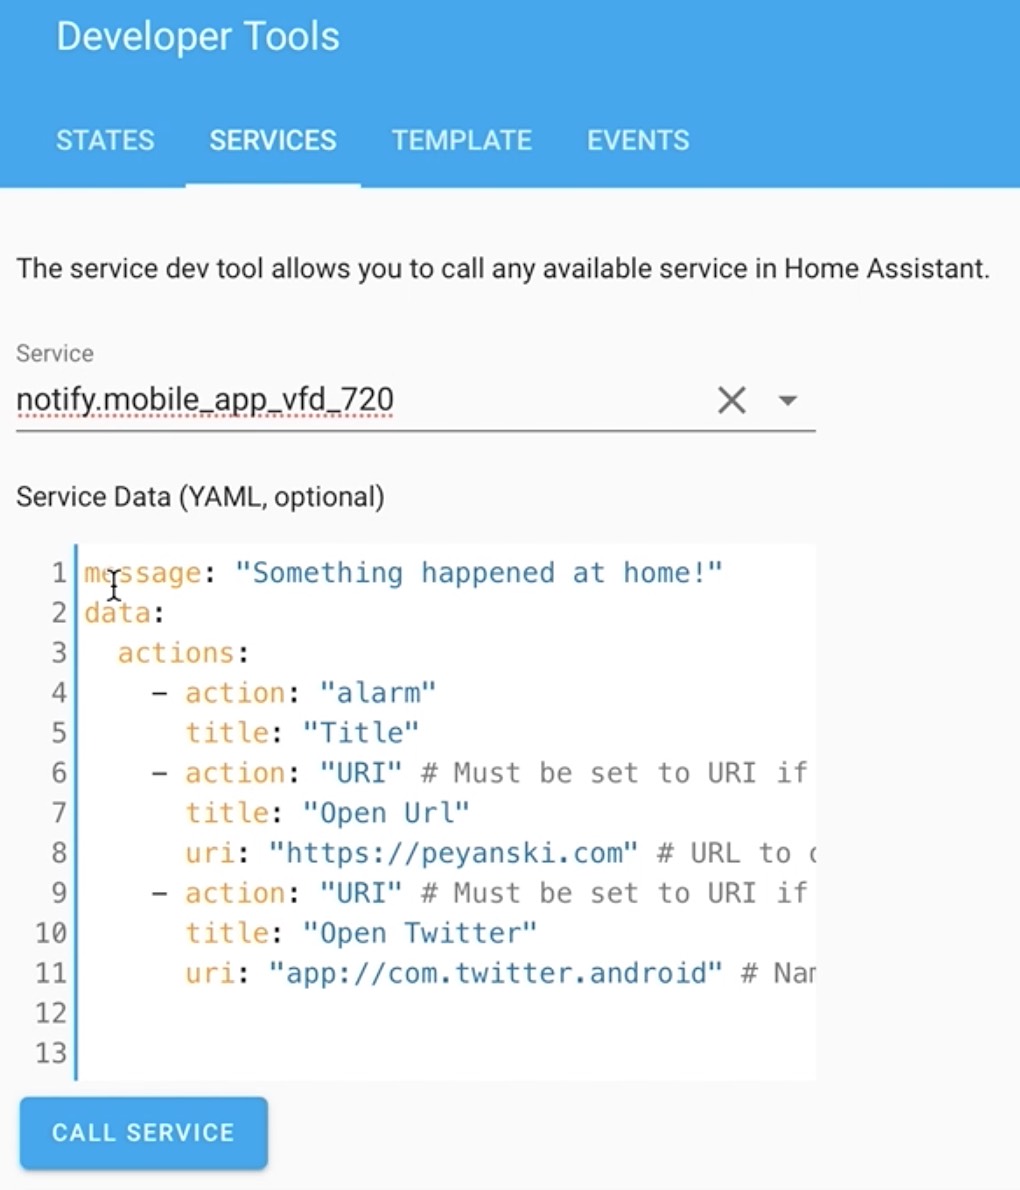
This time paste the following YAML code as Service Data:
 message: "Something happened at home!"
        data:
          actions:
            - action: "alarm" # The key you are sending for the event
              title: "Title" # The button title
            - action: "URI" # Must be set to URI if you plan to use a URI
              title: "Open Url"
              uri: "https://peyanski.com" # URL to open when action is selected, can also be a lovelace view/dashboard
            - action: "URI" # Must be set to URI if you plan to open an application
              title: "Open Twitter"
              uri: "app://com.twitter.android" # Name of package for application you would like to open
And you should have something similar on your screen:
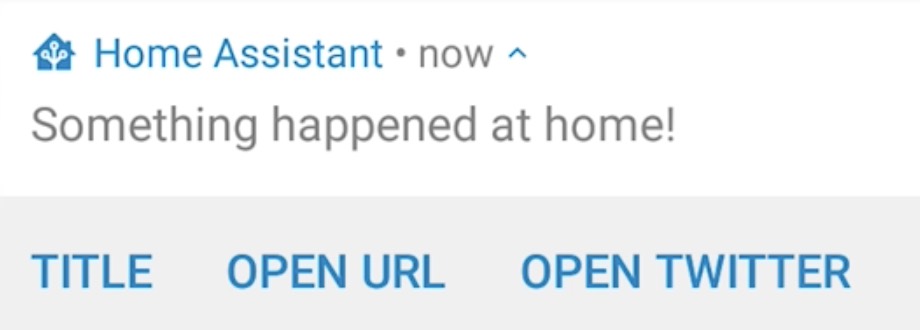
This will send an Actionable notification with three actions:
- The first one will send to your Android device a button named Title and when you press it, it will return back to Home Assistant the event alarm. You can use this event in automations and scripts to activate anything you wish.
- The second action will have title Open Url and if you press it it will open my site – https://peyanski.com
- And the third one will try to open Twitter for Android if you have that installed. Otherwise it will open the Home Assistant Android App.
Other types of Android Notifications
These are the other types of Home Assistant Android notifications
that you can get from the official Home Assistant Companion App documentation.
You could use all of these notifications on your device.
Let me know which one of these notifications you like best and why.
Home Assistant automation with Android Notifications
Let’s wrap everything we learned here in one example Home Assistant automation you can use the graphical automations editor as I’m showing in the video or you can edit your automations.yaml.
Open you automations.yaml file and paste the following YAML file inside:
# automations.yaml entry
- id: '1606123981250'
  alias: testing android notifications
  description: ''
  trigger:
  - platform: state
    entity_id: light.YOUR_LIGHTS
    to: 'on'
  condition: []
  action:
  - service: notify.mobile_app_YOUR_DEVICE_NAME
    data:
      message: TTS
      title: smash the like and hit the notification bell
  - service: notify.mobile_YOUR_DEVICE_NAME
    data:
      message: Something happened at home!
      data:
        actions:
        - action: alarm
          title: Title
        - action: URI
          title: Open Url
          uri: https://peyanski.com
        - action: URI
          title: Open Twitter
          uri: app://com.twitter.android
  mode: single
This automation will send a TTS (Text-to-speech) notification as well as an actionable notification to your Android device when the Kitchen lights are turned on 💡.
You should modify it a bit to suit your needs. Just change the entity_id: light.YOUR_LIGHTS with your lights entity and service: notify.mobile_app_YOUR_DEVICE_NAME with your device name.
Save the automations.yaml file and reload your automations or restart your Home Assistant.
Now you just have to turn on your lights which is the above automation trigger and you should receive TTS and actionable notifications.
Good Job 👏
Support my Work!
If you want to secure this blog existence you can become one of my supporters. You can see exactly how in this section of my site.
Any other sort of engagement on this site and my YouTube channel does really help out a lot with the Google & YouTube algorithms, so make sure you hit the subscribe, as well as the Like and Bell buttons.
You can also buy my Smart Home Getting Started Actionable Guide right here -> LINK
Also feel free to add me on Twitter by searching for @KPeyanski. You can find me on my Discord server as well.
I really hope that you find this information useful and you now know more about Home Assistant Companion app for Android and how to use Home Assistant Android Notifications and sensors.
Stay safe and don’t forget – Home Smart, But Not Hard!
Thank you for reading, I will see you in the next article.